Brother International MFC-8950DW Basic User's Guide - English - Page 144
Setup Send Batch TX, Fax Rx Stamp
 |
View all Brother International MFC-8950DW manuals
Add to My Manuals
Save this manual to your list of manuals |
Page 144 highlights
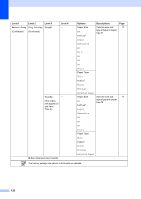
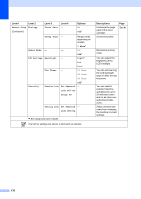
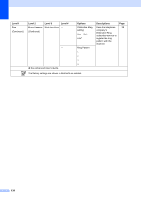
Level 1 Fax (Continued) Level 2 Level 3 Level 4 Setup Receive Print Density - (Continued) Options -2 -1 0* Descriptions Makes printouts darker or lighter. Page See . +1 Fax Rx Stamp - Duplex - Setup Send Batch TX - +2 On Off* On Off* On Off* Coverpage Setting Print Sample - Coverpage Message - Destination - Display* Hidden Report Setting Transmission - On On+Image Off* Prints the received time and date on the top of the received faxes. Prints received faxes on both sides of the paper. Combines delayed faxes going to the same fax number at the same time of day into one transmission. You can print a sample of the fax cover page. Set up your own comments for the fax cover page. Sets the machine to display the destination information on the LCD screen during fax sending. Choose the initial 29 setup for the Transmission Verification Report. Journal Period - See Advanced User's Guide. Off+Image Every 50 Faxes* Sets the interval for See . automatic printing of Every 6 Hours the Fax Journal. Every 12 Hours Every 24 Hours Every 2 Days Every 7 Days Off If you have chosen other than Off and Every 50 Faxes, you can set the time for the chosen option. If you have chosen Every 7 Days, you can also set the day of the week. The factory settings are shown in Bold with an asterisk. 132
-
 1
1 -
2
-
3
-
4
-
5
-
6
-
7
-
8
-
9
-
10
-
11
-
12
-
13
-
14
-
15
-
16
-
17
-
18
-
19
-
20
-
21
-
22
-
23
-
24
-
25
-
26
-
27
-
28
-
29
-
30
-
31
-
32
-
33
-
34
-
35
-
36
-
37
-
38
-
39
-
40
-
41
-
42
-
43
-
44
-
45
-
46
-
47
-
48
-
49
-
50
-
51
-
52
-
53
-
54
-
55
-
56
-
57
-
58
-
59
-
60
-
61
-
62
-
63
-
64
-
65
-
66
-
67
-
68
-
69
-
70
-
71
-
72
-
73
-
74
-
75
-
76
-
77
-
78
-
79
-
80
-
81
-
82
-
83
-
84
-
85
-
86
-
87
-
88
-
89
-
90
-
91
-
92
-
93
-
94
-
95
-
96
-
97
-
98
-
99
-
100
-
101
-
102
-
103
-
104
-
105
-
106
-
107
-
108
-
109
-
110
-
111
-
112
-
113
-
114
-
115
-
116
-
117
-
118
-
119
-
120
-
121
-
122
-
123
-
124
-
125
-
126
-
127
-
128
-
129
-
130
-
131
-
132
-
133
-
134
-
135
-
136
-
137
-
138
-
 139
139 -
 140
140 -
 141
141 -
 142
142 -
 143
143 -
 144
144 -
 145
145 -
 146
146 -
 147
147 -
 148
148 -
 149
149 -
150
-
151
-
152
-
153
-
154
-
155
-
156
-
157
-
158
-
159
-
160
-
161
-
162
-
163
-
164
-
165
-
166
-
167
-
168
-
169
-
170
-
171
-
172
-
173
-
174
-
175
-
176
-
177
-
178
-
179
-
180
-
181
-
182
-
183
-
184
-
185
-
186
-
187
-
188
-
189
-
190
-
191
-
192
-
193
-
194
-
195
-
196
-
197
-
198
 |
 |