Brother International PT-580C Users Manual - English and Spanish - Page 79
LOCAL FORMATTING, Enter the text.
 |
View all Brother International PT-580C manuals
Add to My Manuals
Save this manual to your list of manuals |
Page 79 highlights
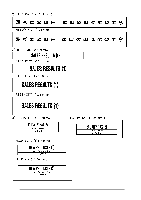
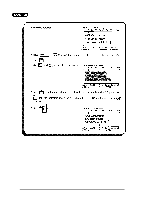
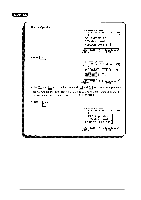
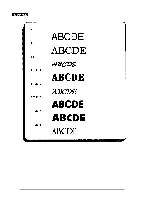
LOCAL FORMAT FONT SIZE WIDTH STYLE UNDL / FRM COLOR The local format settings, shown in the table at the left, determine how the text is printed. After the text is entered, use the AREA and cursor keys to select the characters to be emphasized, then change the format using the local format keys ( FONT, SIZE, etc. ) below the LCD display. If the entire text is selected, the font, size, width, style, underlining or framing, and color print formats can be applied globally. In addition, local formats can be assigned before text entry. Since the text entry mode is WYSIWYG mode, the display shows the text with the selected formats so you can see how the label will appear it is printed. CREATING a local format can be done in two ways: by choosing the character to be included and setting the format or by setting the format before entering the text. TO CREATE A LOCAL FORMAT AFTER TEXT ENTRY: (1) Position the cursor in front of the first character you wish to assign a local format. (2) Press the AREA key. The first character will be highlighted. (3) Use the cursor keys to highlight all characters to which you wish to assign a local format. Select all of the characters in the message to change the format of the entire text. (4) Press the local format key, located below the LCD display, for the format to be set until the text appears on the display in the desired format. (5) Repeat step (4) until the text is formatted as you wish. (6) Press the RETURN key. This local format is applied to the chosen characters. + Press the AREA or CANCEL key at any time to return to text entry mode without setting a local format. TO CREATE A LOCAL FORMAT BEFORE TEXT ENTRY: (1) Press the local format key, located below the LCD display, for the format to be set until the sample letter ("A") appears on the display in the desired format. (2) Repeat step (1) until the sample character is formatted as you wish. (3) Enter the text. All text will be entered using the applied format until the format settings are changed again. 75
-
 1
1 -
2
-
3
-
4
-
5
-
6
-
7
-
8
-
9
-
10
-
11
-
12
-
13
-
14
-
15
-
16
-
17
-
18
-
19
-
20
-
21
-
22
-
23
-
24
-
25
-
26
-
27
-
28
-
29
-
30
-
31
-
32
-
33
-
34
-
35
-
36
-
37
-
38
-
39
-
40
-
41
-
42
-
43
-
44
-
45
-
46
-
47
-
48
-
49
-
50
-
51
-
52
-
53
-
54
-
55
-
56
-
57
-
58
-
59
-
60
-
61
-
62
-
63
-
64
-
65
-
66
-
67
-
68
-
69
-
70
-
71
-
72
-
73
-
 74
74 -
 75
75 -
 76
76 -
 77
77 -
 78
78 -
 79
79 -
 80
80 -
 81
81 -
 82
82 -
 83
83 -
 84
84 -
85
-
86
-
87
-
88
-
89
-
90
-
91
-
92
-
93
-
94
-
95
-
96
-
97
-
98
-
99
-
100
-
101
-
102
-
103
-
104
-
105
-
106
-
107
-
108
-
109
-
110
-
111
-
112
-
113
-
114
-
115
-
116
-
117
-
118
-
119
-
120
-
121
-
122
-
123
-
124
-
125
-
126
-
127
-
128
-
129
-
130
-
131
-
132
-
133
-
134
-
135
-
136
-
137
-
138
-
139
-
140
-
141
-
142
-
143
-
144
-
145
-
146
-
147
-
148
-
149
-
150
-
151
-
152
-
153
-
154
-
155
-
156
-
157
-
158
-
159
-
160
-
161
-
162
-
163
-
164
-
165
-
166
-
167
-
168
-
169
-
170
-
171
-
172
-
173
-
174
-
175
-
176
-
177
-
178
-
179
-
180
-
181
-
182
-
183
-
184
-
185
-
186
-
187
-
188
 |
 |
