Brother International PT-580C Users Manual - English and Spanish - Page 92
Color, Return, To Print The Multi-color Label, Print, The Message Working
 |
View all Brother International PT-580C manuals
Add to My Manuals
Save this manual to your list of manuals |
Page 92 highlights
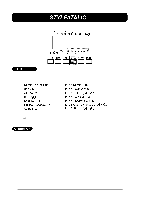
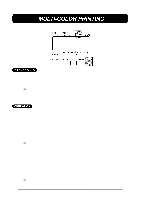
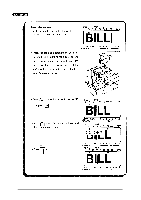
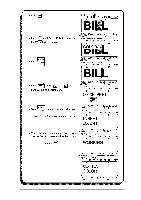
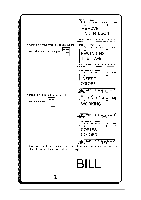
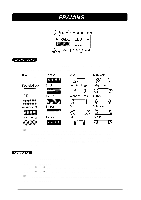
(4) Use the color keys to highlight the string of characters which you wish to print using the second color. (5) Press the COLOR key located below the LCD display, until COLOR2 is displayed and the C2 indicator comes on, then press the RETURN key. These characters will be printed using the second ink color. (6) Repeat steps (2) and (3) to highlight the string of characters which you wish to print using the third color. (7) Press the COLOR key until COLOR3 is displayed and the C3 indicator come on, then press the RETURN key. These characters will be printed using the third ink color. + The C2 and C3 indicators show which color has been assigned to the character that is to the left of the cursor. If no indicators are on, the first color has been assigned. TO PRINT THE MULTI-COLOR LABEL: (1) Continue assigning colors until all the characters' settings are as you wish then press the PRINT key. The multi-color print setting (COLOR PRINT) appears. (2) press the 5 and 6 keys to turn on the Multi-color print mode, then press the RETURN key. The message "INSERT COLOR1" will be displayed. + Before printing, be sure that there is enough tape in the tape cassette, otherwise the label may not be printed correctly. (3) Open the compartment cover and check that the first ink cassette is installed, then close the cover and press the RETURN key. The message "WORKING" briefly flashes, then "COPIES COLOR1" appears while the characters assigned the first ink color are printed. When printing finishes, the message "REMOVE INK RIBBON" will be displayed. (4) Open the compartment cover, then remove the first ink cassette and press the RETURN key. The message "REWINDING THE TAPE" appears while the tape is rewinding. After the tape is rewound, the message "INSERT COLOR2" will be displayed. + Wait until the tape has finished rewinding before inserting the next ink cassette. (5) Insert the second ink cassette, close the cover and press the RETURN key. The message "WORKING" briefly flashes, then "COPIES COLOR2" appears while the characters assigned the second ink color are printed. When printing finishes, the message "REMOVE INK RIBBON" will be displayed. (6) Open the compartment cover, then remove the second ink cassette and press the RETURN key. The message "REWINDING THE TAPE" appears while the tape is rewinding. After the tape is rewound, the message "INSERT COLOR3" will be displayed. (7) Insert the third ink cassette, close the cover and press the RETURN key. The message "WORKING" briefly flashes, then "COPIES COLOR3" appears while the characters assigned the third ink color are printed. (8) Push down on the tape cutter lever to cut off the label, then cut it along the two printed dots to make equal margins. 88
-
 1
1 -
2
-
3
-
4
-
5
-
6
-
7
-
8
-
9
-
10
-
11
-
12
-
13
-
14
-
15
-
16
-
17
-
18
-
19
-
20
-
21
-
22
-
23
-
24
-
25
-
26
-
27
-
28
-
29
-
30
-
31
-
32
-
33
-
34
-
35
-
36
-
37
-
38
-
39
-
40
-
41
-
42
-
43
-
44
-
45
-
46
-
47
-
48
-
49
-
50
-
51
-
52
-
53
-
54
-
55
-
56
-
57
-
58
-
59
-
60
-
61
-
62
-
63
-
64
-
65
-
66
-
67
-
68
-
69
-
70
-
71
-
72
-
73
-
74
-
75
-
76
-
77
-
78
-
79
-
80
-
81
-
82
-
83
-
84
-
85
-
86
-
 87
87 -
 88
88 -
 89
89 -
 90
90 -
 91
91 -
 92
92 -
 93
93 -
 94
94 -
 95
95 -
 96
96 -
 97
97 -
98
-
99
-
100
-
101
-
102
-
103
-
104
-
105
-
106
-
107
-
108
-
109
-
110
-
111
-
112
-
113
-
114
-
115
-
116
-
117
-
118
-
119
-
120
-
121
-
122
-
123
-
124
-
125
-
126
-
127
-
128
-
129
-
130
-
131
-
132
-
133
-
134
-
135
-
136
-
137
-
138
-
139
-
140
-
141
-
142
-
143
-
144
-
145
-
146
-
147
-
148
-
149
-
150
-
151
-
152
-
153
-
154
-
155
-
156
-
157
-
158
-
159
-
160
-
161
-
162
-
163
-
164
-
165
-
166
-
167
-
168
-
169
-
170
-
171
-
172
-
173
-
174
-
175
-
176
-
177
-
178
-
179
-
180
-
181
-
182
-
183
-
184
-
185
-
186
-
187
-
188
 |
 |