Brother International PT-P900W Users Guide - Page 26
Attaching Labels, Extra Strength Adhesive Tape
 |
View all Brother International PT-P900W manuals
Add to My Manuals
Save this manual to your list of manuals |
Page 26 highlights
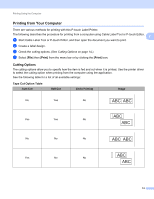
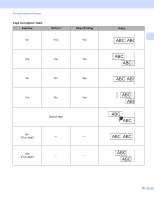
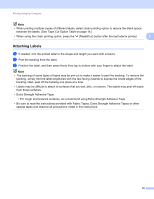
Printing Using the Computer Note • When printing multiple copies of different labels, select chain printing option to reduce the blank space between the labels. (See Tape Cut Option Table on page 14.) • When using the chain printing option, press the (Feed&Cut) button after the last label is printed. 2 Attaching Labels 2 a If needed, trim the printed label to the shape and length you want with scissors. b Peel the backing from the label. c Position the label, and then press firmly from top to bottom with your finger to attach the label. Note • The backing of some types of tapes may be pre-cut to make it easier to peel the backing. To remove the backing, simply fold the label lengthwise with the text facing inwards to expose the inside edges of the backing. Next, peel off the backing one piece at a time. • Labels may be difficult to attach to surfaces that are wet, dirty, or uneven. The labels may peel off easily from these surfaces. • Extra Strength Adhesive Tape: • For rough and textured surfaces, we recommend using Extra Strength Adhesive Tape. • Be sure to read the instructions provided with Fabric Tapes, Extra Strength Adhesive Tapes or other special tapes and observe all precautions noted in the instructions. 16
-
 1
1 -
2
-
3
-
4
-
5
-
6
-
7
-
8
-
9
-
10
-
11
-
12
-
13
-
14
-
15
-
16
-
17
-
18
-
19
-
20
-
 21
21 -
 22
22 -
 23
23 -
 24
24 -
 25
25 -
 26
26 -
 27
27 -
 28
28 -
 29
29 -
 30
30 -
 31
31 -
32
-
33
-
34
-
35
-
36
-
37
-
38
-
39
-
40
-
41
-
42
-
43
-
44
-
45
-
46
-
47
-
48
-
49
-
50
-
51
-
52
-
53
-
54
-
55
-
56
-
57
-
58
-
59
-
60
-
61
-
62
-
63
-
64
-
65
-
66
-
67
-
68
-
69
-
70
-
71
-
72
-
73
-
74
-
75
-
76
-
77
-
78
-
79
-
80
-
81
-
82
-
83
-
84
-
85
-
86
-
87
-
88
-
89
-
90
-
91
-
92
-
93
-
94
-
95
-
96
-
97
-
98
-
99
-
100
-
101
-
102
-
103
-
104
-
105
-
106
-
107
-
108
-
109
-
110
-
111
-
112
-
113
-
114
-
115
-
116
-
117
-
118
-
119
-
120
-
121
-
122
-
123
-
124
-
125
-
126
-
127
-
128
-
129
-
130
-
131
-
132
-
133
-
134
-
135
-
136
-
137
-
138
-
139
-
140
-
141
-
142
-
143
-
144
-
145
-
146
-
147
-
148
-
149
-
150
-
151
-
152
-
153
-
154
-
155
-
156
-
157
-
158
-
159
-
160
-
161
-
162
-
163
-
164
-
165
-
166
-
167
-
168
-
169
-
170
-
171
-
172
-
173
-
174
-
175
-
176
-
177
-
178
-
179
-
180
-
181
-
182
-
183
-
184
-
185
-
186
-
187
-
188
-
189
-
190
-
191
-
192
-
193
-
194
-
195
-
196
-
197
-
198
-
199
-
200
-
201
-
202
-
203
-
204
-
205
-
206
-
207
-
208
-
209
-
210
-
211
-
212
-
213
-
214
-
215
-
216
-
217
-
218
-
219
-
220
-
221
-
222
-
223
-
224
-
225
-
226
-
227
-
228
-
229
-
230
-
231
-
232
-
233
-
234
-
235
-
236
-
237
-
238
-
239
 |
 |
