Canon DC40 DC40 Instruction Manual - Page 64
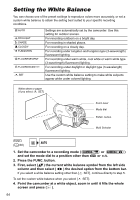
Setting the White Balance
 |
UPC - 013803041606
View all Canon DC40 manuals
Add to My Manuals
Save this manual to your list of manuals |
Page 64 highlights
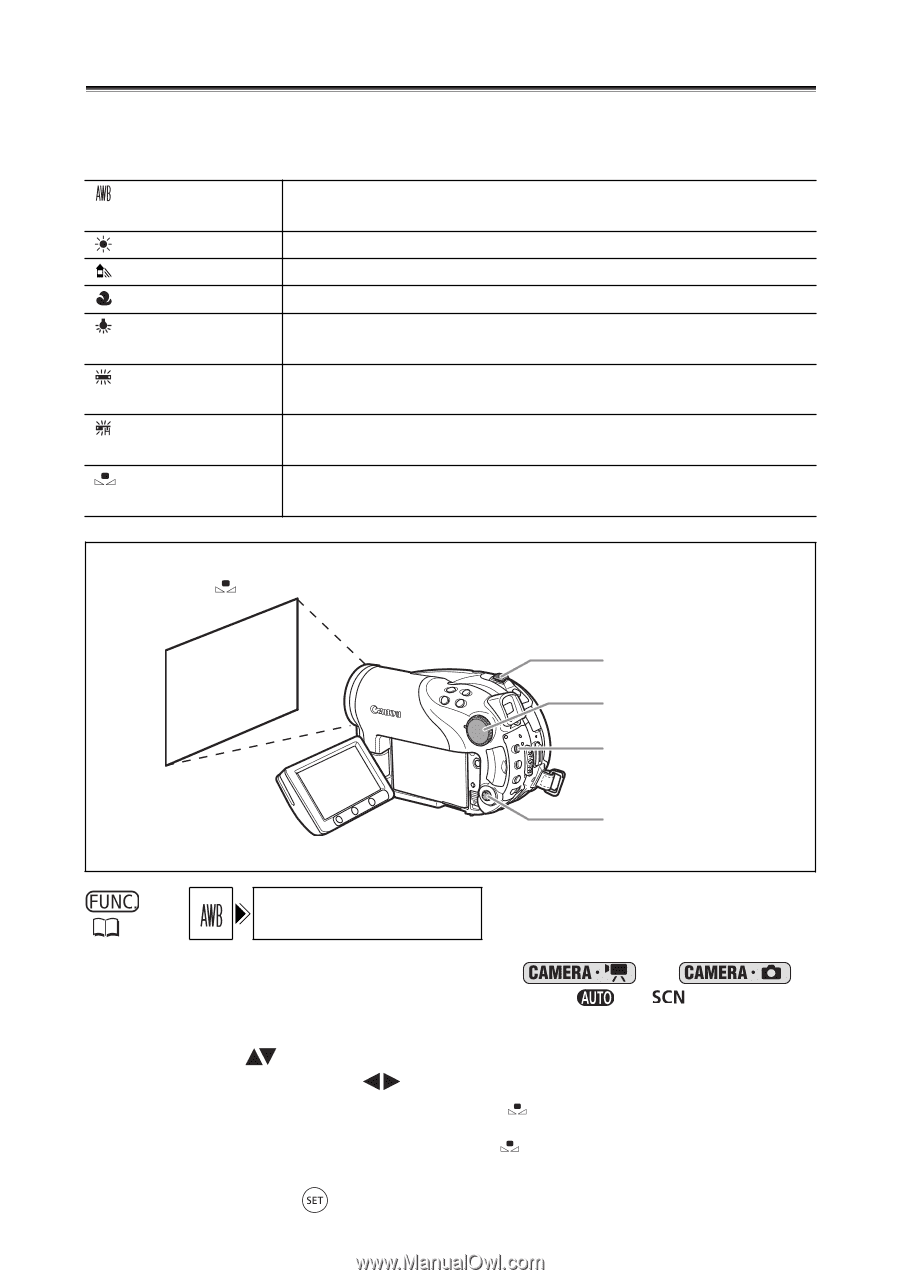
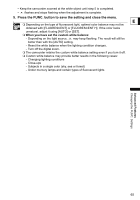
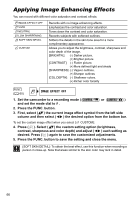
Setting the White Balance You can choose one of the preset settings to reproduce colors more accurately, or set a custom white balance to obtain the setting best suited to your specific recording conditions. AUTO DAYLIGHT SHADE CLOUDY TUNGSTEN FLUORESECENT FLUORESCENT H SET Settings are automatically set by the camcorder. Use this setting for outdoor scenes. For recording outdoors on a bright day. For recording in shaded places. For recording on a cloudy day. For recording under tungsten and tungsten type (3-wavelength) fluorescent lighting. For recording under warm white, cool white or warm white type (3-wavelength) fluorescent lighting. For recording under daylight or daylight type (3-wavelength) fluorescent lighting. Use the custom white balance setting to make white subjects appear white under colored lighting. White sheet or paper (if you select SET) Zoom lever Mode dial FUNC. button Multi Selector ( 60) AUTO 1. Set the camcorder to a recording mode ( or ) and set the mode dial to a position other than or . 2. Press the FUNC. button. 3. First, select ( ) the current white balance symbol from the left side column and then select ( ) the desired option from the bottom bar. If you select a white balance setting other than [ SET], continue directly to step 5. To set the custom white balance when you select [ SET]: 4. Point the camcorder at a white object, zoom in until it fills the whole screen and press ( ). 64
-
 1
1 -
2
-
3
-
4
-
5
-
6
-
7
-
8
-
9
-
10
-
11
-
12
-
13
-
14
-
15
-
16
-
17
-
18
-
19
-
20
-
21
-
22
-
23
-
24
-
25
-
26
-
27
-
28
-
29
-
30
-
31
-
32
-
33
-
34
-
35
-
36
-
37
-
38
-
39
-
40
-
41
-
42
-
43
-
44
-
45
-
46
-
47
-
48
-
49
-
50
-
51
-
52
-
53
-
54
-
55
-
56
-
57
-
58
-
 59
59 -
 60
60 -
 61
61 -
 62
62 -
 63
63 -
 64
64 -
 65
65 -
 66
66 -
 67
67 -
 68
68 -
 69
69 -
70
-
71
-
72
-
73
-
74
-
75
-
76
-
77
-
78
-
79
-
80
-
81
-
82
-
83
-
84
-
85
-
86
-
87
-
88
-
89
-
90
-
91
-
92
-
93
-
94
-
95
-
96
-
97
-
98
-
99
-
100
-
101
-
102
-
103
-
104
-
105
-
106
-
107
-
108
-
109
-
110
-
111
-
112
-
113
-
114
-
115
-
116
-
117
-
118
-
119
-
120
-
121
-
122
-
123
-
124
-
125
-
126
-
127
-
128
-
129
-
130
-
131
-
132
-
133
-
134
-
135
-
136
-
137
-
138
-
139
-
140
-
141
-
142
-
143
-
144
 |
 |