Canon DC40 DC40 Instruction Manual - Page 69
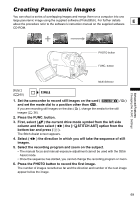
Creating Panoramic Images
 |
UPC - 013803041606
View all Canon DC40 manuals
Add to My Manuals
Save this manual to your list of manuals |
Page 69 highlights
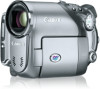
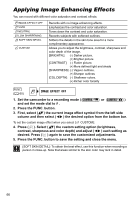
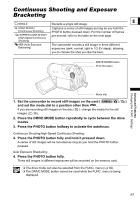
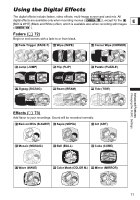
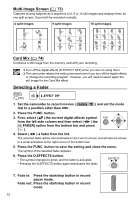
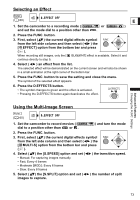
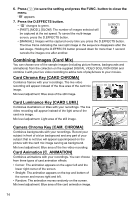
Creating Panoramic Images You can shoot a series of overlapping images and merge them on a computer into one large panoramic image using the supplied software (PhotoStitch). For further details E about the procedure refer to the software's instruction manual on the supplied software CD-ROM. Advanced Features Changing the FUNC. Settings PHOTO button FUNC. button Multi Selector ( 60) SINGLE 1. Set the camcorder to record still images on the card ( and set the mode dial to a position other than . /) If you are recording still images on the disc ( ), change the media for the still images ( 36). 2. Press the FUNC. button. 3. First, select ( ) the current drive mode symbol from the left side column and then select ( ) the [ STITCH AST] option from the bottom bar and press ( ). The Stitch Assist screen appears. 4. Select ( ) the direction in which you will take the sequence of still images. 5. Select the recording program and zoom on the subject. • The manual focus and manual exposure adjustment cannot be used with the Stitch Assist mode. • Once the sequence has started, you cannot change the recording program or zoom. 6. Press the PHOTO button to record the first image. The number of images recorded so far and the direction and number of the next image appear below the image. 69
-
 1
1 -
2
-
3
-
4
-
5
-
6
-
7
-
8
-
9
-
10
-
11
-
12
-
13
-
14
-
15
-
16
-
17
-
18
-
19
-
20
-
21
-
22
-
23
-
24
-
25
-
26
-
27
-
28
-
29
-
30
-
31
-
32
-
33
-
34
-
35
-
36
-
37
-
38
-
39
-
40
-
41
-
42
-
43
-
44
-
45
-
46
-
47
-
48
-
49
-
50
-
51
-
52
-
53
-
54
-
55
-
56
-
57
-
58
-
59
-
60
-
61
-
62
-
63
-
 64
64 -
 65
65 -
 66
66 -
 67
67 -
 68
68 -
 69
69 -
 70
70 -
 71
71 -
 72
72 -
 73
73 -
 74
74 -
75
-
76
-
77
-
78
-
79
-
80
-
81
-
82
-
83
-
84
-
85
-
86
-
87
-
88
-
89
-
90
-
91
-
92
-
93
-
94
-
95
-
96
-
97
-
98
-
99
-
100
-
101
-
102
-
103
-
104
-
105
-
106
-
107
-
108
-
109
-
110
-
111
-
112
-
113
-
114
-
115
-
116
-
117
-
118
-
119
-
120
-
121
-
122
-
123
-
124
-
125
-
126
-
127
-
128
-
129
-
130
-
131
-
132
-
133
-
134
-
135
-
136
-
137
-
138
-
139
-
140
-
141
-
142
-
143
-
144
 |
 |