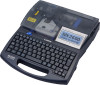
Canon MK 2600 Mk2600 Users Guide - Page 5

Contents

Page 5 highlights

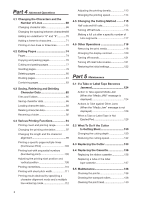
Contents Explanation of Symbols 4 Safety Precautions 5 Quick Guide to Using the Printer 12 Contents Part 1 Before You Begin (Preparation) 1.1 Names and Functions of Parts........... 18 Main Unit 18 LCD screen 20 Keyboard 22 1.2 Connecting the AC Adapter 24 1.3 Use the PC Connection Kit 26 Turn the power switch on........45 Input characters 46 Print 46 2.4 Printing on Plates 48 Install cassettes 48 Insert plate 50 Turn the power switch on........51 Part 2 Basic Operations 2.1 Printing on Tube and Clear Tube........ 28 Input characters 52 Print 55 Install cassettes 28 Insert tube 30 Turn the power switch on........31 Part 3 Character Input 3.1 Inputting Characters 58 Inputting characters 58 Input characters 32 Print 35 3.2 Inputting Symbols 59 Inputting symbols 59 2.2 Printing on Label Tape, Heat Shrink Tube, and 4mm I.D. Strip 36 Install cassettes 36 Turn the power switch on........39 Input characters 40 Print 42 3.3 Deleting Characters, Creating New Pages, Moving the Cursor 61 Deleting or changing characters 61 Deleting all entered text data 62 Insert mode and overwrite mode 63 Creating a new page 64 Moving the cursor 65 2.3 Printing on Wrap around Tape 43 Installing cassettes 43 Install the wrap around tape guide 44 1

  • 1
  • 2
  • 3
  • 4
  • 5
  • 6
  • 7
  • 8
  • 9
  • 10
  • 11
  • 12
  • 13
  • 14
  • 15
  • 16
  • 17
  • 18
  • 19
  • 20
  • 21
  • 22
  • 23
  • 24
  • 25
  • 26
  • 27
  • 28
  • 29
  • 30
  • 31
  • 32
  • 33
  • 34
  • 35
  • 36
  • 37
  • 38
  • 39
  • 40
  • 41
  • 42
  • 43
  • 44
  • 45
  • 46
  • 47
  • 48
  • 49
  • 50
  • 51
  • 52
  • 53
  • 54
  • 55
  • 56
  • 57
  • 58
  • 59
  • 60
  • 61
  • 62
  • 63
  • 64
  • 65
  • 66
  • 67
  • 68
  • 69
  • 70
  • 71
  • 72
  • 73
  • 74
  • 75
  • 76
  • 77
  • 78
  • 79
  • 80
  • 81
  • 82
  • 83
  • 84
  • 85
  • 86
  • 87
  • 88
  • 89
  • 90
  • 91
  • 92
  • 93
  • 94
  • 95
  • 96
  • 97
  • 98
  • 99
  • 100
  • 101
  • 102
  • 103
  • 104
  • 105
  • 106
  • 107
  • 108
  • 109
  • 110
  • 111
  • 112
  • 113
  • 114
  • 115
  • 116
  • 117
  • 118
  • 119
  • 120
  • 121
  • 122
  • 123
  • 124
  • 125
  • 126
  • 127
  • 128
  • 129
  • 130
  • 131
  • 132
  • 133
  • 134
  • 135
  • 136
  • 137
  • 138
  • 139
  • 140
  • 141
  • 142
  • 143
  • 144
  • 145
  • 146
  • 147
  • 148
  • 149
  • 150
  • 151
  • 152
  • 153
  • 154
  • 155
  • 156
  • 157
  • 158

1
Contents
Contents
Explanation of Symbols
.......................................
4
Safety Precautions
..............................................
5
Quick Guide to Using the Printer
.......................
12
Part 1
Before You Begin (Preparation)
1.1 Names and Functions of Parts
..........
18
Main Unit
....................................................
18
LCD screen
................................................
20
Keyboard
....................................................
22
1.2 Connecting the AC Adapter
...............
24
1.3 Use the PC Connection Kit
................
26
Part 2
Basic Operations
2.1 Printing on Tube and Clear Tube
.......
28
Install cassettes
......................
28
Insert tube
..............................
30
Turn the power switch on
.......
31
Input characters
.....................
32
Print
........................................
35
2.2 Printing on Label Tape, Heat Shrink
Tube, and 4mm I.D. Strip
................
36
Install cassettes
......................
36
Turn the power switch on
.......
39
Input characters
.....................
40
Print
........................................
42
2.3 Printing on Wrap around Tape
...........
43
Installing cassettes
.................
43
Install the wrap around tape
guide
.......................................
44
Turn the power switch on
.......
45
Input characters
.....................
46
Print
........................................
46
2.4 Printing on Plates
...............................
48
Install cassettes
......................
48
Insert plate
..............................
50
Turn the power switch on
.......
51
Input characters
.....................
52
Print
........................................
55
Part 3
Character Input
3.1 Inputting Characters
..........................
58
Inputting characters
...................................
58
3.2 Inputting Symbols
...............................
59
Inputting symbols
.......................................
59
3.3 Deleting Characters, Creating New
Pages, Moving the Cursor
..............
61
Deleting or changing characters
................
61
Deleting all entered text data
.....................
62
Insert mode and overwrite mode
...............
63
Creating a new page
..................................
64
Moving the cursor
......................................
65