Canon MK 2600 Mk2600 Users Guide - Page 59
Step2 Print, In the plate mode
 |
View all Canon MK 2600 manuals
Add to My Manuals
Save this manual to your list of manuals |
Page 59 highlights
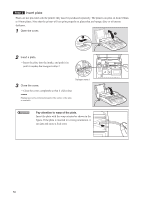
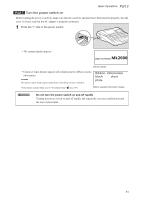
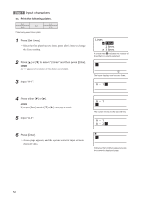
Print Once the characters have been input, begin printing. 1 Press [Print]. • The print media selection display appears. "No ribbon cassette" is displayed if the ribbon cassette is not installed. Install the ribbon cassette. "No ribbon information. No ribbon amount displayed. Press enter" is displayed if the information cannot be read due to the ribbon cassette failure and so forth. If this message is displayed, follow the instruction on the screen. What is "print media"? Print media is the material that you are printing on, such as a tube, heat shrink tube, label tape, 4mm I.D. strip, clear tube, wraparound tape or plate. 2 Press [▲] or [▼] to select "Plate", and then press [Enter]. • The plate (width) selection display appears. The plate size must be set accurately. If the correct plate size is not selected, printing will not proceed correctly. 3 Press [▲] or [▼] to select "8.0mm", and then press [Enter]. • The sets to print and range setting display appears. If "Range: All" is not selected, press [▲] or [▼] to select "Range", then press [◄] or [►] to select "All". Rough amount of the remaining ink ribbon is displayed as shown. When the information of the cassette is not properly retrieved, the amount of the ribbon does not appear. 4 Press [Enter]. • Printing begins. Canceling printing If you press [Canc], the message "Aborting print" appears and printing is aborted. 5 Take out the plate. • Cut the plate with scissors. If a plate jams Hold down [Canc] until the printer beeps. The printer stops all operations immediately. Refer to "If a Tube or Label Tape Becomes Jammed" ( page 124) and take out the jammed plate. Basic Operations Part 2 A check mark is displayed next to the currently selected print media. A check mark is displayed next to the currently selected plate size. If CL is displayed, a centerline is printed. In the plate mode, plates are neither cut in half nor cut fully. If characters are printed on a plate with "On" selected on the Half cut selection display, a solid cut line is printed automatically. When a page is repeatedly printed in the continuous printing mode, the actual segment length may be different from the specified one. To adjust it, refer to Note, "Adjusting the segment length" ( page 101). For details on printing characters on the plate, refer to "Printing with short pitch width" ( page 111). 55
-
 1
1 -
2
-
3
-
4
-
5
-
6
-
7
-
8
-
9
-
10
-
11
-
12
-
13
-
14
-
15
-
16
-
17
-
18
-
19
-
20
-
21
-
22
-
23
-
24
-
25
-
26
-
27
-
28
-
29
-
30
-
31
-
32
-
33
-
34
-
35
-
36
-
37
-
38
-
39
-
40
-
41
-
42
-
43
-
44
-
45
-
46
-
47
-
48
-
49
-
50
-
51
-
52
-
53
-
 54
54 -
 55
55 -
 56
56 -
 57
57 -
 58
58 -
 59
59 -
 60
60 -
 61
61 -
 62
62 -
 63
63 -
 64
64 -
65
-
66
-
67
-
68
-
69
-
70
-
71
-
72
-
73
-
74
-
75
-
76
-
77
-
78
-
79
-
80
-
81
-
82
-
83
-
84
-
85
-
86
-
87
-
88
-
89
-
90
-
91
-
92
-
93
-
94
-
95
-
96
-
97
-
98
-
99
-
100
-
101
-
102
-
103
-
104
-
105
-
106
-
107
-
108
-
109
-
110
-
111
-
112
-
113
-
114
-
115
-
116
-
117
-
118
-
119
-
120
-
121
-
122
-
123
-
124
-
125
-
126
-
127
-
128
-
129
-
130
-
131
-
132
-
133
-
134
-
135
-
136
-
137
-
138
-
139
-
140
-
141
-
142
-
143
-
144
-
145
-
146
-
147
-
148
-
149
-
150
-
151
-
152
-
153
-
154
-
155
-
156
-
157
-
158
 |
 |
