Canon PowerShot A520 Software Starter Guide Ver.22 - Page 51
Saving the Camera's My Camera Settings to the Computer, Adding New Data to the My Camera Window
 |
View all Canon PowerShot A520 manuals
Add to My Manuals
Save this manual to your list of manuals |
Page 51 highlights
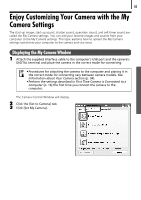
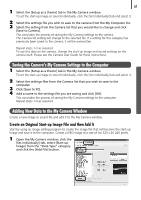
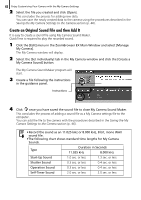
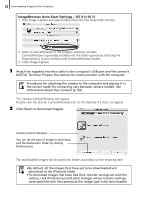
47 1 Select the [Setup as a theme] tab in the My Camera window. To set the start-up image or sound individually, click the [Set individually] tab and select it. 2 Select the settings file you wish to save to the camera from the My Computer list. 3 Select the setting from the Camera list that you would like to change and click [Save to Camera]. This concludes the process of saving the My Camera settings to the camera. The Camera list setting will change to the selected file. If a setting for this category has previously been saved to the camera, it will be overwritten. Repeat steps 1-3 as required. To use this data on the camera, change the start-up image and sound settings on the camera itself. Please see the Camera User Guide for these instructions. Saving the Camera's My Camera Settings to the Computer 1 Select the [Setup as a theme] tab in the My Camera window. To set the start-up image or sound individually, click the [Set individually] tab and select it. 2 Select the settings files from the Camera list that you wish to save to the computer. 3 Click [Save to PC]. 4 Add a name to the settings file you are saving and click [OK]. This concludes the process of saving the My Camera settings to the computer. Repeat steps 1-4 as required. Adding New Data to the My Camera Window Create a new image or sound file and add it to the My Camera window. Create an Original Start-up Image File and then Add It Start by using an image editing program to create the image file that will become the start-up image and save it to the computer. Create a JPEG image at a size of (w) 320 x (h) 240 pixels. 1 Open the My Camera window, click the [Set individually] tab, select [Start-up Image] from the "Data Type" category and click the [Add File] button.
-
 1
1 -
2
-
3
-
4
-
5
-
6
-
7
-
8
-
9
-
10
-
11
-
12
-
13
-
14
-
15
-
16
-
17
-
18
-
19
-
20
-
21
-
22
-
23
-
24
-
25
-
26
-
27
-
28
-
29
-
30
-
31
-
32
-
33
-
34
-
35
-
36
-
37
-
38
-
39
-
40
-
41
-
42
-
43
-
44
-
45
-
 46
46 -
 47
47 -
 48
48 -
 49
49 -
 50
50 -
 51
51 -
 52
52 -
 53
53 -
 54
54 -
 55
55 -
 56
56 -
57
-
58
-
59
-
60
-
61
-
62
-
63
-
64
-
65
-
66
-
67
-
68
-
69
-
70
-
71
-
72
-
73
-
74
-
75
-
76
-
77
-
78
-
79
-
80
-
81
-
82
-
83
-
84
-
85
-
86
-
87
-
88
-
89
-
90
-
91
-
92
-
93
-
94
-
95
-
96
-
97
-
98
-
99
-
100
-
101
-
102
-
103
-
104
-
105
-
106
 |
 |