Canon PowerShot A520 Software Starter Guide Ver.22 - Page 71
Other Downloading Methods
 |
View all Canon PowerShot A520 manuals
Add to My Manuals
Save this manual to your list of manuals |
Page 71 highlights
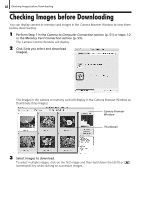
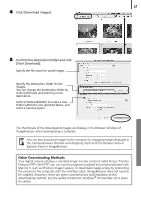
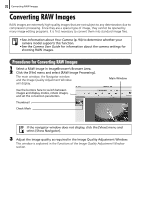
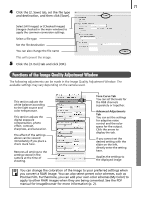
67 4 Click [Download images]. 5 Confirm the destination folder and click [Start Download]. Specify the file name for saved images. Specify the destination folder for the images. You can change the destination folder by clicking [Browse] and selecting a new destination. Select [Create subfolder] to create a new folder within the one specified above, and select a naming option. The thumbnails of the downloaded images will display in the Browser Window of ImageBrowser when downloading is complete. You can also download images to the computer by dragging images displayed in the Camera Browser Window and dropping them onto the Browser Area or Explorer Panel in ImageBrowser. Other Downloading Methods Your digital camera employs a standard image transfer protocol called Picture Transfer Protocol (PTP). With PTP, you can use the programs supplied as standard software with Mac OS X, such as iPhoto or Image Capture, to download images simply by connecting the camera to the computer with the interface cable. (ImageBrowser does not need to be installed.) However, there are some inconveniences and limitations to this downloading method. See the leaflet entitled For Windows® XP and Mac OS X Users for details.
-
 1
1 -
2
-
3
-
4
-
5
-
6
-
7
-
8
-
9
-
10
-
11
-
12
-
13
-
14
-
15
-
16
-
17
-
18
-
19
-
20
-
21
-
22
-
23
-
24
-
25
-
26
-
27
-
28
-
29
-
30
-
31
-
32
-
33
-
34
-
35
-
36
-
37
-
38
-
39
-
40
-
41
-
42
-
43
-
44
-
45
-
46
-
47
-
48
-
49
-
50
-
51
-
52
-
53
-
54
-
55
-
56
-
57
-
58
-
59
-
60
-
61
-
62
-
63
-
64
-
65
-
 66
66 -
 67
67 -
 68
68 -
 69
69 -
 70
70 -
 71
71 -
 72
72 -
 73
73 -
 74
74 -
 75
75 -
 76
76 -
77
-
78
-
79
-
80
-
81
-
82
-
83
-
84
-
85
-
86
-
87
-
88
-
89
-
90
-
91
-
92
-
93
-
94
-
95
-
96
-
97
-
98
-
99
-
100
-
101
-
102
-
103
-
104
-
105
-
106
 |
 |
