Canon PowerShot SD990 IS User Manual - Page 93
Changing the Color and Shooting
 |
View all Canon PowerShot SD990 IS manuals
Add to My Manuals
Save this manual to your list of manuals |
Page 93 highlights
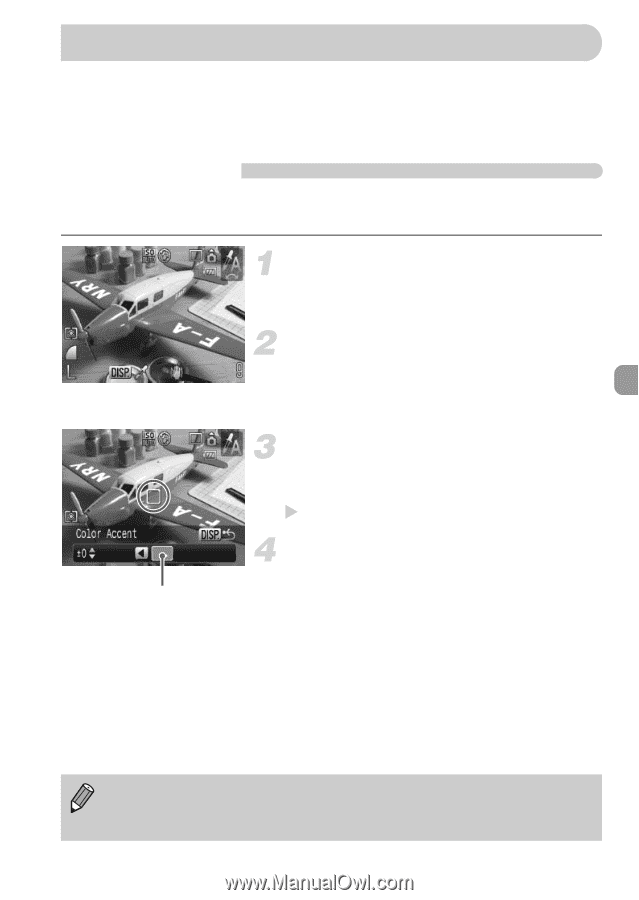
Changing the Color and Shooting You can change the look of an image when shooting. However, depending on the scene, the image may become rough, or the colors may not come out as expected. We recommend saving the original image as well as the new one (p. 95). T Color Accent You can take shots where only a single chosen color from within the screen remains, and the rest of the shot changes to black and white. Recorded color Select T. ● Set the mode dial to K, turn the  dial and select T. Press the l button. ● The unchanged image, and the Color Accent image will both display. ● The color for default settings is green. Indicate the color. ● Position the center frame so it is filled with the the color you want, and press the q button. X The color indicated will be recorded. Indicated the area to be colored. ● Press the op buttons or turn the  dial, and change the area you want to color. ● When you want only the color that you have chosen to remain, increase the value of -. When you want to colors to remain that are close to the color you have chosen, increase the value of +. ● Pressing the l button will make the setting, and will return to the shooting screen. • Using the flash may cause the image to come out different than expected. • Even if you turn off the power, the recorded color will be saved. 93
-
 1
1 -
2
-
3
-
4
-
5
-
6
-
7
-
8
-
9
-
10
-
11
-
12
-
13
-
14
-
15
-
16
-
17
-
18
-
19
-
20
-
21
-
22
-
23
-
24
-
25
-
26
-
27
-
28
-
29
-
30
-
31
-
32
-
33
-
34
-
35
-
36
-
37
-
38
-
39
-
40
-
41
-
42
-
43
-
44
-
45
-
46
-
47
-
48
-
49
-
50
-
51
-
52
-
53
-
54
-
55
-
56
-
57
-
58
-
59
-
60
-
61
-
62
-
63
-
64
-
65
-
66
-
67
-
68
-
69
-
70
-
71
-
72
-
73
-
74
-
75
-
76
-
77
-
78
-
79
-
80
-
81
-
82
-
83
-
84
-
85
-
86
-
87
-
 88
88 -
 89
89 -
 90
90 -
 91
91 -
 92
92 -
 93
93 -
 94
94 -
 95
95 -
 96
96 -
 97
97 -
 98
98 -
99
-
100
-
101
-
102
-
103
-
104
-
105
-
106
-
107
-
108
-
109
-
110
-
111
-
112
-
113
-
114
-
115
-
116
-
117
-
118
-
119
-
120
-
121
-
122
-
123
-
124
-
125
-
126
-
127
-
128
-
129
-
130
-
131
-
132
-
133
-
134
-
135
-
136
-
137
-
138
-
139
-
140
-
141
-
142
-
143
-
144
-
145
-
146
-
147
-
148
-
149
-
150
-
151
-
152
-
153
-
154
-
155
-
156
-
157
-
158
-
159
-
160
-
161
-
162
-
163
-
164
-
165
-
166
-
167
-
168
-
169
-
170
-
171
-
172
-
173
-
174
-
175
-
176
-
177
-
178
-
179
 |
 |