Canon REALiS LCOS SX80 Mark II D Multimedia Projector SX80 MarkII/SX800 Users - Page 57
AUTO PC, Performing the Auto PC Function
 |
View all Canon REALiS LCOS SX80 Mark II D manuals
Add to My Manuals
Save this manual to your list of manuals |
Page 57 highlights
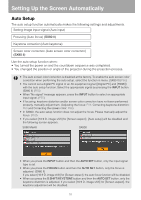
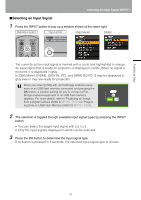
Adjusting Image AUTO PC When you press the AUTO PC button if there is a shift in image display or flickering of screen with the [ANALOG PC-1] or [ANALOG PC-2] selected, the projector is adjusted to an optimum condition. The result of adjustment is recorded for each input signal ([ANALOG PC-1] or [ANALOG PC-2]). If you connect the projector to the same computer, you can project the image with the same settings as before simply by select the input signal. ■Performing the Auto PC Function Press the AUTO PC button to make projector adjustment. Remote control Top control Perform the following if the project image has not been properly adjusted with the auto PC function. • From [Input signal select], select an input signal type based on the resolution of the com- puter. (P80) • If the adjustment is still insufficient, from [Input signal settings] select [Total dots], [Track- ing], [Horizontal position], [Vertical position], [Horizontal pixels] and [Vertical pixels] to make adjustments. (P81 - P84) • For the signal types supported by the projector, see the table on page 150. Projecting an Image 57
-
 1
1 -
2
-
3
-
4
-
5
-
6
-
7
-
8
-
9
-
10
-
11
-
12
-
13
-
14
-
15
-
16
-
17
-
18
-
19
-
20
-
21
-
22
-
23
-
24
-
25
-
26
-
27
-
28
-
29
-
30
-
31
-
32
-
33
-
34
-
35
-
36
-
37
-
38
-
39
-
40
-
41
-
42
-
43
-
44
-
45
-
46
-
47
-
48
-
49
-
50
-
51
-
 52
52 -
 53
53 -
 54
54 -
 55
55 -
 56
56 -
 57
57 -
 58
58 -
 59
59 -
 60
60 -
 61
61 -
 62
62 -
63
-
64
-
65
-
66
-
67
-
68
-
69
-
70
-
71
-
72
-
73
-
74
-
75
-
76
-
77
-
78
-
79
-
80
-
81
-
82
-
83
-
84
-
85
-
86
-
87
-
88
-
89
-
90
-
91
-
92
-
93
-
94
-
95
-
96
-
97
-
98
-
99
-
100
-
101
-
102
-
103
-
104
-
105
-
106
-
107
-
108
-
109
-
110
-
111
-
112
-
113
-
114
-
115
-
116
-
117
-
118
-
119
-
120
-
121
-
122
-
123
-
124
-
125
-
126
-
127
-
128
-
129
-
130
-
131
-
132
-
133
-
134
-
135
-
136
-
137
-
138
-
139
-
140
-
141
-
142
-
143
-
144
-
145
-
146
-
147
-
148
-
149
-
150
-
151
-
152
-
153
-
154
-
155
-
156
-
157
-
158
-
159
-
160
-
161
-
162
-
163
-
164
-
165
-
166
-
167
-
168
 |
 |