Canon S750 S750 Quick Start Guide - Page 26
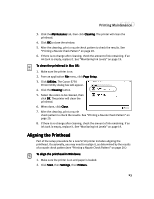
Cleaning the Printhead - printhead cleaning
 |
View all Canon S750 manuals
Add to My Manuals
Save this manual to your list of manuals |
Page 26 highlights
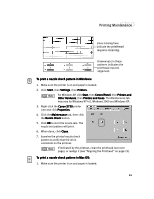
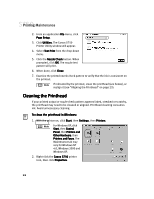
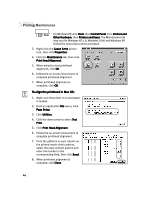
Printing Maintenance 2. From an application File menu, click Page Setup. 3. Click Utilities. The Canon S750 Printer Utility window will appear. 4. Select Test Print from the drop-down menu. 5. Click the Nozzle Check button. When prompted, click OK. The nozzle test pattern will print. 6. When done, click Close. 7. Examine the printed nozzle check pattern to verify that the ink is consistent on the printout. If indicated by the printout, clean the printhead (see below), or realign it (see "Aligning the Printhead" on page 23). Cleaning the Printhead If your printed output or nozzle check pattern appears faded, streaked or scratchy, the printhead may need to be cleaned or aligned. Printhead cleaning consumes ink. Avoid unnecessary cleaning. To clean the printhead in Windows: 1. With the printer on, click Start, then Settings, then Printers. For Windows XP, click Start, then Control Panel, then Printers and Other Hardware, then Printers and Faxes. The Maintenance tab may vary for Windows NT 4.0, Windows 2000 and Windows XP. 2. Right-click the Canon S750 printer icon, then click Properties. 22
-
 1
1 -
2
-
3
-
4
-
5
-
6
-
7
-
8
-
9
-
10
-
11
-
12
-
13
-
14
-
15
-
16
-
17
-
18
-
19
-
20
-
 21
21 -
 22
22 -
 23
23 -
 24
24 -
 25
25 -
 26
26 -
 27
27 -
 28
28 -
 29
29 -
 30
30 -
 31
31 -
32
-
33
-
34
-
35
-
36
-
37
-
38
-
39
-
40
-
41
-
42
-
43
-
44
-
45
-
46
-
47
-
48
-
49
-
50
-
51
-
52
-
53
-
54
-
55
-
56
-
57
-
58
 |
 |
