Canon S750 S750 Quick Start Guide - Page 41

Troubleshooting Printed Output

Page 41 highlights

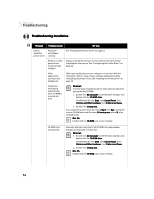
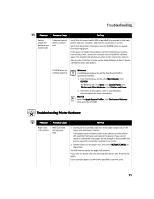
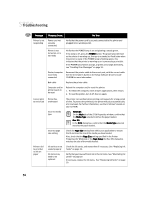
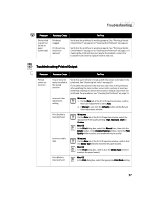
Troubleshooting Problem Printer tried to print but no ink on paper (continued) Possible Cause Try This Printhead clogged Verify that the printhead is working properly. See "Printing a Nozzle Check Pattern" on page 20 or "Cleaning the Printhead" on page 22. Printhead may need to be replaced Verify that the printhead is working properly. See "Printing a Nozzle Check Pattern" on page 20 or "Cleaning the Printhead" on page 22. If cleaning the printhead does not resolve the problem, contact the Customer Care Center to replace it with a new one. Troubleshooting Printed Output Problem Printed colors are incorrect Possible Cause Try This One or more ink tanks installed in the wrong position Verify that each ink tank is lined up with the correct color label in the printhead. See "Replacing Ink Tanks" on page 20. If ink tanks were placed in the incorrect color slots in the printhead, after switching the tanks to their correct slots, perform at least two printhead cleanings to remove the incorrect residual colors from the printhead. For procedures, see "Cleaning the Printhead" on page 22. Incorrect Color Adjustment setting Print Quality is improperly set Incorrect media type Windows 1. On the Main tab of the S750 Properties window, confirm that Color Adjustment is set to Auto. 2. If Manual is set, click the Defaults button on the Manual Color Adjustment window. Windows On the Main tab of the S750 Properties window, select the appropriate Print Quality setting: High, Standard, Draft or Custom. Mac OS In the Print dialog box, select the Manual icon, then click the Details button. In the Detailed Setting window, move the Print Quality slider to select your preferred output quality. Windows On the Main tab of the S750 Properties window, confirm that the Media Type selected matches the paper loaded. Mac OS In the Print dialog box, confirm that the Media Type selected matches the paper loaded. Print Mode is improperly set Mac OS In the Print dialog box, select the appropriate Print Mode setting. 37

  • 1
  • 2
  • 3
  • 4
  • 5
  • 6
  • 7
  • 8
  • 9
  • 10
  • 11
  • 12
  • 13
  • 14
  • 15
  • 16
  • 17
  • 18
  • 19
  • 20
  • 21
  • 22
  • 23
  • 24
  • 25
  • 26
  • 27
  • 28
  • 29
  • 30
  • 31
  • 32
  • 33
  • 34
  • 35
  • 36
  • 37
  • 38
  • 39
  • 40
  • 41
  • 42
  • 43
  • 44
  • 45
  • 46
  • 47
  • 48
  • 49
  • 50
  • 51
  • 52
  • 53
  • 54
  • 55
  • 56
  • 57
  • 58

Troubleshooting
37
Troubleshooting Printed Output
Printer tried
to print but
no ink on
paper
(continued)
Printhead
clogged
Verify that the printhead is working properly. See “Printing a Nozzle
Check Pattern” on page 20 or “Cleaning the Printhead” on page 22.
Printhead may
need to be
replaced
Verify that the printhead is working properly. See “Printing a Nozzle
Check Pattern” on page 20 or “Cleaning the Printhead” on page 22. If
cleaning the printhead does not resolve the problem, contact the
Customer Care Center to replace it with a new one.
Problem
Problem
Problem
Problem
Possible Cause
Possible Cause
Possible Cause
Possible Cause
Try This
Try This
Try This
Try This
Printed
colors are
incorrect
One or more ink
tanks installed in
the wrong
position
Verify that each ink tank is lined up with the correct color label in the
printhead. See “Replacing Ink Tanks” on page 20.
If ink tanks were placed in the incorrect color slots in the printhead,
after switching the tanks to their correct slots, perform at least two
printhead cleanings to remove the incorrect residual colors from the
printhead. For procedures, see “Cleaning the Printhead” on page 22.
Incorrect Color
Adjustment
setting
Windows
Windows
Windows
Windows
1.
On the Main
Main
Main
Main tab of the S750 Properties window, confirm
that Color Adjustment is set to Auto
Auto
Auto
Auto.
2.
If Manual
Manual
Manual
Manual is set, click the Defaults
Defaults
Defaults
Defaults button on the Manual
Color Adjustment window.
Print Quality is
improperly set
Windows
Windows
Windows
Windows
On the Main
Main
Main
Main tab of the S750 Properties window, select the
appropriate Print Quality setting: High
High
High
High, Standard
Standard
Standard
Standard, Draft
Draft
Draft
Draft or
Custom
Custom
Custom
Custom.
Mac OS
Mac OS
Mac OS
Mac OS
In the Print
Print
Print
Print dialog box, select the Manual
Manual
Manual
Manual icon, then click the
Details
Details
Details
Details button. In the Detailed Setting
Detailed Setting
Detailed Setting
Detailed Setting window, move the Print
Print
Print
Print
Quality
Quality
Quality
Quality slider to select your preferred output quality.
Incorrect media
type
Windows
Windows
Windows
Windows
On the Main
Main
Main
Main tab of the S750 Properties window, confirm that
the Media Type
Media Type
Media Type
Media Type selected matches the paper loaded.
Mac OS
Mac OS
Mac OS
Mac OS
In the Print
Print
Print
Print dialog box, confirm that the Media Type
Media Type
Media Type
Media Type selected
matches the paper loaded.
Print Mode is
improperly set
Mac OS
Mac OS
Mac OS
Mac OS
In the Print
Print
Print
Print dialog box, select the appropriate Print Mode
Print Mode
Print Mode
Print Mode setting.
Problem
Problem
Problem
Problem
Possible Cause
Possible Cause
Possible Cause
Possible Cause
Try This
Try This
Try This
Try This