Canon S750 S750 Quick Start Guide - Page 47
Appendix
 |
View all Canon S750 manuals
Add to My Manuals
Save this manual to your list of manuals |
Page 47 highlights
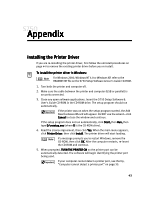
Appendix Installing the Printer Driver If you are re-installing the printer driver, first follow the uninstall procedures on page 44 to remove the existing printer driver before you re-install. To install the printer driver in Windows: For Windows 2000, Windows NT 4.0 or WIndows XP, refer to the README.TXT file on the S750 Setup Software & User's Guide CD-ROM. 1. Turn both the printer and computer off. 2. Make sure the cable between the printer and computer (USB or parallel) is securely connected. 3. Close any open software applications. Insert the S750 Setup Software & User's Guide CD-ROM in the CD-ROM drive. The setup program should run automatically. If the printer was on when the setup program started, the Add New Hardware Wizard will appear. Do NOT use the wizard-click Cancel to close the window and continue. If the setup program does not run automatically, click Start, then Run, then type D:\msetup.exe (where D is the CD-ROM drive). 4. Read the License Agreement, then click Yes. When the main menu appears, click Printer Driver, then click Install. The printer driver will start loading. If a message prompts you to restart Windows, remove the CD-ROM, then click OK. After the computer restarts, re-insert the CD-ROM and continue. 5. When prompted, TURN THE PRINTER ON so the printer port can be automatically detected. The software will begin identifying the printer port being used. If your computer cannot detect a printer port, see the tip, "Computer cannot detect a printer port" on page 35. 43
-
 1
1 -
2
-
3
-
4
-
5
-
6
-
7
-
8
-
9
-
10
-
11
-
12
-
13
-
14
-
15
-
16
-
17
-
18
-
19
-
20
-
21
-
22
-
23
-
24
-
25
-
26
-
27
-
28
-
29
-
30
-
31
-
32
-
33
-
34
-
35
-
36
-
37
-
38
-
39
-
40
-
41
-
 42
42 -
 43
43 -
 44
44 -
 45
45 -
 46
46 -
 47
47 -
 48
48 -
 49
49 -
 50
50 -
 51
51 -
 52
52 -
53
-
54
-
55
-
56
-
57
-
58
 |
 |
