Canon VIXIA HF R50 Instruction Manual - Page 110
<HF R52/R50> Memory Save: Saving an Entire Memory onto an External Hard Drive
 |
View all Canon VIXIA HF R50 manuals
Add to My Manuals
Save this manual to your list of manuals |
Page 110 highlights
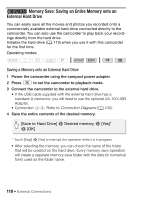
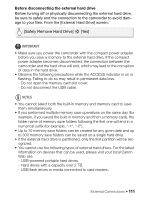
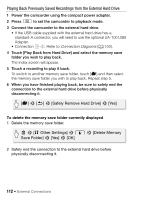
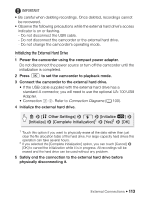
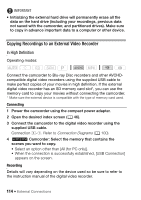
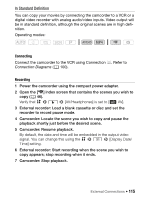
B Memory Save: Saving an Entire Memory onto an External Hard Drive You can easily save all the movies and photos you recorded onto a commercially available external hard drive connected directly to the camcorder. You can also use the camcorder to play back your recordings directly from the hard drive. Initialize the hard drive (A 113) when you use it with this camcorder for the first time. Operating modes: SCN Saving a Memory onto an External Hard Drive 1 Power the camcorder using the compact power adapter. 2 Press ] to set the camcorder to playback mode. 3 Connect the camcorder to the external hard drive. • If the USB cable supplied with the external hard drive has a standard-A connector, you will need to use the optional UA-100 USB Adapter. • Connection #-2. Refer to Connection Diagrams (A 100). 4 Save the entire contents of the desired memory. [Save to Hard Drive] > Desired memory > [Yes]* > [OK] * Touch [Stop] > [Yes] to interrupt the operation while it is in progress. • After selecting the memory, you can check the name of the folder that will be created on the hard drive. Every memory save operation will create a separate memory save folder with the date (in numerical form) used as the folder name. 110 Š External Connections
-
 1
1 -
2
-
3
-
4
-
5
-
6
-
7
-
8
-
9
-
10
-
11
-
12
-
13
-
14
-
15
-
16
-
17
-
18
-
19
-
20
-
21
-
22
-
23
-
24
-
25
-
26
-
27
-
28
-
29
-
30
-
31
-
32
-
33
-
34
-
35
-
36
-
37
-
38
-
39
-
40
-
41
-
42
-
43
-
44
-
45
-
46
-
47
-
48
-
49
-
50
-
51
-
52
-
53
-
54
-
55
-
56
-
57
-
58
-
59
-
60
-
61
-
62
-
63
-
64
-
65
-
66
-
67
-
68
-
69
-
70
-
71
-
72
-
73
-
74
-
75
-
76
-
77
-
78
-
79
-
80
-
81
-
82
-
83
-
84
-
85
-
86
-
87
-
88
-
89
-
90
-
91
-
92
-
93
-
94
-
95
-
96
-
97
-
98
-
99
-
100
-
101
-
102
-
103
-
104
-
 105
105 -
 106
106 -
 107
107 -
 108
108 -
 109
109 -
 110
110 -
 111
111 -
 112
112 -
 113
113 -
 114
114 -
 115
115 -
116
-
117
-
118
-
119
-
120
-
121
-
122
-
123
-
124
-
125
-
126
-
127
-
128
-
129
-
130
-
131
-
132
-
133
-
134
-
135
-
136
-
137
-
138
-
139
-
140
-
141
-
142
-
143
-
144
-
145
-
146
-
147
-
148
-
149
-
150
-
151
-
152
-
153
-
154
-
155
-
156
-
157
-
158
-
159
-
160
-
161
-
162
-
163
-
164
-
165
-
166
-
167
-
168
-
169
-
170
-
171
-
172
-
173
-
174
-
175
-
176
-
177
-
178
-
179
-
180
-
181
-
182
-
183
-
184
-
185
-
186
-
187
-
188
-
189
-
190
-
191
-
192
-
193
-
194
-
195
-
196
-
197
-
198
-
199
-
200
 |
 |
