Canon VIXIA HF R50 Instruction Manual - Page 129
Setting the Desired Web Services in the Camcorder, Saving MP4 Mov, ies and Photos Windows/Mac OS
 |
View all Canon VIXIA HF R50 manuals
Add to My Manuals
Save this manual to your list of manuals |
Page 129 highlights
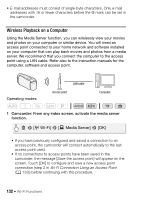
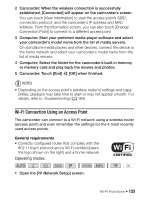
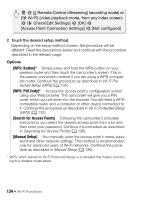
General requirements • Computer with ImageBrowser EX and CameraWindow correctly installed. For details on installing the software, refer to Saving MP4 Movies and Photos (Windows/Mac OS) (A 106). • Completed free registration online for CANON iMAGE GATEWAY. • Account settings for the services you plan to use (YouTube, Facebook, etc.). Available services may differ by country/region. Setting the Desired Web Services in the Camcorder Using CameraWindow, log in to CANON iMAGE GATEWAY and set the Web services you want to use. Refer to 'CameraWindow User Guide' for details on using the software. This PDF file can be accessed through the ? menu on the upper right of the ImageBrowser EX main screen. Operating modes: SCN 1 Camcorder: Open the [y] index screen for MP4 movies (A 46) or [}] index screen (A 50). 2 Connect the camcorder to the computer using the supplied USB cable. Connection #-1. Refer to Connection Diagrams (A 100). 3 Computer: Start CameraWindow. • Windows: If the AutoPlay dialog box appears, click Downloads Images From Canon Camera to open the main screen. • On Windows computers after having activated the auto-launch setting and on Mac OS computers, CameraWindow will start automatically and the main screen will appear. 4 Computer: Click Camera Settings > Set Up Web Services. 5 Computer: Log in to CANON iMAGE GATEWAY and complete the setup process. • Follow the onscreen instructions to register the services you want to use. You will need the account information (user name, password, etc.) to register some services. • CANON iMAGE GATEWAY and all other selected Web services will be set in the camcorder and the CameraWindow menu screen will appear. Wi-Fi Functions Š 129
-
 1
1 -
2
-
3
-
4
-
5
-
6
-
7
-
8
-
9
-
10
-
11
-
12
-
13
-
14
-
15
-
16
-
17
-
18
-
19
-
20
-
21
-
22
-
23
-
24
-
25
-
26
-
27
-
28
-
29
-
30
-
31
-
32
-
33
-
34
-
35
-
36
-
37
-
38
-
39
-
40
-
41
-
42
-
43
-
44
-
45
-
46
-
47
-
48
-
49
-
50
-
51
-
52
-
53
-
54
-
55
-
56
-
57
-
58
-
59
-
60
-
61
-
62
-
63
-
64
-
65
-
66
-
67
-
68
-
69
-
70
-
71
-
72
-
73
-
74
-
75
-
76
-
77
-
78
-
79
-
80
-
81
-
82
-
83
-
84
-
85
-
86
-
87
-
88
-
89
-
90
-
91
-
92
-
93
-
94
-
95
-
96
-
97
-
98
-
99
-
100
-
101
-
102
-
103
-
104
-
105
-
106
-
107
-
108
-
109
-
110
-
111
-
112
-
113
-
114
-
115
-
116
-
117
-
118
-
119
-
120
-
121
-
122
-
123
-
 124
124 -
 125
125 -
 126
126 -
 127
127 -
 128
128 -
 129
129 -
 130
130 -
 131
131 -
 132
132 -
 133
133 -
 134
134 -
135
-
136
-
137
-
138
-
139
-
140
-
141
-
142
-
143
-
144
-
145
-
146
-
147
-
148
-
149
-
150
-
151
-
152
-
153
-
154
-
155
-
156
-
157
-
158
-
159
-
160
-
161
-
162
-
163
-
164
-
165
-
166
-
167
-
168
-
169
-
170
-
171
-
172
-
173
-
174
-
175
-
176
-
177
-
178
-
179
-
180
-
181
-
182
-
183
-
184
-
185
-
186
-
187
-
188
-
189
-
190
-
191
-
192
-
193
-
194
-
195
-
196
-
197
-
198
-
199
-
200
 |
 |