Canon VIXIA HF R50 Instruction Manual - Page 134
WPS: Button], WPS: PIN Code], Search for Access Points], Manual Setup]
 |
View all Canon VIXIA HF R50 manuals
Add to My Manuals
Save this manual to your list of manuals |
Page 134 highlights
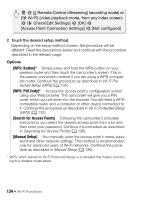
0 > [ Remote Control+Streaming] (recording mode) or [- Wi-Fi] (video playback mode, from any index screen) > [w Check/Edit Settings] > [OK] > [Access Point Connection Settings] > [Not configured] 2 Touch the desired setup method. Depending on the setup method chosen, the procedure will be different. Read the descriptions below and continue with the procedure described in the relevant page. Options [WPS: Button]* Simply press and hold the WPS button on your wireless router and then touch the camcorder's screen. This is the easiest connection method if you are using a WPS-compatible router. Continue the procedure as described in Wi-Fi Protected Setup (WPS) (A 135). [WPS: PIN Code]* Access the access point's configuration screen using your Web browser. The camcorder will give you a PIN code, which you will enter into the browser. You will need a WPScompatible router and a computer or other device connected to it. Continue the procedure as described in Wi-Fi Protected Setup (WPS) (A 135). [Search for Access Points] Following the camcorder's onscreen instructions, you select the desired access point from a list and then enter your password. Continue the procedure as described in Searching for Access Points (A 136). [Manual Setup] You manually enter the access point's name, password and other network settings. This method is recommended only for advanced users of Wi-Fi networks. Continue the procedure as described in Manual Setup (A 136). * WPS, which stands for Wi-Fi Protected Setup, is a standard that makes connecting to a wireless router easier. 134 Š Wi-Fi Functions
-
 1
1 -
2
-
3
-
4
-
5
-
6
-
7
-
8
-
9
-
10
-
11
-
12
-
13
-
14
-
15
-
16
-
17
-
18
-
19
-
20
-
21
-
22
-
23
-
24
-
25
-
26
-
27
-
28
-
29
-
30
-
31
-
32
-
33
-
34
-
35
-
36
-
37
-
38
-
39
-
40
-
41
-
42
-
43
-
44
-
45
-
46
-
47
-
48
-
49
-
50
-
51
-
52
-
53
-
54
-
55
-
56
-
57
-
58
-
59
-
60
-
61
-
62
-
63
-
64
-
65
-
66
-
67
-
68
-
69
-
70
-
71
-
72
-
73
-
74
-
75
-
76
-
77
-
78
-
79
-
80
-
81
-
82
-
83
-
84
-
85
-
86
-
87
-
88
-
89
-
90
-
91
-
92
-
93
-
94
-
95
-
96
-
97
-
98
-
99
-
100
-
101
-
102
-
103
-
104
-
105
-
106
-
107
-
108
-
109
-
110
-
111
-
112
-
113
-
114
-
115
-
116
-
117
-
118
-
119
-
120
-
121
-
122
-
123
-
124
-
125
-
126
-
127
-
128
-
 129
129 -
 130
130 -
 131
131 -
 132
132 -
 133
133 -
 134
134 -
 135
135 -
 136
136 -
 137
137 -
 138
138 -
 139
139 -
140
-
141
-
142
-
143
-
144
-
145
-
146
-
147
-
148
-
149
-
150
-
151
-
152
-
153
-
154
-
155
-
156
-
157
-
158
-
159
-
160
-
161
-
162
-
163
-
164
-
165
-
166
-
167
-
168
-
169
-
170
-
171
-
172
-
173
-
174
-
175
-
176
-
177
-
178
-
179
-
180
-
181
-
182
-
183
-
184
-
185
-
186
-
187
-
188
-
189
-
190
-
191
-
192
-
193
-
194
-
195
-
196
-
197
-
198
-
199
-
200
 |
 |
