Canon VIXIA HF R50 Instruction Manual - Page 150
LCD Mirror Image], HDMI Status], Demo Mode], TV Type], STV-250N Stereo Video Cable
 |
View all Canon VIXIA HF R50 manuals
Add to My Manuals
Save this manual to your list of manuals |
Page 150 highlights
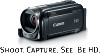
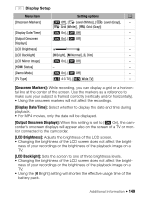
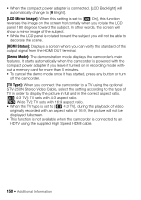
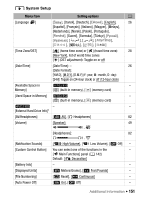
• When the compact power adapter is connected, [LCD Backlight] will automatically change to [H Bright]. [LCD Mirror Image]: When this setting is set to [i On], this function reverses the image on the screen horizontally when you rotate the LCD panel 180 degrees toward the subject. In other words, the screen will show a mirror image of the subject. • While the LCD panel is rotated toward the subject you will not be able to decorate the scene. [HDMI Status]: Displays a screen where you can verify the standard of the output signal from the HDMI OUT terminal. [Demo Mode]: The demonstration mode displays the camcorder's main features. It starts automatically when the camcorder is powered with the compact power adapter if you leave it turned on in recording mode without a memory card for more than 5 minutes. • To cancel the demo mode once it has started, press any button or turn off the camcorder. [TV Type]: When you connect the camcorder to a TV using the optional STV-250N Stereo Video Cable, select the setting according to the type of TV in order to display the picture in full and in the correct aspect ratio. [+ 4:3 TV]: TV sets with 4:3 aspect ratio. [, Wide TV]: TV sets with 16:9 aspect ratio. • When the TV type is set to [+ 4:3 TV], during the playback of video originally recorded with an aspect ratio of 16:9, the picture will not be displayed fullscreen. • This function is not available when the camcorder is connected to an HDTV using the supplied High Speed HDMI cable. 150 Š Additional Information
-
 1
1 -
2
-
3
-
4
-
5
-
6
-
7
-
8
-
9
-
10
-
11
-
12
-
13
-
14
-
15
-
16
-
17
-
18
-
19
-
20
-
21
-
22
-
23
-
24
-
25
-
26
-
27
-
28
-
29
-
30
-
31
-
32
-
33
-
34
-
35
-
36
-
37
-
38
-
39
-
40
-
41
-
42
-
43
-
44
-
45
-
46
-
47
-
48
-
49
-
50
-
51
-
52
-
53
-
54
-
55
-
56
-
57
-
58
-
59
-
60
-
61
-
62
-
63
-
64
-
65
-
66
-
67
-
68
-
69
-
70
-
71
-
72
-
73
-
74
-
75
-
76
-
77
-
78
-
79
-
80
-
81
-
82
-
83
-
84
-
85
-
86
-
87
-
88
-
89
-
90
-
91
-
92
-
93
-
94
-
95
-
96
-
97
-
98
-
99
-
100
-
101
-
102
-
103
-
104
-
105
-
106
-
107
-
108
-
109
-
110
-
111
-
112
-
113
-
114
-
115
-
116
-
117
-
118
-
119
-
120
-
121
-
122
-
123
-
124
-
125
-
126
-
127
-
128
-
129
-
130
-
131
-
132
-
133
-
134
-
135
-
136
-
137
-
138
-
139
-
140
-
141
-
142
-
143
-
144
-
 145
145 -
 146
146 -
 147
147 -
 148
148 -
 149
149 -
 150
150 -
 151
151 -
 152
152 -
 153
153 -
 154
154 -
 155
155 -
156
-
157
-
158
-
159
-
160
-
161
-
162
-
163
-
164
-
165
-
166
-
167
-
168
-
169
-
170
-
171
-
172
-
173
-
174
-
175
-
176
-
177
-
178
-
179
-
180
-
181
-
182
-
183
-
184
-
185
-
186
-
187
-
188
-
189
-
190
-
191
-
192
-
193
-
194
-
195
-
196
-
197
-
198
-
199
-
200
 |
 |
