Canon Vistura Vistura Instruction Manual - Page 26
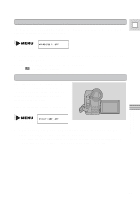
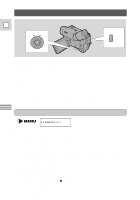
Selecting from the Menus
 |
UPC - 009322161444
View all Canon Vistura manuals
Add to My Manuals
Save this manual to your list of manuals |
Page 26 highlights
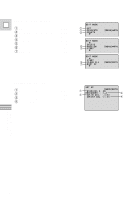
Selecting from the Menus Many of the camera's advanced functions are selected from menus which appear in the display. E There are four main menus: 1. Camera menu (when the camera is in record pause mode: the POWER switch set to [ or P and the standby lever set to MOVIE or PHOTO) 2. VCR menu (when the POWER switch is set to VCR) 3. Edit menu (when the POWER switch is set to VCR and you select the aEDIT MODE from the VCR menu) 4. Recorder set menu (when you select the aSET UP from the Edit menu) Camera menu (CAM. MENU) q Digital zoom p. 15 w 16:9 mode p. 45 e White balance p. 55 r Wireless control p. 31 t Tally lamp p. 31 y Record mode p. 14 u Audio mode p. 46 i Wind screen p. 47 o Self view recording p. 16 !0 Time zone/Daylight saving time p. 32 !1 Date and time set p. 34 CAM. ME NU [ MENU ] CLOSE q D. ZOOM ON 1 6 : 9 ON w e WH I T E BA L. . . AUTO WI RELESS C. . ON r t TALLY LAMP . . ON REC MODE . . . . SP y u AUD I O MODE . . 1 6 bit W I ND SCREEN . AUTO i o M I RROR ON CAM. ME NU [ MENU ] CLOSE WH I T E BA L. . . AUTO WI RELESS C. . ON TALLY LAMP . . ON REC MODE . . . . SP AUD I O MODE . . 1 6 bit W I ND SCREEN . AUTO M I RROR ON !0 T. D/ ZONE T I ME / DST SE T . . . . N. Y. J AN . 1 , 1998 !1 1 2 : 0 0 AM Using the Full Range of Features VCR menu (VCR MENU) q Select edit mode p. 59 w Wireless control p. 31 e Record mode p. 14 r Audio monitor p. 76 t Select data code display ..........p. 34 y Select date and time display ....p. 34 u Information displays p. 92 VCR MENU [ MENU ] CLOSE q ED I T MODE WI RELESS C. . ON w e REC MODE . . . . SP A. MON I TOR . . . S T EREO1 r t DATA CODE . . . DATA / T I ME u D D / I T S I ME PLA Y S S E. L. .. . . DATA ON & T I ME y Turn to the appropriate page for a detailed explanation of each function. 27
-
 1
1 -
2
-
3
-
4
-
5
-
6
-
7
-
8
-
9
-
10
-
11
-
12
-
13
-
14
-
15
-
16
-
17
-
18
-
19
-
20
-
 21
21 -
 22
22 -
 23
23 -
 24
24 -
 25
25 -
 26
26 -
 27
27 -
 28
28 -
 29
29 -
 30
30 -
 31
31 -
32
-
33
-
34
-
35
-
36
-
37
-
38
-
39
-
40
-
41
-
42
-
43
-
44
-
45
-
46
-
47
-
48
-
49
-
50
-
51
-
52
-
53
-
54
-
55
-
56
-
57
-
58
-
59
-
60
-
61
-
62
-
63
-
64
-
65
-
66
-
67
-
68
-
69
-
70
-
71
-
72
-
73
-
74
-
75
-
76
-
77
-
78
-
79
-
80
-
81
-
82
-
83
-
84
-
85
-
86
-
87
-
88
-
89
-
90
-
91
-
92
-
93
-
94
-
95
-
96
-
97
-
98
-
99
 |
 |
