Canon ZR60 DV Messenger Ver 1.0 Instruction Manual - Page 48
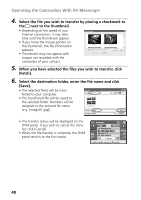
When you have selected the files you wish to transfer, click
 |
UPC - 490561400607
View all Canon ZR60 manuals
Add to My Manuals
Save this manual to your list of manuals |
Page 48 highlights
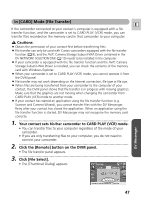
Operating the Camcorders With DV Messenger 4 Select the file you wish to transfer by placing a checkmark to the next to the thumbnail. • Depending on the speed of your Internet connection, it may take time until the thumbnails appear. • If you move the mouse pointer on the thumbnail, the file information appears. • Thumbnails may not appear with images not recorded with the camcorder of your contact. 5 When you have selected the files you wish to transfer, click [Fetch]. 6 Select the destination folder, enter the file name and click [Save]. • The selected file(s) will be transferred to your computer. • The transferred file will be saved to the selected folder. Numbers will be assigned to the entered file name (e.g. [image01.jpg]). • The transfer status will be displayed on the DVM panel. If you wish to cancel the transfer, click [Cancel]. • When the file transfer is complete, the DVM panel returns to the first status. 48
-
 1
1 -
2
-
3
-
4
-
5
-
6
-
7
-
8
-
9
-
10
-
11
-
12
-
13
-
14
-
15
-
16
-
17
-
18
-
19
-
20
-
21
-
22
-
23
-
24
-
25
-
26
-
27
-
28
-
29
-
30
-
31
-
32
-
33
-
34
-
35
-
36
-
37
-
38
-
39
-
40
-
41
-
42
-
 43
43 -
 44
44 -
 45
45 -
 46
46 -
 47
47 -
 48
48 -
 49
49 -
 50
50 -
 51
51 -
 52
52 -
 53
53 -
54
-
55
-
56
-
57
 |
 |
