Canon i70 i70 Quick Start Guide
Canon i70 Manual
 |
View all Canon i70 manuals
Add to My Manuals
Save this manual to your list of manuals |
Canon i70 manual content summary:
- Canon i70 | i70 Quick Start Guide - Page 1
Color Bubble Jet Printer Quick Start Guide - Canon i70 | i70 Quick Start Guide - Page 2
thoroughly in order that it will be an easy-to-use guide to your Canon i70 Color Bubble Jet Printer. All statements, technical information and recommendations in this manual and in any guides or related documents are believed reliable, but the accuracy and completeness thereof are not guaranteed - Canon i70 | i70 Quick Start Guide - Page 3
56 Handling Error Messages While Using the Digital Camera 58 Appendix Installing the Printer Driver when using Mac OS 9.x 60 User's Guide Table of Contents 61 Options 62 Specifications 63 Safety Precautions 65 Regulatory Information 67 CANON LIMITED WARRANTY --- (USA Only 68 Index 70 1 - Canon i70 | i70 Quick Start Guide - Page 4
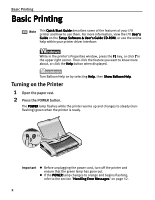
and how to use them. For more information, view the i70 User's Guide on the Setup Software & User's Guide CD-ROM, or use the online help within your printer driver interface: While in the printer's Properties window, press the F1 key, or click ? in the upper right corner. Then click the feature - Canon i70 | i70 Quick Start Guide - Page 5
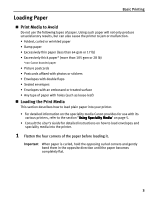
how to load plain paper into your printer. • For detailed information on the speciality media Canon provides for use with its various printers, refer to the section "Using Speciality Media" on page 5. • Consult the User's Guide for detailed instructions on how to load envelopes and speciality - Canon i70 | i70 Quick Start Guide - Page 6
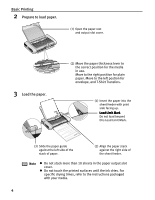
print side facing up. Load Limit Mark Do not load beyond this Load Limit Mark. (3) Slide the paper guide against the left side of the stack of paper. (2) Align the paper stack against the right side of the ink dries. For specific drying times, refer to the instructions packaged with your media. 4 - Canon i70 | i70 Quick Start Guide - Page 7
Basic Printing Using Speciality Media Canon recommends that you use genuine Canon media to ensure optimal print quality. „ Photo Quality Media • Photo Paper Pro • Photo Paper Plus Glossy • Matte Photo Paper • Glossy Photo Paper • Glossy Photo Cards • - Canon i70 | i70 Quick Start Guide - Page 8
Basic Printing „ Canon Speciality Media Media Type Paper Rest Load Limit Paper Printer Driver Setting Thickness Lever Media included on the Setup Software & User's Guide CD-ROM when printing with Photo Paper Pro Perforated. For instructions on how to print from the software applications - Canon i70 | i70 Quick Start Guide - Page 9
section are for printing in Windows XP. 1 Create a document or open a file to print. 2 Open Printer Properties dialog box. (1) Select Print from the application software's File menu. (2) Ensure that Canon i70 is selected. (3) Click Preferences or Properties. Note In Windows 2000, click the Main tab - Canon i70 | i70 Quick Start Guide - Page 10
and click Set on the Main tab. You can control quality in the Set Print Quality dialog box. z For details about other printer driver functions, refer to the User's Guide or Help. z Select Preview before printing by clicking the check box. This displays a preview screen that allows you to confirm the - Canon i70 | i70 Quick Start Guide - Page 11
Basic Printing Printing with Macintosh Note z The menu screens and dialog boxes that appear may vary, depending on the software application you are using. z The steps described in this section are for printing in Mac OS 9. 1 Create a document or open a file to print. 2 Select Paper Size. (1) Select - Canon i70 | i70 Quick Start Guide - Page 12
: If you select Manual, the Details button will become selectable. Click the Details button to display the Detailed Setting dialog box where you can fine-tune the Print Quality and Halftoning settings. Refer to the User's Guide. z For details about other printer driver functions, refer to the - Canon i70 | i70 Quick Start Guide - Page 13
an infrared port for wireless data transmission, you can print data with a cordless connection with the printer. You can also print an address book, schedule, or memo received from a PDA in a incorporated in the computer ·Infrared port (OBEX compliant) of the PDA (Personal Digital Assistants) 11 - Canon i70 | i70 Quick Start Guide - Page 14
this icon is displayed, the required infrared driver has already been installed. Refer to your computer's operation manual for more details. 3.Double-click the infrared transmission, also refer to your computer or PDA manual. 1 Set up the Printer. (1) Ensure that the universal AC adapter is - Canon i70 | i70 Quick Start Guide - Page 15
use. For this distance, refer to your computer or PDA manual. Infrared port of printer Less than 31.5 inch (80 cm) (Do not block with Before printing data or using a maintenance function of the printer driver, ensure that the name of the printer connected based on the IrDA system is displayed by - Canon i70 | i70 Quick Start Guide - Page 16
Printing Printing Photographs from the Digital Camera Directly Connecting a Canon digital camera with Bubble Jet Direct function to the printer allows you to print recorded images directly without using a computer. Note To print directly from a digital camera or digital video camcorder, use only - Canon i70 | i70 Quick Start Guide - Page 17
(3) Slide the paper guide against the left side of the media. 3 Connect the printer and the digital camera. (1) Ensure that the digital camera is turned off. (2) Connect the digital camera and printer with the USB cable that came with the digital camera. The digital camera will automatically turn on - Canon i70 | i70 Quick Start Guide - Page 18
Advanced Printing Note z For the digital camera operation method and troubleshooting, refer to your digital camera manual. For print error messages, refer to "Handling Error Messages While Using the Digital Camera" on page 58. z By operating the digital camera, you can make the following prints: · - Canon i70 | i70 Quick Start Guide - Page 19
Printer Driver The Printer Properties dialog box can be opened from either within an application, or directly from the Windows Start menu. Note z This manual Canon i70 is selected. Then click Preferences (or Properties). The Printer Properties dialog box opens. „ Opening the Printer Properties - Canon i70 | i70 Quick Start Guide - Page 20
photographs can significantly improve the quality of your printouts. See the inside back cover for a list of Canon media and inks for this printer. Printer Driver Settings The printer driver has a variety of settings that can be used to creatively enhance the colors and output of your photographs - Canon i70 | i70 Quick Start Guide - Page 21
To manually adjust Print Quality settings: Advanced Printing 1 Open the Printer Properties dialog box. See"Opening the Printer Properties box. See "Printing with Macintosh" on page 9. 2 Click Print Mode and select Manual, then click Details... to open the Detailed Setting dialog box. 3 Move the - Canon i70 | i70 Quick Start Guide - Page 22
adjusts the photographic image created with a digital camera. Use this feature to compensate for unsatisfactory color balance and over- or under-exposure before printing. 1 Open the Printer Properties dialog box. See"Opening the Printer Properties Dialog Box from Your Application Program - Canon i70 | i70 Quick Start Guide - Page 23
Advanced Printing To use Vivid Photo option: Vivid Photo intensifies background colors like fields, trees, oceans and skies, while maintaining natural skin tones in the images. Note In Windows Me or Windows 98 The Vivid Photo function is not available, if Background Printing has been disabled. To - Canon i70 | i70 Quick Start Guide - Page 24
: Photo Noise Reduction function reduces noise from blue portions, such as the sky and dark portions of the images recorded with your digital camera. Note In Windows Me or Windows 98 The Photo Noise Reduction function is not available, if Background Printing has been disabled. To use Photo Noise - Canon i70 | i70 Quick Start Guide - Page 25
settings. (3) Select an icon. (4) Enter a description on the registering profile. 4 Click OK. 5 Click OK on the Profiles tab. This registers your printer driver print settings. Note You can retrieve or delete the print settings profile at any time. Retrieving profile: Select the desired profile from - Canon i70 | i70 Quick Start Guide - Page 26
which to register your settings. 4 Click OK. 5 Click Close in the Register Settings dialog box. This registers your printer driver print settings. Note You can retrieve or delete the saved driver settings at any time. Retrieving print settings: Select the name of the settings to retrieve from the - Canon i70 | i70 Quick Start Guide - Page 27
to the many features offered by your printer driver. Note For detailed description of the printer driver functions, refer to the User's Guide. Printing with Borderless Printing Reducing Noise from Images Recorded with Digital Camera Smoothing the Rough Edges of Certain Images Automatically - Canon i70 | i70 Quick Start Guide - Page 28
Explorer or pages from the User's Guide (on-screen manual of this printer) in full size. Easy-WebPrint digital camera can record data tags for specific camera settings and functions such as whether the flash was on or off, if the camera was in portrait or night scene mode, etc. BJ Printers support - Canon i70 | i70 Quick Start Guide - Page 29
photo applications included with your Setup Software and User's Guide CD-ROM using the Borderless Printing mode. Note Media below to create color prints of digital camera photographs with EasyPhotoPrint using the Borderless Printing function. Easy-PhotoPrint supports Exif Print (Exif 2.2). Easy- - Canon i70 | i70 Quick Start Guide - Page 30
Advanced Printing (2) Click the [+] button on the thumbnail of the photograph you want to print and specify the number of copies. 3 Select the paper. Increases the number of copies. Displays the specified number of copies. Decreases the number of copies. 4 Select the layout. (1) Click the 2. - Canon i70 | i70 Quick Start Guide - Page 31
with your Setup Software and User's Guide CD-ROM using the Borderless Printing mode digital camera in the folder on the hard disk. This section describes how to print photographs stored in the folder on the hard disk. (2) Double-click the Canon ImageBrowser (alias) icon on the desktop. If the Canon - Canon i70 | i70 Quick Start Guide - Page 32
Advanced Printing 3 Enter layout options. (1) Select Tiled photo printing. (2) Click Next. (3) Click Page setup.... 4 Select Borderless Printing. (1) Select Borderless Printing. (2) Select a paper size from the Paper Size pull-down menu. The menu only displays paper sizes compatible with - Canon i70 | i70 Quick Start Guide - Page 33
from the No. of images pull-down menu. (2) Click OK. (1) Click PRINT. The Print dialog box is displayed. (4) Load the selected paper in the printer. (5) Click Print. (2) Select a type of media for printing from the Media Type pull-down menu. (3) Select Photo from the Print Mode pull-down menu - Canon i70 | i70 Quick Start Guide - Page 34
the Print Head" on page 39 Step 3 "Print Head Deep Cleaning" on page 37 Still the problem remains Step 4 "Replacing an Ink Tank" on page 42 Note z If ink tank replacement does not resolve the problem, contact the Customer Care Center. z You will be alerted if you enable a low ink warning. 32 - Canon i70 | i70 Quick Start Guide - Page 35
the RESUME/CANCEL button until the POWER lamp flashes twice. 1 With the printer on, load a sheet of paper in the printer. 2 Open the Printer Properties dialog box. See "Opening the Printer Properties Dialog Box Directly from the Start Menu" on page 17. 3 Print the Nozzle Check Pattern. (1) Click - Canon i70 | i70 Quick Start Guide - Page 36
Pattern The nozzle check pattern should appear as follows when ink is discharged properly. Examine the nozzle check pattern output by the printer. (1) Lines missing here indicate the print head requires cleaning. See "Print Head Cleaning" on page 35. (2) Unevenness in these patterns indicates the - Canon i70 | i70 Quick Start Guide - Page 37
be clogged. Cleaning the print head consumes ink, so perform print head cleaning only when necessary. 1 Ensure the printer is on. 2 Open the Printer Properties dialog box. See "Opening the Printer Properties Dialog Box Directly from the Start Menu" on page 17. 3 Start Print Head Cleaning. (1) Click - Canon i70 | i70 Quick Start Guide - Page 38
seconds. Note z Print head cleaning can be performed also from the printer itself. Ensure the printer is on. Hold down the RESUME/CANCEL button until the POWER lamp flashes cleaning three times. If the problem persists, perform print head deep cleaning. See "Print Head Deep Cleaning" on page 37. - Canon i70 | i70 Quick Start Guide - Page 39
powerful process. Print head deep cleaning consumes ink, so perform this procedure only when necessary. 1 Ensure the printer is on. 2 Open the Printer Properties dialog box. See "Opening the Printer Properties Dialog Box Directly from the Start Menu" on page 17. 3 Start Print Head Deep Cleaning - Canon i70 | i70 Quick Start Guide - Page 40
. (1) Select Page Setup... in the File menu. (2) Click Utilities to open the Printer Utility dialog box. 3 Start Print Head Deep Cleaning. (1) Select Cleaning from the pulldown If ink tank replacement does not resolve the problem, the print head may be worn out. Contact the Customer Care Center. 38 - Canon i70 | i70 Quick Start Guide - Page 41
you to print without shifts in the color registration. 1 With the printer on, load a sheet of paper in the printer. Move the paper thickness lever to the right position. 2 Open the Printer Properties dialog box. See "Opening the Printer Properties Dialog Box Directly from the Start Menu" on page 17 - Canon i70 | i70 Quick Start Guide - Page 42
noticeable vertical white stripes. Less noticeable white stripes More noticeable white stripes (4) When the confirmation message is displayed, click OK. 1 Ensure the printer is on. 2 Open the Print Utility dialog box. (1) Select Page Setup... in the File menu. (2) Click Utilities to open the - Canon i70 | i70 Quick Start Guide - Page 43
3 Print the pattern. Printing Maintenance (1) Select Test Print from the pull-down menu. (2) Click Print Head Alignment. 4 Align the Print Head. (1) Look at the print out. From the patterns, select the most even, least irregular patterns and enter the number that corresponds. (2) Enter the numbers - Canon i70 | i70 Quick Start Guide - Page 44
replacing an ink tank, check the model number very carefully. The printer will not print properly if the wrong ink tank is used, or ink tank runs out of ink, replace it using the following steps. 1 Ensure that the printer is on, and then open the print head cover. The print head holder moves to the - Canon i70 | i70 Quick Start Guide - Page 45
remove it from the printer and leave it out in the open. This will cause the ink tank to dry out and the printer may not function properly consumed in the head cleaning and deep cleaning, which are necessary to maintain the printer's capabilities. z When an ink tank runs out of ink, replace the ink - Canon i70 | i70 Quick Start Guide - Page 46
will not output the message asking for confirmation of ink tank replacement. This is why it is important to open the printer driver's Properties dialog box and manually reset the ink tank counter in the Maintenance tab whenever an ink tank is replaced. 1 Check the message, and click Yes or OK - Canon i70 | i70 Quick Start Guide - Page 47
the Ink Low alert from functioning properly. If this happens, manually reset the ink counter according to the following procedure. Resetting the Ink Counter in Printer Properties dialog box: z When using Windows: 1. Open the Printer Properties dialog box and click the Maintenance Tab. 2. Click Ink - Canon i70 | i70 Quick Start Guide - Page 48
Printing Maintenance „ How Low Ink Warning Setting Works The low ink warning notifies you of low ink levels during printing. The Low Ink Warning has been preset to be automatically displayed. When you reset the ink counter, it will assume the ink tank is full regardless of how much ink actually - Canon i70 | i70 Quick Start Guide - Page 49
find the most common printing problems. Refer to the User's Guide for additional information on topics not covered in this section. • "Cannot Install the Printer Driver" on page 48 • "Print Quality is Poor or Contains Errors" on page 49 • "Troubleshooting Printer Hardware" on page 50 • "Paper - Canon i70 | i70 Quick Start Guide - Page 50
Troubleshooting Cannot Install the Printer Driver Problem Possible Cause Cannot Install the Installation Printer Driver procedure not followed correctly Try This Follow the Easy Setup Instructions for proper printer driver are no problems with the Setup Software & User's Guide CDROM. Use - Canon i70 | i70 Quick Start Guide - Page 51
Troubleshooting Print Quality is Poor or Contains Errors Problem correct print side facing up. Note Follow the instructions packaged with your speciality media for loading and printer driver and try printing again. 1. Open the Printer Properties dialog box. 2. On the Main tab, select Manual - Canon i70 | i70 Quick Start Guide - Page 52
Troubleshooting Troubleshooting Printer Hardware Problem Printer Does Not Start or Printer Stops During Print Jobs Possible Cause Try This Print head has overheated due to long periods of continuous printing Stop printing and turn the printer off for at least 15 minutes to allow the print head - Canon i70 | i70 Quick Start Guide - Page 53
Troubleshooting Cannot Print to End of Job Incorrect page size selected Verify that the page size setting matches the size of the paper loaded in the printer Transmission" on page 11. Paper Does Not Feed Properly Problem Paper Does Not Feed Properly Possible Cause Inappropriate paper type - Canon i70 | i70 Quick Start Guide - Page 54
LK-51 User's Guide. Note POWER lamp flashes alternately green and orange An error that requires contacting the Customer Care Center may have occurred. Turn off and unplug the printer from the power supply. Then plug the printer back in and turn it back on. Should the problem persist, contact the - Canon i70 | i70 Quick Start Guide - Page 55
(LPT) Port) * A port other than the LPT3 port may be selected depending on the computer setting. Follow the procedures described in the Easy Setup Instructions and reinstall the printer driver. Refer to the User's Guide for instructions on how to verify status and the correct action to take. 53 - Canon i70 | i70 Quick Start Guide - Page 56
Troubleshooting Problem "Error No.: X202" "Error No.: X203" "Error No.: X300" Possible Cause Printer driver is not installed properly Try This Uninstall then reinstall the printer driver. 1. Click Start, and select All Programs (or Programs), Canon i70, and Uninstall. 2. Follow the on-screen - Canon i70 | i70 Quick Start Guide - Page 57
Troubleshooting Problem Low Ink Warning Accompanied by Ink Tank Icon With '?' ink tank is not synchronized with its ink counter. Always be sure to reset the ink counter in your printer driver when you replace ink tank. See "Resetting the Ink Counter" on page 44. Note A"?" is displayed next - Canon i70 | i70 Quick Start Guide - Page 58
Troubleshooting Cannot Print Properly through Infrared Transmission Problem Cannot Print Properly through Infrared Transmission Possible Cause The required driver Data through Infrared Transmission." The infrared transmission function of this printer can be used only with the PC/ AT compatible - Canon i70 | i70 Quick Start Guide - Page 59
Troubleshooting Problem Cannot Print Properly through Infrared Transmission (continued) Possible Cause Try This The selected printer Check the printer port setting. port is wrong 1. Open the printer driver Properties dialog box from the Start menu. 2. Click the Details tab to ensure that the - Canon i70 | i70 Quick Start Guide - Page 60
Troubleshooting Handling Error Messages While Using the Digital Camera The following messages may be displayed on the digital camera or digital video camcorder when images are printed directly from them. Correct the error according to the procedure below. Camera Error Message Possible Cause - Canon i70 | i70 Quick Start Guide - Page 61
Canon "Bubble Jet Direct" compatible digital cameras and digital video camcorders connected to this printer. z A low ink warning is not displayed on the digital camera the connected digital camera or digital video camcorder does not support "Bubble Jet Direct", the POWER lamp on the printer stays lit - Canon i70 | i70 Quick Start Guide - Page 62
on your Mac and insert the Setup Software & User's Guide CD-ROM. TURN THE PRINTER ON. 2 Open the Printer Driver folder on the CD-ROM, then double-click the Installer product support. 13 To insure highest quality output, continue with Step 7 Align the Printhead on the Easy Setup Instructions. 60 - Canon i70 | i70 Quick Start Guide - Page 63
Print Properly from the Digital Camera Problems Relating to Windows Problems Relating to the Macintosh Appendix Printing Area Using the Printer with a Network Uninstalling Printer Drivers Uninstalling the User's Guide Printer Driver Functions (Windows) Printer Driver Functions (Macintosh) Printing - Canon i70 | i70 Quick Start Guide - Page 64
is a battery kit that consists of a battery charger and a lithium-ion battery. Use this kit together with the printer in locations where there is no power supply (during business trip, etc.). „ Canon Li-ion Battery LB-51 This option is available as an additional lithium-ion battery for the portable - Canon i70 | i70 Quick Start Guide - Page 65
) (for Borderless Printing: 216 mm / 8.5 in) Resident print control mode: Canon extended mode Receive buffer: 64 KB Interface: USB 2.0 Full Speed / IrDA Ver standard and plain paper mode with Windows XP printer driver *2 Based on printing the ISO JIS-SCID No.5 pattern at standard and plain paper - Canon i70 | i70 Quick Start Guide - Page 66
, Index Print: 15-80 images Supported Standard / Index (DPOF only) Supported (The function depends on the camera connected) Ver. 1.00 compatible (Index print, number of copies, select images, print special characters (date/image no.)) BJ Printer Driver Systems Requirements z Use a computer on - Canon i70 | i70 Quick Start Guide - Page 67
on while cleaning it, you could injure yourself or damage the printer. Do not attempt to disassemble or modify the printer. There are no user serviceable parts inside the printer. The printer contains high-voltage components. Never attempt any maintenance procedure not described in this guide. 65 - Canon i70 | i70 Quick Start Guide - Page 68
clips, staples, etc.) or containers of flammable solvents (alcohol, thinners, etc.) on top of the printer. If any foreign object (mental or liquid) fall into the printer, unplug the power cord and call for service. Print heads and ink tanks For safety reasons store print heads and ink tanks out of - Canon i70 | i70 Quick Start Guide - Page 69
Printer accordance with the instructions, may cause harmful manual. If such changes or modifications should be made, you could be required to stop operation of the equipment. Canon U.S.A., Inc. One Canon Plaza Lake Success, NY 11042 1-516-328-5600 Canadian Radio Interference Regulations This digital - Canon i70 | i70 Quick Start Guide - Page 70
fluctuations, improper use, failure to follow operating or maintenance instructions, or environmental conditions, prescribed in Canon USA's user's manual or other documentation, or services performed by someone other than a Canon USA repair facility or ASF. Without limiting the foregoing, dropping - Canon i70 | i70 Quick Start Guide - Page 71
Appendix Canon offers a full range of customer technical support* options: • For interactive troubleshooting, e-mail technical support, the latest driver downloads and answers to frequently asked questions (www.canontechsupport.com) • Automated interactive telephone support on most current products
-
 1
1 -
 2
2 -
 3
3 -
 4
4 -
 5
5 -
 6
6 -
 7
7 -
8
-
9
-
10
-
11
-
12
-
13
-
14
-
15
-
16
-
17
-
18
-
19
-
20
-
21
-
22
-
23
-
24
-
25
-
26
-
27
-
28
-
29
-
30
-
31
-
32
-
33
-
34
-
35
-
36
-
37
-
38
-
39
-
40
-
41
-
42
-
43
-
44
-
45
-
46
-
47
-
48
-
49
-
50
-
51
-
52
-
53
-
54
-
55
-
56
-
57
-
58
-
59
-
60
-
61
-
62
-
63
-
64
-
65
-
66
-
67
-
68
-
69
-
70
-
71
 |
 |

Color Bubble Jet Printer
Color Bubble Jet Printer
Color Bubble Jet Printer
Color Bubble Jet Printer
Quick Start Guide
Quick Start Guide
Quick Start Guide
Quick Start Guide