Canon i70 i70 Quick Start Guide - Page 31
Printing Photographs with Macintosh
 |
View all Canon i70 manuals
Add to My Manuals
Save this manual to your list of manuals |
Page 31 highlights
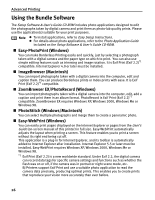
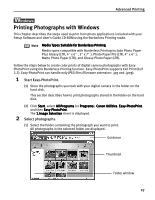
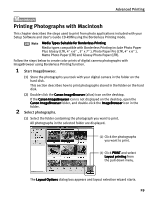
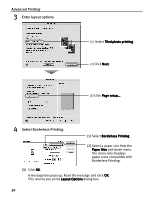
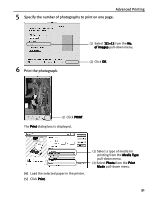
Advanced Printing Printing Photographs with Macintosh This chapter describes the steps used to print from photo applications included with your Setup Software and User's Guide CD-ROM using the Borderless Printing mode. Note Media Types Suitable for Borderless Printing Media types compatible with Borderless Printing include Photo Paper Plus Glossy (LTR, 4s x 6s , 5s x 7s ), Photo Paper Pro (LTR, 4s x 6s ), Matte Photo Paper (LTR) and Glossy Photo Paper (LTR). Follow the steps below to create color prints of digital camera photographs with ImageBrowser using Borderless Printing function. 1 Start ImageBrowser. (1) Store the photographs you took with your digital camera in the folder on the hard disk. This section describes how to print photographs stored in the folder on the hard disk. (2) Double-click the Canon ImageBrowser (alias) icon on the desktop. If the Canon ImageBrowser icon is not displayed on the desktop, open the Canon ImageBrowser folder, and double-click the ImageBrowser icon in the folder. 2 Select photographs. (1) Select the folder containing the photograph you want to print. All photographs in the selected folder are displayed. (2) Click the photographs you want to print. (3) Click PRINT and select Layout printing from the pull-down menu. The Layout Options dialog box appears and layout selection wizard starts. 29
-
 1
1 -
2
-
3
-
4
-
5
-
6
-
7
-
8
-
9
-
10
-
11
-
12
-
13
-
14
-
15
-
16
-
17
-
18
-
19
-
20
-
21
-
22
-
23
-
24
-
25
-
 26
26 -
 27
27 -
 28
28 -
 29
29 -
 30
30 -
 31
31 -
 32
32 -
 33
33 -
 34
34 -
 35
35 -
 36
36 -
37
-
38
-
39
-
40
-
41
-
42
-
43
-
44
-
45
-
46
-
47
-
48
-
49
-
50
-
51
-
52
-
53
-
54
-
55
-
56
-
57
-
58
-
59
-
60
-
61
-
62
-
63
-
64
-
65
-
66
-
67
-
68
-
69
-
70
-
71
 |
 |