| Section |
Page |
| Cover |
1 |
| Contents |
3 |
| Basic Printing Workflow |
17 |
| Printing procedure |
18 |
| Printing Options Using Rolls and Sheets |
18 |
| Turning the Printer On and Off |
19 |
| Loading and Printing on Rolls |
21 |
| Loading and Printing on Sheets |
24 |
| Printing in Windows |
25 |
| Printing from Mac OS X |
26 |
| Canceling print jobs |
28 |
| Canceling Print Jobs from the Control Panel |
28 |
| Canceling Print Jobs from Windows |
29 |
| Canceling Print Jobs from Mac OS X |
29 |
| Pausing Printing |
32 |
| Pausing Printing |
32 |
| Enhanced Printing Options |
33 |
| Choosing Paper for Printing |
34 |
| Choosing a Paper for Printing |
34 |
| Specifying Paper in the Printer Driver |
34 |
| Printing Photos and Office Documents |
35 |
| Printing Photos and Images |
35 |
| Printing Photos and Images (Windows) |
36 |
| Printing Photos and Images (Mac OS X) |
37 |
| Printing Office Documents |
40 |
| Printing Office Documents (Windows) |
41 |
| Printing Office Documents (Mac OS X) |
42 |
| Using PosterArtist to Compose Originals |
44 |
| Printing CAD Drawings |
47 |
| Printing CAD Drawings |
47 |
| Printing Line Drawings and Text |
47 |
| Printing Line Drawings and Text (Windows) |
48 |
| Printing Line Drawings and Text (Mac OS X) |
49 |
| Printing from AutoCAD |
52 |
| Specifying Colors and Printing CAD Drawings |
53 |
| Specifying Colors and Printing CAD Drawings (Windows) |
54 |
| HP-GL/2 Printing |
55 |
| Adjusting Images |
56 |
| Adjusting the Color in the Printer Driver |
56 |
| Fine-Tuning Colors of Photos and Images (Windows) |
58 |
| Fine-Tuning Colors of Photos and Images (Mac OS X) |
60 |
| Giving Priority to Particular Graphic Elements and Colors for Printing |
63 |
| Choosing the Document Type and Printing Conditions (Windows) |
65 |
| Choosing the Document Type and Printing Conditions (Mac OS X) |
67 |
| Printing enlargements or reductions |
70 |
| Resizing Originals to Match the Paper Size |
70 |
| Resizing Originals to Match the Paper Size (Windows) |
70 |
| Resizing Originals to Match the Paper Size (Mac OS X) |
72 |
| Resizing Originals to Fit the Roll Width |
74 |
| Resizing Originals to Fit the Roll Width (Windows) |
75 |
| Resizing Originals to Fit the Roll Width (Mac OS X) |
77 |
| Resizing Originals by Entering a Scaling Value |
80 |
| Resizing Originals by Entering a Scaling Value (Windows) |
80 |
| Resizing Originals by Entering a Scaling Value (Mac OS X) |
82 |
| Printing at full size |
86 |
| Printing on Oversized Paper |
86 |
| Printing at Full Size (Windows) |
87 |
| Printing at Full Size (Mac OS X) |
88 |
| Borderless Printing at Actual Size |
90 |
| Borderless Printing at Actual Size (Windows) |
92 |
| Borderless Printing at Actual Size (Mac OS X) |
94 |
| Borderless Printing |
97 |
| Borderless Printing on Paper of Equivalent Size |
97 |
| Borderless Printing by Resizing Originals to Match the Paper Size (Windows) |
98 |
| Borderless Printing by Resizing Originals to Match the Paper Size (Mac OS X) |
100 |
| Borderless Printing by Resizing Originals to Fit the Roll Width |
103 |
| Borderless Printing by Resizing Originals to Fit the Roll Width (Windows) |
104 |
| Borderless Printing by Resizing Originals to Fit the Roll Width (Mac OS X) |
106 |
| Printing banners or at other non-standard sizes |
110 |
| Printing Vertical or Horizontal Banners (Large-Format Printing) |
110 |
| Printing Vertical or Horizontal Banners (Large-Format Printing; Windows) |
111 |
| Printing Vertical or Horizontal Banners (Large-Format Printing; Mac OS X) |
115 |
| Printing on Non-Standard Paper Sizes |
118 |
| Printing on Non-Standard Paper Sizes (Windows) |
118 |
| Printing on Non-Standard Paper Sizes (Mac OS X) |
122 |
| Tiling and multiple pages per sheet |
125 |
| Printing Multiple Originals Next to Each Other |
125 |
| Printing Multiple Originals Next to Each Other (Windows) |
126 |
| Printing Multiple Originals Next to Each Other (Mac OS X) |
128 |
| Printing Multiple Pages Continuously |
129 |
| Printing Multiple Pages Continuously (Windows) |
129 |
| Printing Multiple Pages Continuously (Mac OS X) |
131 |
| Printing Multiple Pages Per Sheet |
133 |
| Printing Multiple Pages Per Sheet (Windows) |
133 |
| Printing Multiple Pages Per Sheet (Mac OS X) |
135 |
| Printing Posters in Sections |
138 |
| Printing Large Posters (Windows) |
139 |
| Centering originals |
142 |
| Printing Originals Centered on Rolls |
142 |
| Printing Originals Centered on Rolls (Windows) |
142 |
| Printing Originals Centered on Rolls (Mac OS X) |
144 |
| Printing Originals Centered on Sheets |
147 |
| Printing Originals Centered on Sheets (Windows) |
147 |
| Printing Originals Centered on Sheets (Mac OS X) |
149 |
| Conserving roll paper |
152 |
| Conserving Roll Paper by Rotating Originals 90 Degrees |
152 |
| Conserving Roll Paper by Rotating Originals 90 Degrees (Windows) |
152 |
| Conserving Roll Paper by Rotating Originals 90 Degrees (Mac OS X) |
154 |
| Conserving Roll Paper by Printing Originals Without Top and Bottom Margins |
156 |
| Conserving Roll Paper by Printing Originals Without Top and Bottom Margins (Windows) |
157 |
| Conserving Roll Paper by Printing Originals Without Top and Bottom Margins (Mac OS X) |
158 |
| Checking Images Before Printing |
162 |
| Checking the Layout in a Preview Before Printing |
162 |
| Other useful settings |
163 |
| Printing With Watermarks |
163 |
| Printing with Watermarks— COPY, FILE COPY, and so on (Windows) |
164 |
| Making the Original Orientation Match the Paper Orientation |
166 |
| Making the Original Orientation Match the Paper Orientation (Windows) |
166 |
| Making the Original Orientation Match the Paper Orientation (Mac OS X) |
168 |
| Using Favorites |
170 |
| Cutting Roll Paper After Printing |
171 |
| Cutting Roll Paper After Printing (Windows) |
171 |
| Cutting Roll Paper After Printing (Mac OS X) |
172 |
| Windows Software |
175 |
| Printer Driver |
176 |
| Printer Driver Settings |
176 |
| Specifying Paper in the Printer Driver |
178 |
| Confirming Print Settings |
179 |
| Checking the Layout in a Preview Before Printing |
180 |
| Using Favorites |
181 |
| Accessing the Printer Driver Dialog Box from Applications |
183 |
| Accessing the Printer Driver Dialog Box from the Operating System Menu |
184 |
| Main Sheet |
186 |
| Paper Information on Printer Dialog Box |
189 |
| Paper Detailed Settings Dialog Box |
189 |
| View Settings Dialog Box for the Printing Application |
190 |
| Color Adjustment Sheet: Color |
191 |
| Object Adjustment dialog box: Color |
192 |
| Matching Sheet |
192 |
| Color Adjustment Sheet: Monochrome |
194 |
| Object Adjustment dialog box: Monochrome |
195 |
| Page Setup Sheet |
196 |
| Paper Size Options Dialog Box |
198 |
| Layout Sheet |
199 |
| Page Options Dialog Box |
201 |
| Special Settings Dialog Box |
202 |
| Favorites Sheet |
203 |
| Utility Sheet |
204 |
| Support Sheet |
205 |
| Settings Summaries Dialog Box |
206 |
| Device Settings Sheet |
206 |
| Preview |
208 |
| The Features of Preview |
208 |
| Starting Preview |
208 |
| Preview Main Window |
209 |
| Dialog Area |
211 |
| Enlarge/Reduce the screen display |
212 |
| Moving a Page |
212 |
| Using the ruler |
212 |
| Priority setting for rotating 90 degrees |
213 |
| Printing with Selecting the Layout |
214 |
| Print on the Center |
216 |
| Not Print Spaces at the Top/Bottom |
217 |
| Free Layout |
218 |
| The Features of Free Layout |
218 |
| Starting Free Layout |
219 |
| Free Layout Main Window |
220 |
| Detailed Settings |
221 |
| Preferences Dialog Box |
222 |
| Page Options Dialog Box |
223 |
| Zoom Dialog Box |
224 |
| Format Dialog Box |
224 |
| Laying out a Multiple-File Document on One Page |
226 |
| Laying out a Document Created with Multiple Application Programs on One Page |
228 |
| Selecting an Object |
231 |
| Changing the Object Size |
232 |
| Moving an Object |
233 |
| Rotating an Object |
233 |
| Laying out Objects Automatically |
233 |
| Aligning Objects |
234 |
| Changing the Object Overlapping Order |
235 |
| Pasting a Copied or Cut Object |
237 |
| Folded Duplex Window |
237 |
| Finished Size Settings Dialog Box |
238 |
| Binding Settings Dialog Box |
239 |
| Prints using Folded Duplex |
240 |
| Color imageRUNNER Enlargement Copy |
241 |
| The Features of Color imageRUNNER Enlargement Copy |
241 |
| Starting Color imageRUNNER Enlargement Copy |
241 |
| Color imageRUNNER Enlargement Copy Dialog Box |
242 |
| Hot Folder |
243 |
| Creating a New Hot Folder |
244 |
| Specifying an Existing Shared Folder as a Hot Folder |
247 |
| Setting the Print Parameters |
250 |
| Printing Enlargements of Scanned Originals from a Color imageRUNNER |
250 |
| Print Plug-In for Office |
252 |
| Print Plug-In for Office features |
252 |
| Steps to install |
253 |
| Steps to uninstall |
255 |
| When Print Plug-In for Office is not displayed |
256 |
| To start from Microsoft Word |
260 |
| Print Matching Roll Width (Word) |
261 |
| Borderless Printing (Word) |
263 |
| Multi-Page Printing (Word) |
266 |
| Register the settings (Word) |
267 |
| Print Using Registered Settings (Word) |
268 |
| Portrait Orientation / Landscape Orientation (Word) |
270 |
| To start from Microsoft PowerPoint |
271 |
| Print Matching Roll Width (PowerPoint) |
273 |
| Borderless Printing (PowerPoint) |
275 |
| Multi-Page Printing (PowerPoint) |
278 |
| Register the settings (PowerPoint) |
279 |
| Print Using Registered Settings (PowerPoint) |
280 |
| Portrait Orientation / Landscape Orientation (PowerPoint) |
282 |
| To start from Microsoft Excel |
283 |
| Print Entire Sheet (Excel) |
285 |
| Print Selected Area (Excel) |
287 |
| Configuring Binding (Excel) |
290 |
| Configuring Special Settings |
291 |
| Status Monitor |
293 |
| The Features of imagePROGRAF Status Monitor |
293 |
| Job Management Using imagePROGRAF Status Monitor |
294 |
| Accounting |
295 |
| Accounting Manager |
295 |
| Launching the Accounting Manager |
295 |
| Accounting Manager Main Window |
296 |
| Job List Area |
298 |
| Accounting Manager Basic Procedures |
299 |
| Configuring Unit Costs in Accounting Manager |
299 |
| Setting the Unit Cost for Ink |
300 |
| Setting the Unit Cost for Paper |
301 |
| Setting the Unit Cost for Items Other Than Ink and Paper |
302 |
| Configuring Units and Display Settings in Accounting Manager |
303 |
| Automatically Acquiring Print Job Logs at Regular Intervals |
303 |
| Canceling Regular Print Job Log Acquisition |
304 |
| Switching Between Displaying Jobs on Printer and Regularly Acquired Jobs |
304 |
| Exporting Print Job Data as a CSV File |
304 |
| Showing Job Properties |
305 |
| Showing, Saving and Loading Selected Unit Cost Data |
305 |
| Showing the Total Amount of Ink and Paper Consumed |
305 |
| Device Setup Utility |
306 |
| imagePROGRAF Device Setup Utility |
306 |
| Installing imagePROGRAF Device Setup Utility |
306 |
| Configuring the IP Address Using imagePROGRAF Device Setup Utility |
306 |
| Media Configuration Tool |
309 |
| The Features of Media Configuration Tool |
309 |
| Installation Procedures |
309 |
| Starting the Media Configuration Tool |
311 |
| Media Configuration Tool Main Window |
312 |
| Editing Media Type Information |
312 |
| Adding Media Types |
313 |
| Changing Media Names |
315 |
| Deleting Media Types You Have Added |
316 |
| Switching Media Types Display Show/Hide |
318 |
| Changing the Display Order of Media Types |
319 |
| Updating Media Types |
320 |
| Mac OS X Software |
323 |
| Printer Driver |
324 |
| Printer Driver Settings |
324 |
| Specifying Paper in the Printer Driver |
325 |
| Confirming Print Settings |
327 |
| Checking the Layout in a Preview Before Printing |
328 |
| Using Favorites |
329 |
| Accessing the Printer Driver Dialog Box from Applications |
329 |
| Main Pane |
330 |
| Paper Information on Printer Dialog Box |
333 |
| Paper Detailed Settings Dialog Box |
333 |
| View settings Dialog Box for the Printing Application |
334 |
| Matching pane |
335 |
| Color Settings Pane: Color |
337 |
| Object Adjustment dialog box: Color |
338 |
| Color Settings Pane: Monochrome |
339 |
| Object Adjustment dialog box: Monochrome |
340 |
| Page Setup Pane |
340 |
| Utility Pane |
342 |
| Additional Settings Pane |
343 |
| Support Pane |
343 |
| Preview |
344 |
| The Features of Preview |
344 |
| Starting Preview |
344 |
| Preview Main Window |
346 |
| Paper Settings Panel |
349 |
| Easy Settings |
351 |
| Advanced Settings |
352 |
| Output Settings Panel |
354 |
| Color Settings Panel |
356 |
| Color Adjustment |
357 |
| Matching |
359 |
| Driver Matching Mode |
361 |
| ICC Matching Mode |
362 |
| ColorSync |
363 |
| Preferences Dialog Box |
363 |
| Zoom Dialog Box |
364 |
| Go to Page Dialog Box |
364 |
| Print with No Borders |
364 |
| Print on the Center |
365 |
| Not Print Spaces at the Top/Bottom |
365 |
| Print Page Rotated 90 Degrees |
366 |
| Display with Fitting to the Width of the Paper |
367 |
| Display with All |
367 |
| Display with Actual Size |
367 |
| Moving a Page |
368 |
| Free Layout |
369 |
| The Features of Free Layout |
369 |
| Starting Free Layout |
369 |
| Free Layout Main Window |
371 |
| Paper Settings Panel |
373 |
| Easy Settings |
375 |
| Advanced Settings |
376 |
| Color Settings Panel |
378 |
| Color Adjustment |
379 |
| Matching |
381 |
| Driver Matching Mode |
383 |
| ICC Matching Mode |
384 |
| ColorSync |
385 |
| Preferences Dialog Box |
386 |
| Page Setup Dialog Box |
387 |
| Zoom Dialog Box |
388 |
| Format Dialog Box |
388 |
| Laying out a Multiple-File Document on One Page |
389 |
| Laying out a Document Created with Multiple Application Programs on One Page |
389 |
| Selecting an Object |
390 |
| Changing the Object Size |
390 |
| Moving an Object |
391 |
| Rotating an Object |
391 |
| Laying out Objects Automatically |
392 |
| Aligning Objects |
392 |
| Changing the Object Overlapping Order |
394 |
| Pasting a Copied or Cut Object |
395 |
| Color imageRUNNER Enlargement Copy |
396 |
| The Features of Color imageRUNNER Enlargement Copy |
396 |
| Starting Color imageRUNNER Enlargement Copy |
397 |
| Color imageRUNNER Enlargement Copy Dialog Box |
398 |
| Hot Folder |
398 |
| Creating a New Hot Folder |
399 |
| Editing a Hot Folder (Setting Print Conditions) |
400 |
| Deleting a Hot Folder |
403 |
| Setting the Print Parameters |
403 |
| Paper Settings Panel |
404 |
| Easy Settings |
405 |
| Advanced Settings |
406 |
| Output Settings Panel |
407 |
| Color Settings Panel |
409 |
| Driver Matching Mode |
410 |
| ICC Matching Mode |
411 |
| ColorSync |
412 |
| Printing Enlargements of Scanned Originals from a Color imageRUNNER |
412 |
| Printmonitor |
414 |
| The Features of imagePROGRAF Printmonitor |
414 |
| Job Management Using imagePROGRAF Printmonitor |
415 |
| Media Configuration Tool |
416 |
| The Features of Media Configuration Tool |
416 |
| Procedures for Installing |
416 |
| Procedures for Uninstalling |
418 |
| Starting the Media Configuration Tool |
421 |
| Media Configuration Tool main window |
422 |
| Editing Media Type Information |
422 |
| Adding Media Types |
423 |
| Changing Media Names |
425 |
| Deleting Media Types You Have Added |
426 |
| Switching Media Types Display Show/Hide |
427 |
| Changing the Display Order of Media Types |
429 |
| Updating Media Types |
430 |
| Handling Paper |
433 |
| Paper |
434 |
| Types of Paper |
434 |
| Paper Sizes |
434 |
| Displaying the Paper Reference Guide |
436 |
| Updating paper information |
438 |
| Handling rolls |
439 |
| Attaching the Roll Holder to Rolls |
439 |
| Loading Rolls in the Printer |
442 |
| Changing the Type of Paper |
445 |
| Specifying the Paper Length |
447 |
| Removing the Roll from the Printer |
447 |
| Removing the Roll Holder from Rolls |
450 |
| Feeding Roll Paper Manually |
451 |
| Keeping Track of the Amount of Roll Paper Left |
452 |
| Specifying the Ink Drying Time for Rolls |
452 |
| Specifying the Cutting Method for Rolls |
454 |
| Cutting the Leading Edge of Roll Paper Automatically |
458 |
| Reducing Dust from Cutting Rolls |
460 |
| Handling sheets |
461 |
| Loading Sheets in the Printer |
461 |
| Printing From a Desired Starting Point |
463 |
| Removing Sheets |
466 |
| Output Stacker |
468 |
| Using the Output Stacker |
468 |
| Control Panel |
473 |
| Operations and Display Screen |
474 |
| Control Panel |
474 |
| Control Panel Display |
476 |
| How to View Instructions With Navigate |
479 |
| Checking Instructions During Printer Operations |
480 |
| Printer Menu |
482 |
| Printer Menu Operations |
482 |
| Menu Operations |
483 |
| Menu Structure |
486 |
| Menu Settings |
495 |
| Status Print |
505 |
| Printing Interface Setting Reports |
507 |
| Printer Parts |
511 |
| Printer parts |
512 |
| Front |
512 |
| Side |
514 |
| Top Cover (Inside) |
515 |
| Roll Cover (Inside) |
516 |
| Carriage |
516 |
| Ink Tank Cover (Inside) |
517 |
| Stand |
518 |
| Optional accessories |
519 |
| Roll Holder Set |
519 |
| Network Setting |
521 |
| Network Environment |
522 |
| Network Environment |
522 |
| Using RemoteUI |
525 |
| Using RemoteUI |
525 |
| Initial Settings |
527 |
| Configuring the IP Address on the Printer |
527 |
| Configuring the IP Address Using the Printer Control Panel |
527 |
| Configuring the IP Address Using ARP and PING Commands |
528 |
| Configuring TCP/IPv6 Network Settings |
530 |
| Configuring the Printer Driver Destination (Windows) |
530 |
| Configuring the Printer Driver Destination (Mac OS X) |
531 |
| Configuring the Printer's TCP/IP Network Settings With RemoteUI |
531 |
| NetWare Settings |
534 |
| Configuring NetWare Network Settings |
534 |
| Specifying the Printer's Frame Type |
534 |
| Specifying NetWare Print Services |
537 |
| Configuring the Printer's NetWare Network Settings With RemoteUI |
539 |
| Mac OS X Settings |
542 |
| Configuring the Destination in TCP/IP Networks |
542 |
| Configuring the Destination for Bonjour Network |
543 |
| Configuring the Destination for AppleTalk Networks |
545 |
| Configuring the Printer's AppleTalk Network Settings |
546 |
| Other Settings |
548 |
| Specifying Printer-Related Information |
548 |
| Configuring the Communication Mode Manually |
549 |
| Email Notification When Printing is Finished or Errors Occur |
550 |
| Initializing the Network Settings |
550 |
| Adjustments for Better Print Quality |
551 |
| Adjusting the Printhead |
552 |
| Adjusting the Printhead |
552 |
| Automatic Adjustment to Straighten Lines and Colors (Head Posi. Adj.) |
552 |
| Manual Adjustment to Straighten Lines and Colors (Head Posi. Adj.) |
553 |
| Adjusting Line Misalignment (Head Inc. Adj.) |
555 |
| Troubleshooting Paper Abrasion and Blurry Images (Head Height) |
558 |
| Adjusting the feed amount |
559 |
| Adjusting the Feed Amount |
559 |
| Selecting a Feed Amount Adjustment Method (Feed Priority) |
559 |
| Automatic Banding Adjustment (Adj. Quality) |
560 |
| Manual Banding Adjustment (Adj. Quality) |
561 |
| Fine-Tuning the Paper Feed Amount (Adj. Fine Feed) |
563 |
| Adjusting Line Length (Adjust Length) |
564 |
| Adjusting the Vacuum Strength (VacuumStrngth) |
565 |
| Maintenance and Consumables |
567 |
| Ink Tanks |
568 |
| Ink Tanks |
568 |
| Replacing Ink Tanks |
568 |
| Checking Ink Tank Levels |
572 |
| When to Replace Ink Tanks |
573 |
| Printheads |
575 |
| Printhead |
575 |
| Checking for Nozzle Clogging |
575 |
| Cleaning the Printhead |
576 |
| Replacing the Printhead |
577 |
| Maintenance Cartridge |
584 |
| Maintenance Cartridge |
584 |
| Replacing the Maintenance Cartridge |
584 |
| Checking the Remaining Maintenance Cartridge Capacity |
588 |
| When to Replace the Maintenance Cartridge |
588 |
| Cleaning the Printer |
590 |
| Cleaning the Printer Exterior |
590 |
| Cleaning Inside the Top Cover |
590 |
| Other Maintenance |
594 |
| Preparing to Transfer the Printer |
594 |
| Updating the Firmware |
597 |
| Consumables |
598 |
| Troubleshooting |
599 |
| Frequently Asked Questions |
600 |
| Frequently Asked Questions |
600 |
| Problems Regarding Paper |
602 |
| Clearing Jammed Paper (Paper Feed Slot) |
602 |
| Clearing Jammed Roll Paper |
604 |
| Clearing a Jammed Sheet |
607 |
| Roll paper cannot be inserted into the paper feed slot |
609 |
| Cannot load sheets |
609 |
| Paper is not cut neatly |
609 |
| Paper is not cut |
609 |
| Depression on the leading edge is left |
610 |
| The size of clear film cannot be detected |
610 |
| Roll Paper is Continuously Ejected |
610 |
| Printing does not start |
611 |
| The Data lamp on the Control Panel does not light up |
611 |
| The printer does not respond even if print jobs are sent |
611 |
| Ink Filling.. is displayed |
611 |
| The display screen indicates Agitating |
611 |
| The printer stops during a print job |
612 |
| An error message is shown on the Display Screen |
612 |
| The printer ejects blank, unprinted paper |
612 |
| Problems with the printing quality |
613 |
| Printing is faint |
613 |
| Paper rubs against the Printhead |
613 |
| The edges of the paper are dirty |
614 |
| The surface of the paper is dirty |
615 |
| The back side of the paper is dirty |
615 |
| Printed colors are inaccurate |
615 |
| Banding in different colors occurs |
616 |
| Colors in printed images are uneven |
616 |
| Image edges are blurred or white banding occurs |
617 |
| The contrast becomes uneven during printing |
617 |
| The length of printed images is inaccurate in the feeding direction |
618 |
| Images are printed crooked |
618 |
| Documents are printed in monochrome |
618 |
| Line thickness is not uniform |
618 |
| Lines are misaligned |
619 |
| Cannot print over a network |
620 |
| Cannot connect the printer to the network |
620 |
| Cannot print over a TCP/IP network |
620 |
| Cannot print over a NetWare network |
620 |
| Cannot print over AppleTalk or Bonjour networks |
621 |
| Installation problems |
622 |
| The computer does not recognize the printer |
622 |
| Removing Installed Printer Drivers |
622 |
| HP-GL/2 problems |
624 |
| With HP-GL/2, printing is misaligned |
624 |
| Lines or images are missing in printed HP-GL/2 jobs. |
624 |
| Lines are printed too thick or thin in HP-GL/2 print jobs |
624 |
| HP-GL/2 jobs are printed in monochrome (or color) |
624 |
| Printed colors of lines are inaccurate during HP-GL/2 printing |
624 |
| HP-GL/2 jobs are printed 6 mm larger than specified |
624 |
| HP-GL/2 jobs are printed at maximum size, even if a standard size is specified |
625 |
| HP-GL/2 printing takes a long time |
625 |
| Replotting with HP-GL/2 jobs is not possible. |
625 |
| The printer stops when printing a HP-GL/2 job (the carriage stops moving) |
625 |
| Other problems |
626 |
| The printer does not go on |
626 |
| If the Printer Makes a Strange Sound |
626 |
| Messages advising to check the maintenance cartridge are not cleared |
626 |
| The printer consumes a lot of ink |
627 |
| Ink Level Detection |
627 |
| Error Message |
631 |
| Error Messages |
632 |
| Messages regarding paper |
634 |
| MediaType Mismatch |
634 |
| The paper is too small. |
635 |
| The paper is too small. |
635 |
| PaprWidth Mismatch |
636 |
| Paper size not detected. |
636 |
| Insufficient paper for job |
637 |
| This paper cannot be used. |
637 |
| Roll printing is selected. |
637 |
| Roll printing is selected, but sheets are loaded. |
638 |
| The roll is empty. |
638 |
| Sheet printing is selected. |
638 |
| Regular printing is selected, but a roll is loaded. |
639 |
| Paper jam |
639 |
| Paper is crooked. |
639 |
| Paper not aligned with right guide. |
640 |
| Cannot detect papr |
640 |
| Paper cutting failed. |
640 |
| End of paper feed. |
641 |
| Rel lever is in wrong position. |
641 |
| Borderless printng not possible. |
641 |
| Paper position not suitable for borderless printing. |
642 |
| Roll paper is not securely in contact with roll holder. |
642 |
| Messages regarding ink |
643 |
| Ink insufficient. |
643 |
| No ink left. |
643 |
| Remaining level of the ink cannot be correctly detected. |
643 |
| Unable to detect ink level correctly. |
643 |
| Close Ink Tank Cover |
643 |
| Ink tank is empty. |
644 |
| Not much ink is left. |
644 |
| No ink tank loaded. |
644 |
| Wrong ink tank. |
644 |
| Do not pull out ink tank. |
644 |
| Messages regarding printing or adjustment |
645 |
| Cannot adjust paper feed. |
645 |
| Check printed document. |
645 |
| Messages regarding printheads |
646 |
| Cannot adjust printhead. |
646 |
| Wrong printhead. |
646 |
| Printhead error |
646 |
| No printhead |
646 |
| Execute printhead cleaning. |
646 |
| Messages regarding the maintenance cartridge |
648 |
| Insert the maintenance cartridge. |
648 |
| Wrong maintenance cartridge. |
648 |
| Maint. cart. The level is low |
648 |
| No Maintenance Cartridge capacity. |
648 |
| Maintenance cartridge full. |
648 |
| Maintenance cartridge problem. |
648 |
| Messages regarding HP-GL/2 |
649 |
| This type of paper is not compatible with HP-GL/2. |
649 |
| GL2: Wxxxx The memory is full. (xxxx is 0501, 0903, or 0904) |
649 |
| GL2: W0502 The parameter is out of range. |
649 |
| GL2: W0504 This command is not supported. |
649 |
| Other Messages |
650 |
| GARO Wxxxx (x represents a number) |
650 |
| ERROR Exxx-xxxx (x represents a letter or number) |
650 |
| Hardware error. xxxxxxxx-xxxx (x represents a letter or number) |
650 |
| Top cover is open. |
650 |
| Prepare for parts replacement. |
651 |
| Parts replacement time has passed. |
651 |
| Unknown file. |
651 |
| Multi-sensor error |
651 |
| Error in cutter position. |
651 |
| Specifications |
653 |
| Printer Specifications |
654 |
| Specifications |
654 |
| Print Area |
656 |
| Appendix |
659 |
| Safety Precautions |
660 |
| Safety Precautions |
660 |
| Legal Notices |
662 |
| Manuals for this printer |
664 |
| Manuals for this printer |
664 |
| About This User Manual |
664 |
| How to use this manual |
666 |
| Searching Topics |
666 |
| HTML Version of the Manual for Printing |
667 |
| Disposal of the product |
673 |
| WEEE Directive |
673 |
 1
1 525
525 526
526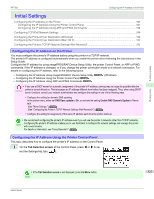 527
527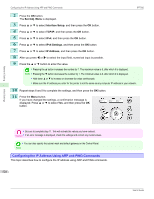 528
528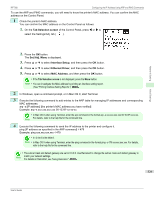 529
529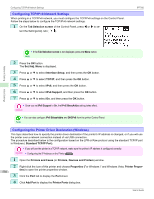 530
530 531
531 532
532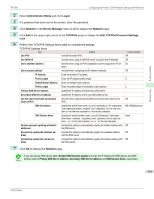 533
533 534
534 535
535