Cisco SGE2000 Reference Guide - Page 22
Building Automatically-Con d Stacks, Building a New Stack, Adding Units to a Running Stack - console
 |
View all Cisco SGE2000 manuals
Add to My Manuals
Save this manual to your list of manuals |
Page 22 highlights
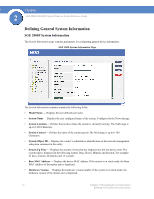
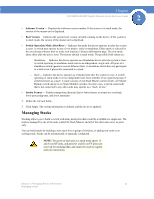
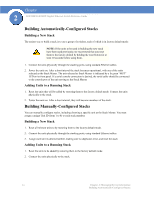
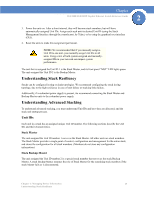
Chapter 2 SGE2000/SGE2000P Gigabit Ethernet Switch Reference Guide Building Automatically-Configured Stacks Building a New Stack The easiest way to build a stack is to use a group of switches, each of which is in factory default mode: NOTE: If the units to be used in building the new stack have been used previously, we recommend that you reset them to the factory default by holding the reset button for at least 10 seconds before using them. 1. Connect the units physically through the stacking ports, using standard Ethernet cables. 2. Power the units on. After a short interval the stack becomes operational, with one of the units selected as the Stack Master. The unit selected as Stack Master is indicated by a lit green "MST" LED on its front panel. If a serial console connection is desired, the serial cable should be connected to the console port of the unit serving as the Stack Master. Adding Units to a Running Stack 1. Reset the units that will be added by restoring them to the factory default mode. Connect the units physically to the stack. 2. Power the units on. After a short interval, they will become members of the stack. Building Manually-Configured Stacks You can manually configure stacks, including choosing a specific unit as the Stack Master. You must assign a unique Unit ID (from 1 to 8) to each stack member. Building a New Stack 1. Reset all relevant units to by restoring them to the factory default mode. 2. Connect the units physically through the stacking ports, using standard Ethernet cables. 3. Assign each unit its desired number, making sure no duplicates exist, and reset the stack. Adding Units to a Running Stack 1. Reset the units to be added by restoring them to the factory default mode. 2. Connect the units physically to the stack. 14 Chapter 2: Managing Device Information Building Automatically-Configured Stacks
-
 1
1 -
2
-
3
-
4
-
5
-
6
-
7
-
8
-
9
-
10
-
11
-
12
-
13
-
14
-
15
-
16
-
 17
17 -
 18
18 -
 19
19 -
 20
20 -
 21
21 -
 22
22 -
 23
23 -
 24
24 -
 25
25 -
 26
26 -
 27
27 -
28
-
29
-
30
-
31
-
32
-
33
-
34
-
35
-
36
-
37
-
38
-
39
-
40
-
41
-
42
-
43
-
44
-
45
-
46
-
47
-
48
-
49
-
50
-
51
-
52
-
53
-
54
-
55
-
56
-
57
-
58
-
59
-
60
-
61
-
62
-
63
-
64
-
65
-
66
-
67
-
68
-
69
-
70
-
71
-
72
-
73
-
74
-
75
-
76
-
77
-
78
-
79
-
80
-
81
-
82
-
83
-
84
-
85
-
86
-
87
-
88
-
89
-
90
-
91
-
92
-
93
-
94
-
95
-
96
-
97
-
98
-
99
-
100
-
101
-
102
-
103
-
104
-
105
-
106
-
107
-
108
-
109
-
110
-
111
-
112
-
113
-
114
-
115
-
116
-
117
-
118
-
119
-
120
-
121
-
122
-
123
-
124
-
125
-
126
-
127
-
128
-
129
-
130
-
131
-
132
-
133
-
134
-
135
-
136
-
137
-
138
-
139
-
140
-
141
-
142
-
143
-
144
-
145
-
146
-
147
-
148
-
149
-
150
-
151
-
152
-
153
-
154
-
155
-
156
-
157
-
158
-
159
-
160
-
161
-
162
-
163
-
164
-
165
-
166
-
167
-
168
-
169
-
170
-
171
-
172
-
173
-
174
-
175
-
176
-
177
-
178
-
179
-
180
-
181
-
182
-
183
-
184
-
185
-
186
-
187
-
188
-
189
-
190
-
191
-
192
-
193
-
194
-
195
-
196
-
197
-
198
-
199
-
200
-
201
-
202
-
203
-
204
-
205
-
206
-
207
-
208
-
209
-
210
-
211
-
212
-
213
-
214
-
215
-
216
-
217
-
218
-
219
-
220
-
221
-
222
-
223
-
224
-
225
-
226
-
227
-
228
-
229
-
230
-
231
-
232
-
233
-
234
-
235
-
236
-
237
-
238
-
239
-
240
-
241
-
242
-
243
-
244
-
245
-
246
-
247
-
248
-
249
-
250
-
251
-
252
-
253
-
254
-
255
-
256
-
257
-
258
-
259
-
260
-
261
-
262
-
263
-
264
-
265
-
266
-
267
-
268
-
269
-
270
-
271
-
272
-
273
-
274
-
275
-
276
-
277
-
278
-
279
-
280
-
281
-
282
-
283
-
284
-
285
-
286
 |
 |