Cisco SGE2000 Reference Guide - Page 27
Configuring Units and Ports, Setting the Unit’s Operational Mode - command line
 |
View all Cisco SGE2000 manuals
Add to My Manuals
Save this manual to your list of manuals |
Page 27 highlights
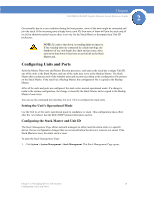
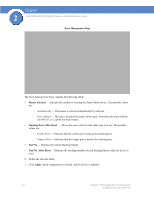
Chapter SGE2000/SGE2000P Gigabit Ethernet Switch Reference Guide 2 Occasionally, due to a race condition during the boot process, some of the units might be connected and join the stack. If the incoming units already have a unit ID, then none of them will join the stack and all are left in shutdown mode because there is no way for the Stack Master to determine their Unit ID preference. NOTE: If a unit is shut down, its stacking links are inactive. If the stacking units are connected in a chain topology, the shutdown of one unit breaks the chain and can cause other units to be shut down if they have no active link to the Stack Master unit. Configuring Units and Ports After the Master Discovery and Master Election processes, each unit in the stack has a unique Unit ID, one of the units is the Stack Master, and one of the units may serve as the Backup Master. The Stack Master then configures each of the member units and its ports according to the configuration file present on the Stack Master. If the stack has a Backup Master, the configuration file is copied to the Backup Master. After all the units and ports are configured, the stack enters normal operational mode. If a change is made to the system configuration, the change is stored by the Stack Master and is copied to the Backup Master if one exists. You can use the command-line interface (CLI) or GUI to configure the stack units. Setting the Unit's Operational Mode Use the GUI to set the unit's operational mode to standalone or stack. This configuration takes effect after the next reboot. See the SGE 2000P System Information section. Configuring the Stack Master and Unit ID The Stack Management Page allows network managers to either reset the entire stack or a specific device. Device configuration changes that are not saved before the device is reset are not saved. If the Stack Master is reset, the entire stack is reset. To open the Stack Management Page: 1. Click System > System Management > Stack Management. The Stack Management Page opens: Chapter 2: Managing Device Information 19 Configuring Units and Ports
-
 1
1 -
2
-
3
-
4
-
5
-
6
-
7
-
8
-
9
-
10
-
11
-
12
-
13
-
14
-
15
-
16
-
17
-
18
-
19
-
20
-
21
-
 22
22 -
 23
23 -
 24
24 -
 25
25 -
 26
26 -
 27
27 -
 28
28 -
 29
29 -
 30
30 -
 31
31 -
 32
32 -
33
-
34
-
35
-
36
-
37
-
38
-
39
-
40
-
41
-
42
-
43
-
44
-
45
-
46
-
47
-
48
-
49
-
50
-
51
-
52
-
53
-
54
-
55
-
56
-
57
-
58
-
59
-
60
-
61
-
62
-
63
-
64
-
65
-
66
-
67
-
68
-
69
-
70
-
71
-
72
-
73
-
74
-
75
-
76
-
77
-
78
-
79
-
80
-
81
-
82
-
83
-
84
-
85
-
86
-
87
-
88
-
89
-
90
-
91
-
92
-
93
-
94
-
95
-
96
-
97
-
98
-
99
-
100
-
101
-
102
-
103
-
104
-
105
-
106
-
107
-
108
-
109
-
110
-
111
-
112
-
113
-
114
-
115
-
116
-
117
-
118
-
119
-
120
-
121
-
122
-
123
-
124
-
125
-
126
-
127
-
128
-
129
-
130
-
131
-
132
-
133
-
134
-
135
-
136
-
137
-
138
-
139
-
140
-
141
-
142
-
143
-
144
-
145
-
146
-
147
-
148
-
149
-
150
-
151
-
152
-
153
-
154
-
155
-
156
-
157
-
158
-
159
-
160
-
161
-
162
-
163
-
164
-
165
-
166
-
167
-
168
-
169
-
170
-
171
-
172
-
173
-
174
-
175
-
176
-
177
-
178
-
179
-
180
-
181
-
182
-
183
-
184
-
185
-
186
-
187
-
188
-
189
-
190
-
191
-
192
-
193
-
194
-
195
-
196
-
197
-
198
-
199
-
200
-
201
-
202
-
203
-
204
-
205
-
206
-
207
-
208
-
209
-
210
-
211
-
212
-
213
-
214
-
215
-
216
-
217
-
218
-
219
-
220
-
221
-
222
-
223
-
224
-
225
-
226
-
227
-
228
-
229
-
230
-
231
-
232
-
233
-
234
-
235
-
236
-
237
-
238
-
239
-
240
-
241
-
242
-
243
-
244
-
245
-
246
-
247
-
248
-
249
-
250
-
251
-
252
-
253
-
254
-
255
-
256
-
257
-
258
-
259
-
260
-
261
-
262
-
263
-
264
-
265
-
266
-
267
-
268
-
269
-
270
-
271
-
272
-
273
-
274
-
275
-
276
-
277
-
278
-
279
-
280
-
281
-
282
-
283
-
284
-
285
-
286
 |
 |