Compaq 100B Maintenance and Service Guide - Page 32
Front Bezel,
 |
View all Compaq 100B manuals
Add to My Manuals
Save this manual to your list of manuals |
Page 32 highlights
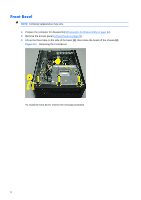
Front Bezel NOTE: Computer appearance may vary. 1. Prepare the computer for disassembly (Preparation for Disassembly on page 22). 2. Remove the access panel (Access Panel on page 23). 3. Lift up the three tabs on the side of the bezel (1), then rotate the bezel off the chassis (2). Figure 5-2 Removing the Front Bezel To install the front bezel, reverse the removal procedure. 24
-
 1
1 -
2
-
3
-
4
-
5
-
6
-
7
-
8
-
9
-
10
-
11
-
12
-
13
-
14
-
15
-
16
-
17
-
18
-
19
-
20
-
21
-
22
-
23
-
24
-
25
-
26
-
 27
27 -
 28
28 -
 29
29 -
 30
30 -
 31
31 -
 32
32 -
 33
33 -
 34
34 -
 35
35 -
 36
36 -
 37
37 -
38
-
39
-
40
-
41
-
42
-
43
-
44
-
45
-
46
-
47
-
48
-
49
-
50
-
51
-
52
-
53
-
54
-
55
-
56
-
57
-
58
-
59
-
60
-
61
-
62
-
63
-
64
-
65
-
66
-
67
-
68
-
69
-
70
-
71
-
72
-
73
-
74
-
75
-
76
-
77
-
78
-
79
-
80
-
81
-
82
-
83
-
84
-
85
-
86
-
87
-
88
-
89
-
90
-
91
-
92
-
93
-
94
-
95
-
96
-
97
-
98
-
99
-
100
-
101
-
102
-
103
-
104
 |
 |

24
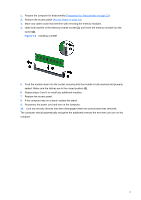
Front Bezel
NOTE:
Computer appearance may vary.
1.
Prepare the computer for disassembly (
Preparation for Disassembly on page 22
).
2.
Remove the access panel (
Access Panel on page 23
).
3.
Lift up the three tabs on the side of the bezel
(1)
, then rotate the bezel off the chassis
(2)
.
Figure 5-2
Removing the Front Bezel
To install the front bezel, reverse the removal procedure.