Craftsman 10872 Operation Manual - Page 22
Z_warning, Warning
 |
View all Craftsman 10872 manuals
Add to My Manuals
Save this manual to your list of manuals |
Page 22 highlights
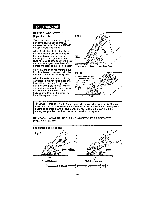
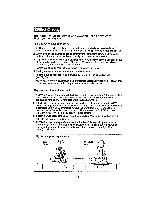
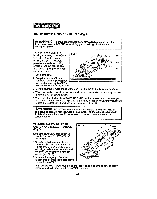
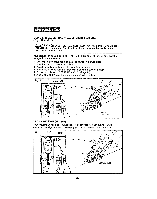
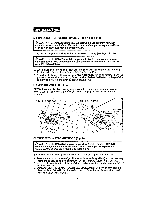
ADJUSTING THE 3-POSITION HANDLE (Fig. 8) Z_WARNING: To prevent personal Injury, ALWAYSdisconnect the plug from power source BEFORE assembling parts, making adjustments or i changing blades, Your saw has a handle/motor housing withsoft-grip that adjusts Fig, 8 3O° to 3 different cutting angles, 0°, 15°, and 30". This feature provides more efficient cuttlng 15o angles for vadous applications and added gripping comfort with 0o maximum control. 1, Unplug the saw. 2. Graspthe handle with one j handand pushthe swivel head lock and release button "IN" to release the handlefor adjustment. 3. Movethe handleforward or backward (see Fig. 8) to locate the 3 differentpositions. 4_Whanthe handlemovesinto1 of the 3 positionsthe release button willsnap outand the handlewilllockintoposition. 5.When adjusting the handle,ALWAYS BE SURE thatthe reteasebutton has snapped out and the handle Is locked in position.Ifthe handle st_llmoves forward or backward, repeat the processuntilthe handleIs locked securely in position. _WARNING: DO NOT operate the saw If the handle IS NOT LOCKED In position and can still move forward or backward. Failure to lock the handle In 1 of 3 cutting positions could cause loss of control of saw and result in serious Injury. TRIGGER SAFETY RELEASE SWITCH AND TRIGGER PADDLE (Fig. 9) Fig. 9 1. Plugthe saw'spowercordplug Intoa standard household 120V.60Hz AC only outlet° 2.To activate the tdggerpaddle and turn the saw "ON", place yourIndex and middle fingersintothe molded finger griptriggersafety release switch, and the othertwo fingerson the trigger paddle (see Fig. 9). 3_Squeeze the fingergrip "back" until it "clicks",then depress the trigger paddle to turn the saw "ON", 4, To STOP the saw,release your grip on the trigger paddle, and the finger grip safety release switchwtl!move back Intothe "OFF" position. 22
-
 1
1 -
2
-
3
-
4
-
5
-
6
-
7
-
8
-
9
-
10
-
11
-
12
-
13
-
14
-
15
-
16
-
 17
17 -
 18
18 -
 19
19 -
 20
20 -
 21
21 -
 22
22 -
 23
23 -
 24
24 -
 25
25 -
 26
26 -
 27
27 -
28
-
29
-
30
-
31
-
32
-
33
-
34
-
35
-
36
-
37
-
38
-
39
-
40
-
41
-
42
-
43
-
44
-
45
-
46
-
47
-
48
-
49
-
50
-
51
-
52
-
53
-
54
-
55
-
56
-
57
-
58
-
59
-
60
-
61
-
62
-
63
-
64
-
65
-
66
-
67
-
68
-
69
-
70
-
71
-
72
-
73
-
74
-
75
-
76
-
77
-
78
-
79
-
80
 |
 |
