Craftsman 10872 Operation Manual - Page 28
Installing
 |
View all Craftsman 10872 manuals
Add to My Manuals
Save this manual to your list of manuals |
Page 28 highlights
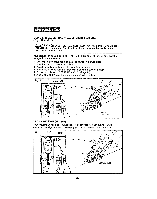
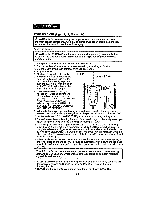
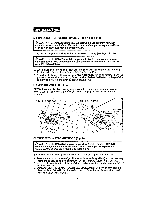
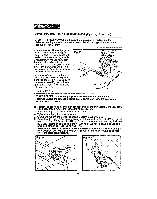
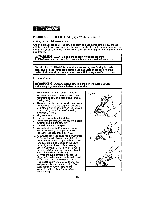
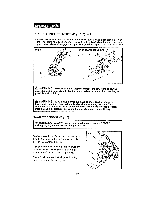
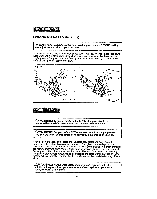
INSTALLINGANDUSINGTHE DGEGUIDE(Figs.15,16and 16a) z_WARNING: ALWAYSunplug saw before making any adjustments. I Failureto unplug the saw could result In accidental starting which can cause serious personal injury, ! Your saw comeswith an edge guide that is 7-fncheslong on the guide edge. It allows you to make accurate paratlet cuts when tdmmfng a workpiece. It attaches to the saw'sbase.. The arm of the edge guide Is stamped, on both sides, 0 to 7 inches in 1/4-Inchincrementsand 1 to 18 centimeters in 10-mm increments for easy adjustment of your cut, The edge guide can be used with the guide edge turned down to guide along the edge of a workplace for rip or cross cuts (see Ftgo16),or turned up to guide against a wal! for inside cuts (see Fig.16a), Fig. 15 1. Unplug the saw. /_ WAR NI NG: ALWAYSunplug saw before making any adjustments. I Failureto unplug the saw could result In accldental starting which can cause serious personal injury, I 2, Positionthe edge guide so the arm cans!]de Into the mounting slots at the front of the saw'sbase (see Fi-go15)a, nd loosen the retaining screw. 3. Adjust the edge guide to the desired length of cut. 4. Tighten the edge gulde retaining screw. 5, Clampand supportthe workplace securely before maktn.qyour cut, 6. Race the edgeguide firmly against the edge ofthe workplace(see Fig.16), or against a wall (sea Hg.16a). Doing thi-swill help give you a true cut without pinching the blade. 7. BE SURE that the guid!ngedge of the workpfece, or the wall, is stralght so you can produce a straight cut (see Fig°16 and 16a). 8. ALWAYSLETTHE BLADE REACH FULL SPEED, then carefuiIy guide the saw into the wort_pleceD. O NOT .blndthe blade in the cut. Push the saw forward at a speed where the blase is not larJonng. Fig. 16 28 ,,,III,IL,I ILL I LJlJ J !ILL J'J'J LL IL
-
 1
1 -
2
-
3
-
4
-
5
-
6
-
7
-
8
-
9
-
10
-
11
-
12
-
13
-
14
-
15
-
16
-
17
-
18
-
19
-
20
-
21
-
22
-
 23
23 -
 24
24 -
 25
25 -
 26
26 -
 27
27 -
 28
28 -
 29
29 -
 30
30 -
 31
31 -
 32
32 -
 33
33 -
34
-
35
-
36
-
37
-
38
-
39
-
40
-
41
-
42
-
43
-
44
-
45
-
46
-
47
-
48
-
49
-
50
-
51
-
52
-
53
-
54
-
55
-
56
-
57
-
58
-
59
-
60
-
61
-
62
-
63
-
64
-
65
-
66
-
67
-
68
-
69
-
70
-
71
-
72
-
73
-
74
-
75
-
76
-
77
-
78
-
79
-
80
 |
 |
