Craftsman 10872 Operation Manual - Page 26
ToHelpMaintainControl, ALWAYS, support, theworkplace, thecut°, ALWAYS
 |
View all Craftsman 10872 manuals
Add to My Manuals
Save this manual to your list of manuals |
Page 26 highlights
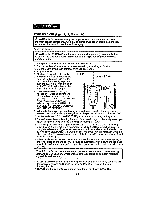
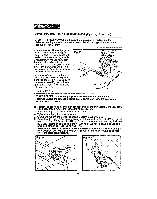
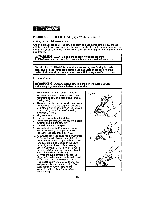
To HelpMaintainControl: 1. ALWAYsSupportht eworkplacneeatrhecut° 2. ALWAYsSupportht eworkplacsoethe cutwili be onyourright. 3, ALWAYSclampthe workplaceso it wtlinot move during the CUtrP, lace the workplace with the good side down_ NOTE:The good side of the workplece is the slde where appearance Is Important. ] ! 4, NEVER place the saw on the part of the workplace that willfall off whenthe cut Is made (see Fig 13s). 5, ALWAYS keep the cord away from the cutting area. ALWAYSplace the cord so it does not hang up on the workplece when making a cuL I ! trigger switch Immediately.Toavoid Injury unplug the saw and move the cordto I_WAR prevent It NfroINmGh:antfgtihnegcuopradghaainn.gsup on the workplaceduring a cut, release the I / J [_ Injury or death. IfUtshiengcothrde shaaws bwelethn adadmamagaegde,dhcaovredItcroeupldlacreesdublteIfnorseeruiosiunsg | the saw again. 6. When makinga cut, ALWAYSusesteady,evenpressure.Forcingthe saw causes roughcutsand coutdshortenthe lifeof the saw or cause Kickback. L_ CAUTION: This circular saw DOES NOT have the standard retractable lower blade guard found on standard circular saws. ON THIS saw the lower blade guard Is an Integral part of the saw's base and only encloses the blade ABOVE the saw's base. When the desired depth of cut Is set, the blade Is manually lowered (plunge action) below the lower blade guard and base assembly to make the cut, This Is done by releasing the blade guard release lever, After the cut Is made and the blade clears the workplece, the lower blade guard and base assembly will automatically "drop"down and the blade guard release lever will engage the upper blade guard and lock In position and the blade will be ABOVE the base enclosed by the upper and lower blade guard and base assemblies. _PLUCNAGUETAICOTNIO: N:(tFoawmeirliinagribzelaydoeutrosedlef wsiirtehdthdiespBthL)ABDEEFGOURAERUDSISNYGS!Th!EsMsaanwd...t.h..e....II....... 26
-
 1
1 -
2
-
3
-
4
-
5
-
6
-
7
-
8
-
9
-
10
-
11
-
12
-
13
-
14
-
15
-
16
-
17
-
18
-
19
-
20
-
 21
21 -
 22
22 -
 23
23 -
 24
24 -
 25
25 -
 26
26 -
 27
27 -
 28
28 -
 29
29 -
 30
30 -
 31
31 -
32
-
33
-
34
-
35
-
36
-
37
-
38
-
39
-
40
-
41
-
42
-
43
-
44
-
45
-
46
-
47
-
48
-
49
-
50
-
51
-
52
-
53
-
54
-
55
-
56
-
57
-
58
-
59
-
60
-
61
-
62
-
63
-
64
-
65
-
66
-
67
-
68
-
69
-
70
-
71
-
72
-
73
-
74
-
75
-
76
-
77
-
78
-
79
-
80
 |
 |