Craftsman 10872 Operation Manual - Page 27
Warning, I _warning
 |
View all Craftsman 10872 manuals
Add to My Manuals
Save this manual to your list of manuals |
Page 27 highlights
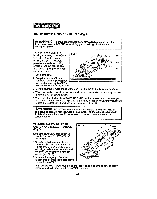
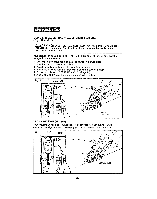
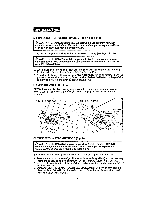
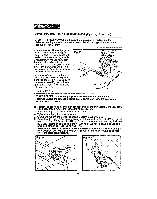
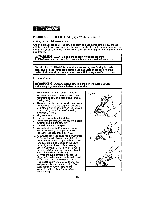
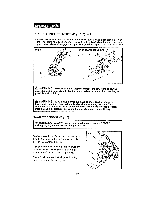
MAKINGCROSSCUTSANDRIPCUTS(Figs.14 and 14a) maintain proper control of saw. Failureto clamp and support workpeceand loss l of cWonAtrRoNl oINf sGa:w cAoLuWldAreYsSucltlaInmspearniodussuInpjpuorryt.workplece securely.ALWAYS 1. ALWAYS useyour saw withyour hands positionedcorrectly(see Figs°14, 14a)_ safer and easier. Loss of control of the saw could cause an accident resulting In I p_oWssAlbRlNe sINerGio:us InAjLuWryA. YSmaintain propercontrol of the saw to make sawing 2. When making cross or rip cuts, align your line of cut with the center of the '_/" notch located on the front of the saw's base (see Pg. 24, Fig. 1 t). 3. Since the thickness of blades varies, MAKE ATRIAL CUT In scrap matertal along the guideline to determine how much, if any, you should offset the blade from the guideline to allow for the keff of the blade to get an accurate cut. MAKING RIP CUTS (Fig. 14a) ALWAYS use a gulde when making longor wide rip cutswith yoursawoYoucan use either a straightedge (sold separately), or use the edge guide that ts includedwith your saw. Fig. 14a Rip Cut CUTTING WITH A STRAIGHT EDGE (Fig, 14) I maintain proper controlof saw. Failureto clamp and support workplace and I _loWsAs oRfNcIoNnGtr:ol of sAaLwWcAouYlSdcrleasmupltaIndsesruiopupsoritnwjuorryk. plece securely.ALWAYS II You can make an efficient rip guide by clampinga straight edge to your workpleceo t. Mark the position of the stdaedge of the saw's base (cutting platform) and then securely clamp the straight edge (sold separately) on the mark and parallelto the cut line. 2. As you cut, keep the edge of the saw'sbase flush against the straight edge and flat on the workplace. 3. ALWAYS LETTHE BLADE REACH FULL SPEED, then carefullyguide the saw into the workp]eceoDO NOT bind the blade in the cut. Pushthe saw forward at a speed where the blade Is not labortng_ 27
-
 1
1 -
2
-
3
-
4
-
5
-
6
-
7
-
8
-
9
-
10
-
11
-
12
-
13
-
14
-
15
-
16
-
17
-
18
-
19
-
20
-
21
-
 22
22 -
 23
23 -
 24
24 -
 25
25 -
 26
26 -
 27
27 -
 28
28 -
 29
29 -
 30
30 -
 31
31 -
 32
32 -
33
-
34
-
35
-
36
-
37
-
38
-
39
-
40
-
41
-
42
-
43
-
44
-
45
-
46
-
47
-
48
-
49
-
50
-
51
-
52
-
53
-
54
-
55
-
56
-
57
-
58
-
59
-
60
-
61
-
62
-
63
-
64
-
65
-
66
-
67
-
68
-
69
-
70
-
71
-
72
-
73
-
74
-
75
-
76
-
77
-
78
-
79
-
80
 |
 |
