Craftsman 10872 Operation Manual - Page 29
Z_caution
 |
View all Craftsman 10872 manuals
Add to My Manuals
Save this manual to your list of manuals |
Page 29 highlights
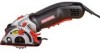
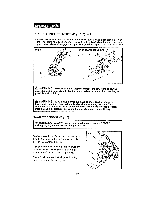
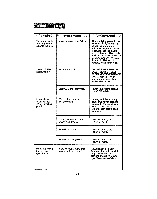
PLUNGE OR POCKET CUTTING (Figs. 17: A, B, C, and D) Cutting Into a solid base surface One ofthe major benefits of this saw is Its abilityto make plungecuts directly Into the middle, or Interiorof a workplace, or plunge cut directly Into a solid base surfacesuch as sub-flooring, siding, panelingand hardwoodor laminateflooringthat Is mounted on top of sub-flooring. [ ZA_LWWAARYNSImNGak: e surAe tLhWe AwYoSrcklpalmeopeaIsndsescuuprpeolyrpt wosolrtklopnleecdessoeIctuwrlefilyn.ot move. I I Z_CAUTION: ALWAYSknowwhat you are sawing Into.Sawlng Into nalis, I I pipes and electrical wires could result In kickback,ross of control, risk of fire, I ] and/or electric shock,causingserious personal Injury to yourselfor to others. I 1. Unplug the saw. /_WARNING: ALWAYSunplug saw from the powersource BEFORE makingany adjustments or attaching accessories. 2. Mark the cutline on the surface tobe cut. 3, Set the depth-of-cut to the thickness of the material to be cut, (sub/floor, siding,laminate flooring, etco) 4. Allgn (position) the saw base on the workplace to your mark, using the Length-of-Cut guide (sothat yourstarting pointlines up with the mark correspondingto the Depth-of-Cutsetting (see Page 21, Figo6). 5_ Plug in the saw. 6o Hold the saw firmly with both hands. 7. Activate the trlgger safety release and paddle switchesand turn the saw "On". 8. Let the blade reach full speed, 9. Manually release the blade guard release leverwhile holdlng the fingerlift bracket on the rear of the base (see Fig. 17, A). !0. A, SLOWLYlower the blade Intothe workplace. B. Carefully guide the sawthroughthe line of cut untl!the forward depth marking or} the length of cut guide located on the saw's base aligns with the end of cut marking on your workplace. (DO NOT bind the blade in the cut;push the saw blade forward at a rate where the blade is not laboring). C. When the cut Is complete, release the trigger safetyrelease and paddle switch and letthe bladecome to a completestop, DO NOT REMOVE the saw and blade from the workplace while the blade Ismoving.This could damage your cut (kerf), cause kickbackand loss of control, resulting In serious Injury, Flg. 17 29
-
 1
1 -
2
-
3
-
4
-
5
-
6
-
7
-
8
-
9
-
10
-
11
-
12
-
13
-
14
-
15
-
16
-
17
-
18
-
19
-
20
-
21
-
22
-
23
-
 24
24 -
 25
25 -
 26
26 -
 27
27 -
 28
28 -
 29
29 -
 30
30 -
 31
31 -
 32
32 -
 33
33 -
 34
34 -
35
-
36
-
37
-
38
-
39
-
40
-
41
-
42
-
43
-
44
-
45
-
46
-
47
-
48
-
49
-
50
-
51
-
52
-
53
-
54
-
55
-
56
-
57
-
58
-
59
-
60
-
61
-
62
-
63
-
64
-
65
-
66
-
67
-
68
-
69
-
70
-
71
-
72
-
73
-
74
-
75
-
76
-
77
-
78
-
79
-
80
 |
 |