Craftsman 10872 Operation Manual - Page 30
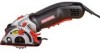
PLUNGE, POCKET, Fig. 17, D cont., Plunge, Pocket Cutting, Fig. 18
 |
View all Craftsman 10872 manuals
Add to My Manuals
Save this manual to your list of manuals |
Page 30 highlights
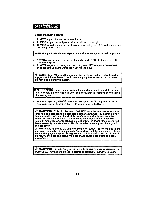
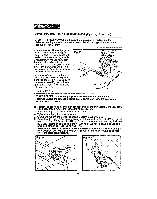
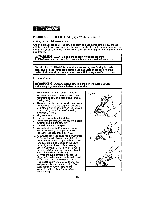
PLUNGE OR POCKET CLI'i-I'ING (Fig. 17, D) cont. 11 When the blade and saw are clear of and removed from the workpiece (see Fig 17, D), the lower blade guard and base will be able to automatically drop down and the blade guard release lever will engage the upper blade guard, locking the blade above the base. Fig. 17 f Plunge, Pocket Cutting D i : i I ! _spWaofseAsrRibaNlneIdNsGeear:sioieurs. Loss of control of the saw could cause an accident resulting in inAjuLrWy.AYS maintain proper control of the saw to make sawing II i i, i i ,,lll,ll,l,,i,illl, i i i Z_WARNING: NEVER clamp or tie the blade guard release lever and the lower blade guard and base in the raised position exposing the blade.This would not allow the lower blade guard and base assembly to function properly after the cutting operation, increasing the risk of serious personal injury. SAWDUST REMOVAL (Fig. 18) z_WARNING: ALWAYS unplug saw from the power source BEFORE making any adjustments or attaching accessories. Your saw includes a 11/4-inch vac hose adapter tube that attaches to the built-in dust extraction port on the saw (see Fig. 18). This adapter tube can be attached to a wet!dry vac hose with a 11/4-inch hose adapter and then to a wet/dry vac (all sold separately). This will help remove dust, chips and cutting debris away from the cutting area_ Fig. 18 30
-
 1
1 -
2
-
3
-
4
-
5
-
6
-
7
-
8
-
9
-
10
-
11
-
12
-
13
-
14
-
15
-
16
-
17
-
18
-
19
-
20
-
21
-
22
-
23
-
24
-
 25
25 -
 26
26 -
 27
27 -
 28
28 -
 29
29 -
 30
30 -
 31
31 -
 32
32 -
 33
33 -
 34
34 -
 35
35 -
36
-
37
-
38
-
39
-
40
-
41
-
42
-
43
-
44
-
45
-
46
-
47
-
48
-
49
-
50
-
51
-
52
-
53
-
54
-
55
-
56
-
57
-
58
-
59
-
60
-
61
-
62
-
63
-
64
-
65
-
66
-
67
-
68
-
69
-
70
-
71
-
72
-
73
-
74
-
75
-
76
-
77
-
78
-
79
-
80
 |
 |
