D-Link DGS-1510-20 User Manual - Page 150
IPv4 Static/Default Route, Secondary, Apply, Delete, DHCP Client, DHCP Client Client-ID
 |
View all D-Link DGS-1510-20 manuals
Add to My Manuals
Save this manual to your list of manuals |
Page 150 highlights
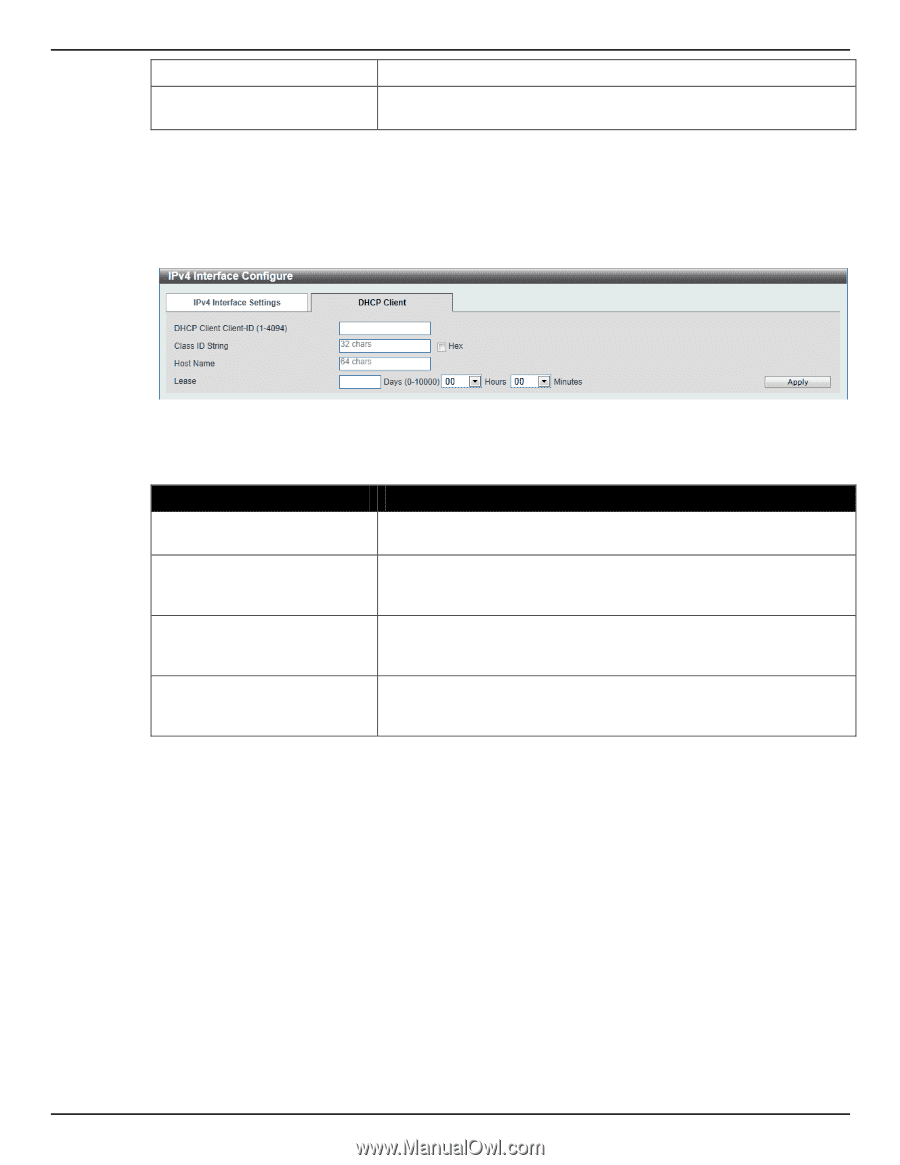
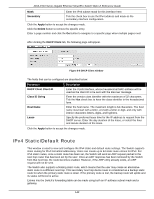
DGS-1510 Series Gigabit Ethernet SmartPro Switch Web UI Reference Guide Mask Secondary Enter the IPv6 subnet mask for this interface here. Tick the check box to use the IPv4 address and mask as the secondary interface configuration. Click the Apply button to accept the changes made. Click the Delete button to remove the specific entry. Enter a page number and click the Go button to navigate to a specific page when multiple pages exist. After clicking the DHCP Client tab, the following page will appear. Figure 6-8 DHCP Client window The fields that can be configured are described below: Parameter DHCP Client Client-ID Class ID String Host Name Lease Description Enter the VLAN interface, whose hexadecimal MAC address will be used as the client ID to be sent with the discover message. Enter the vendor class identifier with the maximum of 32 characters. Tick the Hex check box to have the class identifier in the hexadecimal form. Enter the host name. The maximum length is 64 characters. The host name must start with a letter, end with a letter or digit, and only with interior characters letters, digits, and hyphens. Specify the preferred lease time for the IP address to request from the DHCP server. Enter the day duration of the lease, or select the hour and minute duration of the lease. Click the Apply button to accept the changes made. IPv4 Static/Default Route This window is used to view and configure the IPv4 static and default route settings. The Switch supports static routing for IPv4 formatted addressing. Users can create up to 64 static route entries for IPv4. For IPv4 static routes, once a static route has been set, the Switch will send an ARP request packet to the next hop router that has been set by the user. Once an ARP response has been retrieved by the Switch from that next hop, the route becomes enabled. However, if the ARP entry already exists, an ARP request will not be sent. The Switch also supports a floating static route, which means that the user may create an alternative static route to a different next hop. This secondary next hop device route is considered as a backup static route for when the primary static route is down. If the primary route is lost, the backup route will uplink and its status will become active. Entries into the Switch's forwarding table can be made using both an IP address subnet mask and a gateway. 142
-
 1
1 -
2
-
3
-
4
-
5
-
6
-
7
-
8
-
9
-
10
-
11
-
12
-
13
-
14
-
15
-
16
-
17
-
18
-
19
-
20
-
21
-
22
-
23
-
24
-
25
-
26
-
27
-
28
-
29
-
30
-
31
-
32
-
33
-
34
-
35
-
36
-
37
-
38
-
39
-
40
-
41
-
42
-
43
-
44
-
45
-
46
-
47
-
48
-
49
-
50
-
51
-
52
-
53
-
54
-
55
-
56
-
57
-
58
-
59
-
60
-
61
-
62
-
63
-
64
-
65
-
66
-
67
-
68
-
69
-
70
-
71
-
72
-
73
-
74
-
75
-
76
-
77
-
78
-
79
-
80
-
81
-
82
-
83
-
84
-
85
-
86
-
87
-
88
-
89
-
90
-
91
-
92
-
93
-
94
-
95
-
96
-
97
-
98
-
99
-
100
-
101
-
102
-
103
-
104
-
105
-
106
-
107
-
108
-
109
-
110
-
111
-
112
-
113
-
114
-
115
-
116
-
117
-
118
-
119
-
120
-
121
-
122
-
123
-
124
-
125
-
126
-
127
-
128
-
129
-
130
-
131
-
132
-
133
-
134
-
135
-
136
-
137
-
138
-
139
-
140
-
141
-
142
-
143
-
144
-
 145
145 -
 146
146 -
 147
147 -
 148
148 -
 149
149 -
 150
150 -
 151
151 -
 152
152 -
 153
153 -
 154
154 -
 155
155 -
156
-
157
-
158
-
159
-
160
-
161
-
162
-
163
-
164
-
165
-
166
-
167
-
168
-
169
-
170
-
171
-
172
-
173
-
174
-
175
-
176
-
177
-
178
-
179
-
180
-
181
-
182
-
183
-
184
-
185
-
186
-
187
-
188
-
189
-
190
-
191
-
192
-
193
-
194
-
195
-
196
-
197
-
198
-
199
-
200
-
201
-
202
-
203
-
204
-
205
-
206
-
207
-
208
-
209
-
210
-
211
-
212
-
213
-
214
-
215
-
216
-
217
-
218
-
219
-
220
-
221
-
222
-
223
-
224
-
225
-
226
-
227
-
228
-
229
-
230
-
231
-
232
-
233
-
234
-
235
-
236
-
237
-
238
-
239
-
240
-
241
-
242
-
243
-
244
-
245
-
246
-
247
-
248
-
249
-
250
-
251
-
252
-
253
-
254
-
255
-
256
-
257
-
258
-
259
-
260
-
261
-
262
-
263
-
264
-
265
-
266
-
267
-
268
-
269
-
270
-
271
-
272
-
273
-
274
-
275
-
276
-
277
-
278
-
279
-
280
-
281
-
282
-
283
-
284
-
285
-
286
-
287
-
288
-
289
-
290
-
291
-
292
-
293
-
294
-
295
-
296
-
297
-
298
-
299
-
300
-
301
-
302
-
303
-
304
-
305
-
306
-
307
-
308
-
309
-
310
-
311
-
312
-
313
-
314
-
315
-
316
-
317
-
318
-
319
-
320
-
321
-
322
-
323
-
324
-
325
-
326
-
327
-
328
-
329
-
330
-
331
-
332
-
333
-
334
-
335
-
336
-
337
-
338
-
339
-
340
-
341
-
342
-
343
-
344
-
345
-
346
-
347
-
348
-
349
-
350
-
351
-
352
-
353
-
354
-
355
-
356
-
357
-
358
-
359
-
360
-
361
-
362
-
363
-
364
-
365
-
366
-
367
-
368
-
369
-
370
-
371
-
372
-
373
-
374
-
375
-
376
-
377
-
378
-
379
-
380
-
381
-
382
-
383
-
384
-
385
-
386
-
387
-
388
-
389
-
390
-
391
-
392
-
393
-
394
-
395
-
396
-
397
-
398
-
399
-
400
-
401
-
402
-
403
-
404
-
405
-
406
-
407
-
408
-
409
-
410
-
411
-
412
-
413
-
414
-
415
-
416
-
417
-
418
-
419
-
420
-
421
-
422
-
423
-
424
-
425
-
426
-
427
-
428
-
429
-
430
 |
 |