D-Link DGS-1510-20 User Manual - Page 355
SSH Global Settings, Host Key, Security > SSH > SSH Global Settings
 |
View all D-Link DGS-1510-20 manuals
Add to My Manuals
Save this manual to your list of manuals |
Page 355 highlights
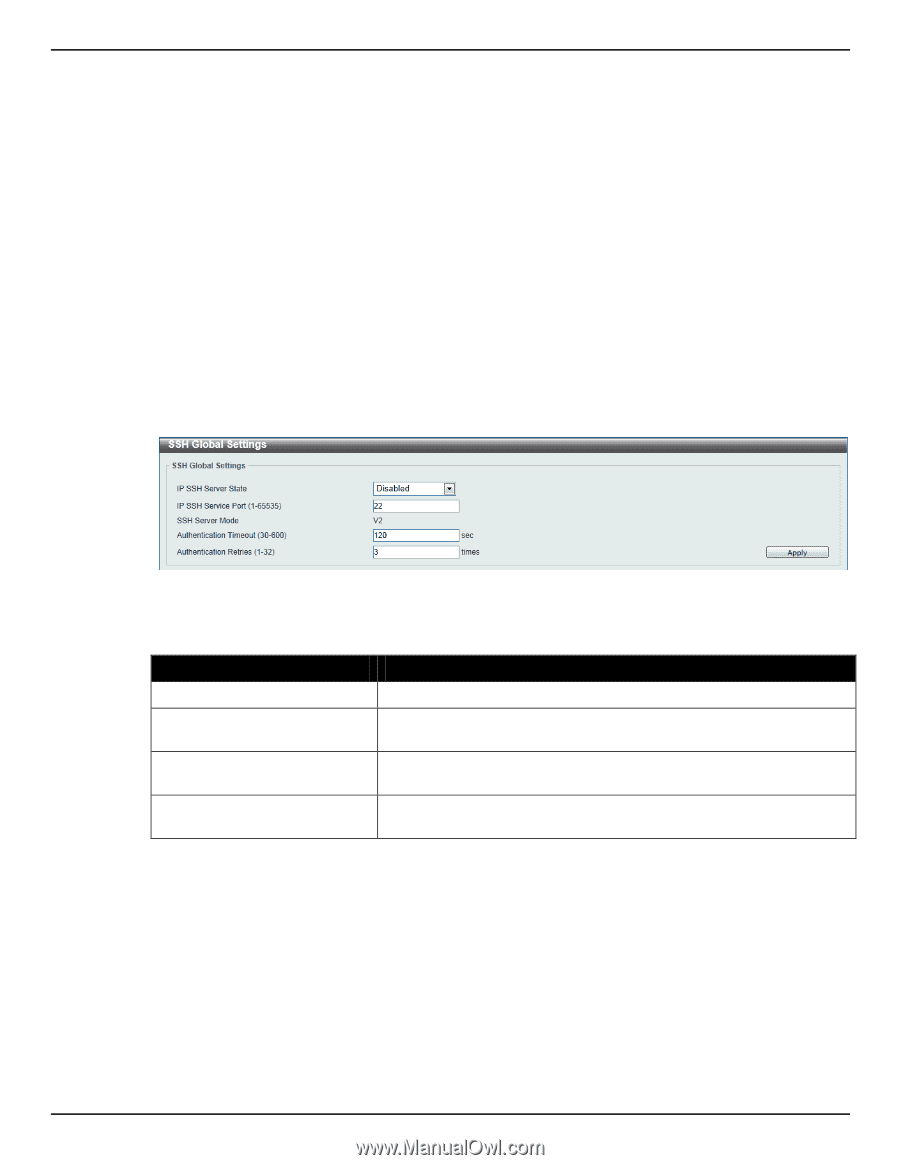
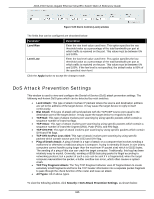
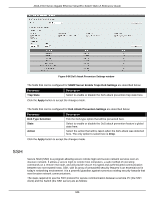
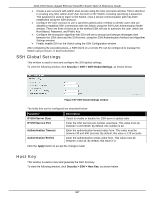
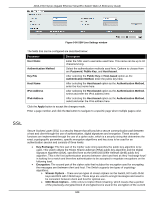
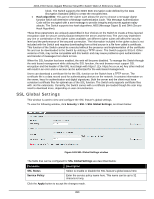
DGS-1510 Series Gigabit Ethernet SmartPro Switch Web UI Reference Guide • Create a user account with admin-level access using the User Accounts window. This is identical to creating any other admin-level User Account on the Switch, including specifying a password. This password is used to logon to the Switch, once a secure communication path has been established using the SSH protocol. • Configure the User Account to use a specified authorization method to identify users that are allowed to establish SSH connections with the Switch using the SSH User Authentication Mode window. There are three choices as to the method SSH will use to authorize the user, which are Host Based, Password, and Public Key. • Configure the encryption algorithm that SSH will use to encrypt and decrypt messages sent between the SSH client and the SSH server, using the SSH Authentication Method and Algorithm Settings window. • Finally, enable SSH on the Switch using the SSH Configuration window. After completing the preceding steps, a SSH Client on a remote PC can be configured to manage the Switch using a secure, in band connection. SSH Global Settings This window is used to view and configure the SSH global settings. To view the following window, click Security > SSH > SSH Global Settings, as shown below: Figure 9-87 SSH Global Settings window The fields that can be configured are described below: Parameter IP SSH Server State IP SSH Service Port Authentication Timeout Authentication Retries Description Select to enable or disable the SSH server's global state. Enter the SSH service port number used here. This value must be between 1 and 65535. By default, this number is 22. Enter the authentication timeout value here. This value must be between 30 and 600 seconds. By default, this value is 120 seconds. Enter the authentication retries value here. This value must be between 1 and 32. By default, this value is 3. Click the Apply button to accept the changes made. Host Key This window is used to view and generate the SSH host key. To view the following window, click Security > SSH > Host Key, as shown below: 347
-
 1
1 -
2
-
3
-
4
-
5
-
6
-
7
-
8
-
9
-
10
-
11
-
12
-
13
-
14
-
15
-
16
-
17
-
18
-
19
-
20
-
21
-
22
-
23
-
24
-
25
-
26
-
27
-
28
-
29
-
30
-
31
-
32
-
33
-
34
-
35
-
36
-
37
-
38
-
39
-
40
-
41
-
42
-
43
-
44
-
45
-
46
-
47
-
48
-
49
-
50
-
51
-
52
-
53
-
54
-
55
-
56
-
57
-
58
-
59
-
60
-
61
-
62
-
63
-
64
-
65
-
66
-
67
-
68
-
69
-
70
-
71
-
72
-
73
-
74
-
75
-
76
-
77
-
78
-
79
-
80
-
81
-
82
-
83
-
84
-
85
-
86
-
87
-
88
-
89
-
90
-
91
-
92
-
93
-
94
-
95
-
96
-
97
-
98
-
99
-
100
-
101
-
102
-
103
-
104
-
105
-
106
-
107
-
108
-
109
-
110
-
111
-
112
-
113
-
114
-
115
-
116
-
117
-
118
-
119
-
120
-
121
-
122
-
123
-
124
-
125
-
126
-
127
-
128
-
129
-
130
-
131
-
132
-
133
-
134
-
135
-
136
-
137
-
138
-
139
-
140
-
141
-
142
-
143
-
144
-
145
-
146
-
147
-
148
-
149
-
150
-
151
-
152
-
153
-
154
-
155
-
156
-
157
-
158
-
159
-
160
-
161
-
162
-
163
-
164
-
165
-
166
-
167
-
168
-
169
-
170
-
171
-
172
-
173
-
174
-
175
-
176
-
177
-
178
-
179
-
180
-
181
-
182
-
183
-
184
-
185
-
186
-
187
-
188
-
189
-
190
-
191
-
192
-
193
-
194
-
195
-
196
-
197
-
198
-
199
-
200
-
201
-
202
-
203
-
204
-
205
-
206
-
207
-
208
-
209
-
210
-
211
-
212
-
213
-
214
-
215
-
216
-
217
-
218
-
219
-
220
-
221
-
222
-
223
-
224
-
225
-
226
-
227
-
228
-
229
-
230
-
231
-
232
-
233
-
234
-
235
-
236
-
237
-
238
-
239
-
240
-
241
-
242
-
243
-
244
-
245
-
246
-
247
-
248
-
249
-
250
-
251
-
252
-
253
-
254
-
255
-
256
-
257
-
258
-
259
-
260
-
261
-
262
-
263
-
264
-
265
-
266
-
267
-
268
-
269
-
270
-
271
-
272
-
273
-
274
-
275
-
276
-
277
-
278
-
279
-
280
-
281
-
282
-
283
-
284
-
285
-
286
-
287
-
288
-
289
-
290
-
291
-
292
-
293
-
294
-
295
-
296
-
297
-
298
-
299
-
300
-
301
-
302
-
303
-
304
-
305
-
306
-
307
-
308
-
309
-
310
-
311
-
312
-
313
-
314
-
315
-
316
-
317
-
318
-
319
-
320
-
321
-
322
-
323
-
324
-
325
-
326
-
327
-
328
-
329
-
330
-
331
-
332
-
333
-
334
-
335
-
336
-
337
-
338
-
339
-
340
-
341
-
342
-
343
-
344
-
345
-
346
-
347
-
348
-
349
-
 350
350 -
 351
351 -
 352
352 -
 353
353 -
 354
354 -
 355
355 -
 356
356 -
 357
357 -
 358
358 -
 359
359 -
 360
360 -
361
-
362
-
363
-
364
-
365
-
366
-
367
-
368
-
369
-
370
-
371
-
372
-
373
-
374
-
375
-
376
-
377
-
378
-
379
-
380
-
381
-
382
-
383
-
384
-
385
-
386
-
387
-
388
-
389
-
390
-
391
-
392
-
393
-
394
-
395
-
396
-
397
-
398
-
399
-
400
-
401
-
402
-
403
-
404
-
405
-
406
-
407
-
408
-
409
-
410
-
411
-
412
-
413
-
414
-
415
-
416
-
417
-
418
-
419
-
420
-
421
-
422
-
423
-
424
-
425
-
426
-
427
-
428
-
429
-
430
 |
 |