Dell PowerEdge T350 EMC Installation and Service Manual - Page 106
Removing the system side cover
 |
View all Dell PowerEdge T350 manuals
Add to My Manuals
Save this manual to your list of manuals |
Page 106 highlights
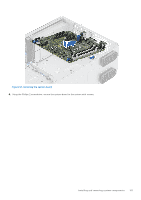
Figure 94. Removing the system side cover 3. Pull out the tabs on both sides of the front faceplate and remove the front faceplate out of the system. NOTE: For easy removal of tabs on the left side of the faceplate, it is recommended to use screwdriver or plastic scribe. 106 Installing and removing system components
-
 1
1 -
2
-
3
-
4
-
5
-
6
-
7
-
8
-
9
-
10
-
11
-
12
-
13
-
14
-
15
-
16
-
17
-
18
-
19
-
20
-
21
-
22
-
23
-
24
-
25
-
26
-
27
-
28
-
29
-
30
-
31
-
32
-
33
-
34
-
35
-
36
-
37
-
38
-
39
-
40
-
41
-
42
-
43
-
44
-
45
-
46
-
47
-
48
-
49
-
50
-
51
-
52
-
53
-
54
-
55
-
56
-
57
-
58
-
59
-
60
-
61
-
62
-
63
-
64
-
65
-
66
-
67
-
68
-
69
-
70
-
71
-
72
-
73
-
74
-
75
-
76
-
77
-
78
-
79
-
80
-
81
-
82
-
83
-
84
-
85
-
86
-
87
-
88
-
89
-
90
-
91
-
92
-
93
-
94
-
95
-
96
-
97
-
98
-
99
-
100
-
 101
101 -
 102
102 -
 103
103 -
 104
104 -
 105
105 -
 106
106 -
 107
107 -
 108
108 -
 109
109 -
 110
110 -
 111
111 -
112
-
113
-
114
-
115
-
116
-
117
-
118
-
119
-
120
-
121
-
122
-
123
-
124
-
125
-
126
-
127
-
128
-
129
 |
 |

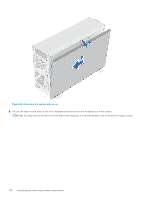
Figure 94. Removing the system side cover
3.
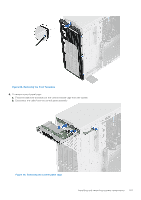
Pull out the tabs on both sides of the front faceplate and remove the front faceplate out of the system.
NOTE:
For easy removal of tabs on the left side of the faceplate, it is recommended to use screwdriver or plastic scribe.
106
Installing and removing system components