Dell PowerEdge T350 EMC Installation and Service Manual - Page 110
Installing the front faceplate
 |
View all Dell PowerEdge T350 manuals
Add to My Manuals
Save this manual to your list of manuals |
Page 110 highlights
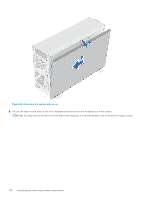
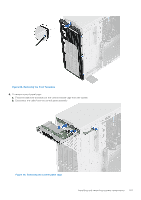
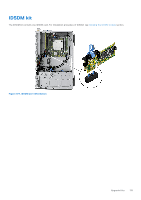
3. Insert front faceplate tabs into the slots in the system and press until the front faceplate locks into place. Figure 100. Installing the front faceplate 4. Tilt at an angle and align the system side cover with the slots in the system, then slide the cover towards the front of the system until locks into place. 5. Using a Phillips 2 screwdriver, tighten the screws that secure the system side cover to the chassis. 110 Installing and removing system components
-
 1
1 -
2
-
3
-
4
-
5
-
6
-
7
-
8
-
9
-
10
-
11
-
12
-
13
-
14
-
15
-
16
-
17
-
18
-
19
-
20
-
21
-
22
-
23
-
24
-
25
-
26
-
27
-
28
-
29
-
30
-
31
-
32
-
33
-
34
-
35
-
36
-
37
-
38
-
39
-
40
-
41
-
42
-
43
-
44
-
45
-
46
-
47
-
48
-
49
-
50
-
51
-
52
-
53
-
54
-
55
-
56
-
57
-
58
-
59
-
60
-
61
-
62
-
63
-
64
-
65
-
66
-
67
-
68
-
69
-
70
-
71
-
72
-
73
-
74
-
75
-
76
-
77
-
78
-
79
-
80
-
81
-
82
-
83
-
84
-
85
-
86
-
87
-
88
-
89
-
90
-
91
-
92
-
93
-
94
-
95
-
96
-
97
-
98
-
99
-
100
-
101
-
102
-
103
-
104
-
 105
105 -
 106
106 -
 107
107 -
 108
108 -
 109
109 -
 110
110 -
 111
111 -
 112
112 -
 113
113 -
 114
114 -
 115
115 -
116
-
117
-
118
-
119
-
120
-
121
-
122
-
123
-
124
-
125
-
126
-
127
-
128
-
129
 |
 |

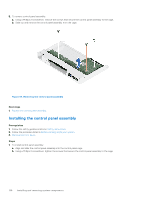
3.
Insert front faceplate tabs into the slots in the system and press until the front faceplate locks into place.
Figure 100. Installing the front faceplate
4.
Tilt at an angle and align the system side cover with the slots in the system, then slide the cover towards the front of the
system until locks into place.
5.
Using a Phillips 2 screwdriver, tighten the screws that secure the system side cover to the chassis.
110
Installing and removing system components