Dell PowerEdge T350 EMC Installation and Service Manual - Page 109
Installing the control panel assembly, Installing the control panel cage
 |
View all Dell PowerEdge T350 manuals
Add to My Manuals
Save this manual to your list of manuals |
Page 109 highlights
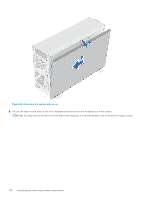
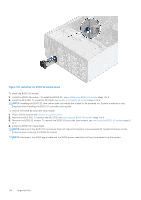
Figure 98. Installing the control panel assembly 2. To install control panel cage: a. Connect the cable to the control panel assembly. b. Slide the control panel cage into the system until clicks into its place. Figure 99. Installing the control panel cage Installing and removing system components 109
-
 1
1 -
2
-
3
-
4
-
5
-
6
-
7
-
8
-
9
-
10
-
11
-
12
-
13
-
14
-
15
-
16
-
17
-
18
-
19
-
20
-
21
-
22
-
23
-
24
-
25
-
26
-
27
-
28
-
29
-
30
-
31
-
32
-
33
-
34
-
35
-
36
-
37
-
38
-
39
-
40
-
41
-
42
-
43
-
44
-
45
-
46
-
47
-
48
-
49
-
50
-
51
-
52
-
53
-
54
-
55
-
56
-
57
-
58
-
59
-
60
-
61
-
62
-
63
-
64
-
65
-
66
-
67
-
68
-
69
-
70
-
71
-
72
-
73
-
74
-
75
-
76
-
77
-
78
-
79
-
80
-
81
-
82
-
83
-
84
-
85
-
86
-
87
-
88
-
89
-
90
-
91
-
92
-
93
-
94
-
95
-
96
-
97
-
98
-
99
-
100
-
101
-
102
-
103
-
 104
104 -
 105
105 -
 106
106 -
 107
107 -
 108
108 -
 109
109 -
 110
110 -
 111
111 -
 112
112 -
 113
113 -
 114
114 -
115
-
116
-
117
-
118
-
119
-
120
-
121
-
122
-
123
-
124
-
125
-
126
-
127
-
128
-
129
 |
 |

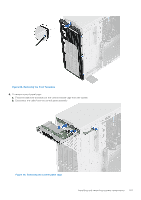
Figure 98. Installing the control panel assembly
2.
To install control panel cage:
a.
Connect the cable to the control panel assembly.
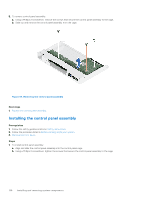
b.
Slide the control panel cage into the system until clicks into its place.
Figure 99. Installing the control panel cage
Installing and removing system components
109