Dell PowerEdge T350 EMC Installation and Service Manual - Page 80
Installing the BOSS S2 module, Installing the M.2 SSD
 |
View all Dell PowerEdge T350 manuals
Add to My Manuals
Save this manual to your list of manuals |
Page 80 highlights
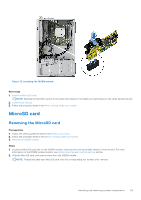
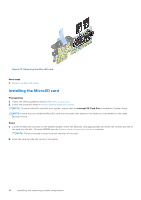
Figure 68. Installing the BOSS S2 module 4. Align the M.2 SSD at an angle with the BOSS S2 card carrier. 5. Insert the M.2 SSD until it is firmly seated in the BOSS S2 card carrier. 6. Using the Phillips 1 screwdriver, secure the M.2 SSD on the BOSS S2 card carrier with the M3 x 0.5 x 4.5 mm screw. Figure 69. Installing the M.2 SSD NOTE: Remove BOSS S2 card carrier filler, if installed. 7. Slide the BOSS S2 card carrier into the BOSS S2 module slot. 8. Close the BOSS S2 card carrier release latch to lock the carrier in place. 80 Installing and removing system components
-
 1
1 -
2
-
3
-
4
-
5
-
6
-
7
-
8
-
9
-
10
-
11
-
12
-
13
-
14
-
15
-
16
-
17
-
18
-
19
-
20
-
21
-
22
-
23
-
24
-
25
-
26
-
27
-
28
-
29
-
30
-
31
-
32
-
33
-
34
-
35
-
36
-
37
-
38
-
39
-
40
-
41
-
42
-
43
-
44
-
45
-
46
-
47
-
48
-
49
-
50
-
51
-
52
-
53
-
54
-
55
-
56
-
57
-
58
-
59
-
60
-
61
-
62
-
63
-
64
-
65
-
66
-
67
-
68
-
69
-
70
-
71
-
72
-
73
-
74
-
 75
75 -
 76
76 -
 77
77 -
 78
78 -
 79
79 -
 80
80 -
 81
81 -
 82
82 -
 83
83 -
 84
84 -
 85
85 -
86
-
87
-
88
-
89
-
90
-
91
-
92
-
93
-
94
-
95
-
96
-
97
-
98
-
99
-
100
-
101
-
102
-
103
-
104
-
105
-
106
-
107
-
108
-
109
-
110
-
111
-
112
-
113
-
114
-
115
-
116
-
117
-
118
-
119
-
120
-
121
-
122
-
123
-
124
-
125
-
126
-
127
-
128
-
129
 |
 |

Figure 68. Installing the BOSS S2 module
4.
Align the M.2 SSD at an angle with the BOSS S2 card carrier.
5.
Insert the M.2 SSD until it is firmly seated in the BOSS S2 card carrier.
6.
Using the Phillips 1 screwdriver, secure the M.2 SSD on the BOSS S2 card carrier with the M3 x 0.5 x 4.5 mm screw.
Figure 69. Installing the M.2 SSD
NOTE:
Remove BOSS S2 card carrier filler, if installed.
7.
Slide the BOSS S2 card carrier into the BOSS S2 module slot.
8.
Close the BOSS S2 card carrier release latch to lock the carrier in place.
80
Installing and removing system components