Denon ADV-700 Owners Manual - Page 29
] Setting the channel level, MANUAL, TEST TONE START, FRONT L, CENTER, SURROUND R, SUBWOOFER
 |
View all Denon ADV-700 manuals
Add to My Manuals
Save this manual to your list of manuals |
Page 29 highlights
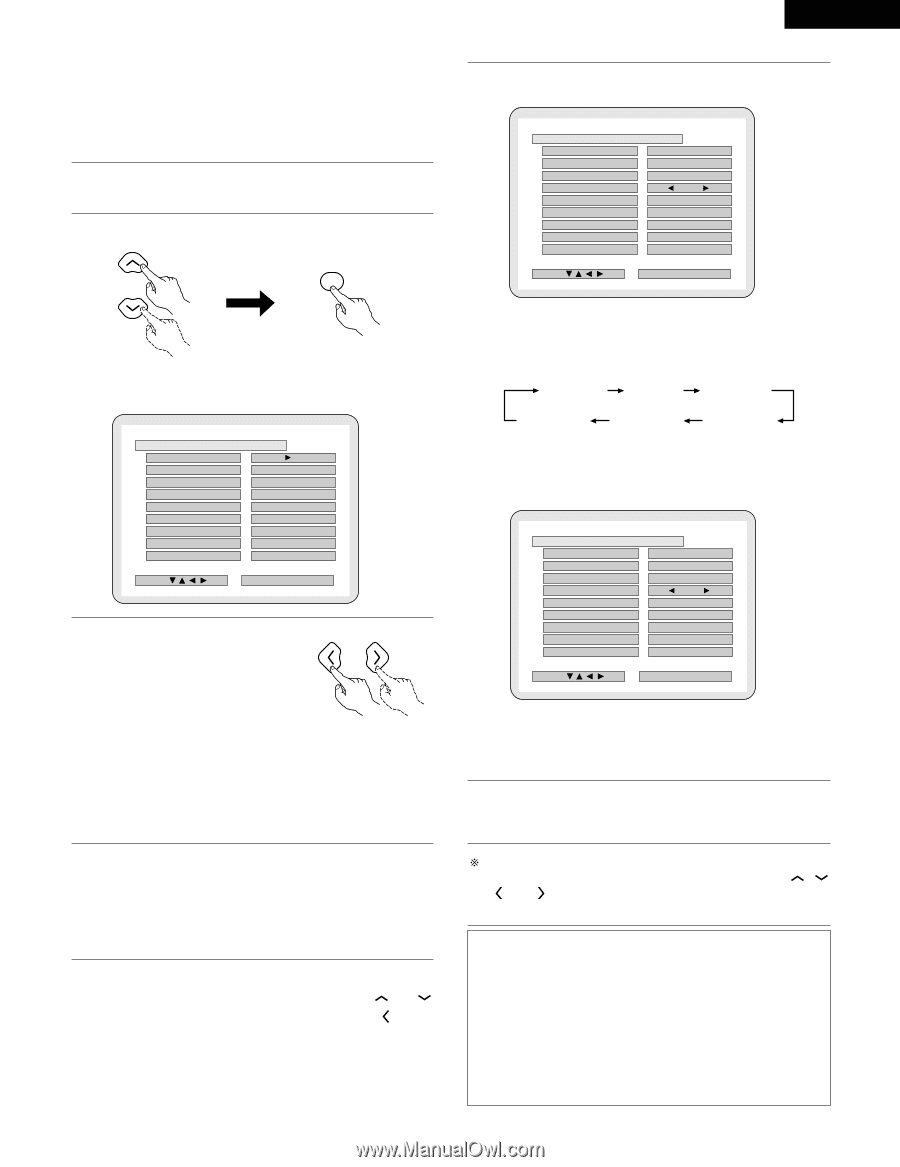
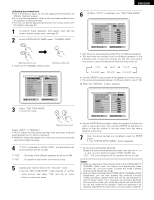
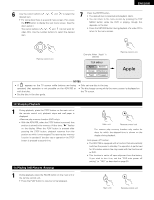
ENGLISH [3] Setting the channel level • Use this setting to adjust so that the playback level between the different channels is equal. • From the listening position, listen to the test tones produced from the speakers to adjust the level. • The level can also be adjusted directly from the remote control unit. (For details, see page 40.) 1 To perform these operations from places other than the system setting change menu, see page 26. 2 At the SYSTEM SETUP MENU select "CHANNEL LEVEL". ENTER Remote control unit Remote control unit • Switch to the CHANNEL LEVEL screen. CHANNEL LEVEL B TEST TONE MODE AUTO MANUAL LEVEL CLEAR TEST TONE START FRONT L 0 d B CENTER 0 d B FRONT R 0 d B SURROUND R 0 d B SURROUND L 0 d B SUBWOOFER 0 d B SELECT : FINISH: ENTER BUTTON 3 Select "TEST TONE MODE". • Select the mode. 6 q When "AUTO" is selected in the "TEST TONE MODE" CHANNEL LEVEL B TEST TONE MODE AUTO MANUAL LEVEL CLEAR TEST TONE START YES FRONT L + 1 0 d B CENTER 0 d B FRONT R 0 d B SURROUND R 0 d B SURROUND L 0 d B SUBWOOFER 0 d B SELECT : FINISH: ENTER BUTTON • Test tones are automatically emitted from the different speakers. • The test tones are emitted from the different speakers in the following order, at 4-second intervals the first time and second time around, 2-second intervals the third time around and on: Front L Subwoofer Center Surround L Front R Surround R • Use the CURSOR buttons to adjust all the speakers to the same volume. • The volume can be adjusted between -12 dB and +12 dB in units of 1 dB. w When the "MANUAL" mode is selected CHANNEL LEVEL B TEST TONE MODE AUTO MANUAL LEVEL CLEAR TEST TONE START YES FRONT L + 1 0 d B CENTER 0 d B FRONT R 0 d B SURROUND R 0 d B SURROUND L 0 d B SUBWOOFER 0 d B SELECT : FINISH: ENTER BUTTON Remote control unit Select "AUTO" or "MANUAL". • AUTO: Adjust the level while listening to the test tones produced automatically from the different speakers. • MANUAL: Select the speaker from which you want to produce the test tone to adjust the level. 4 If "YES" is selected at "LEVEL CLEAR", the level settings for all the speakers are set to 0 dB. B "YES" : The levels of the different speakers are all set to 0dB. B "NO" : The speakers stay at their currently set levels. 5 Adjusting the channel levels in the "test tone" mode • Set the "TEST TONE START" mode using the and cursor buttons, then select "YES" with the cursor button to output test tones. • Use the CURSOR left and right to select the speaker for which you want to output test tones, then use the CURSOR up and down to adjust so that the volume of the test tones from the various speakers is the same. 7 After the above settings are completed, press the ENTER button. • The "SYSTEM SETUP MENU" screen reappears. To cancel the setting after adjusting Display the channel level adjustment screen, then use the , , and cursor buttons to select "LEVEL CLEAR" and "YES". The level settings for all the speakers are set to 0 dB. NOTE: • When you adjust the channel levels while in the SYSTEM SETUP CHANNEL LEVEL mode, the channel level adjustments made will affect ALL surround modes. Consider this mode a Master Channel Level adjustment mode. • After you have completed the SYSTEM SETUP CHANNEL LEVEL adjustments, you can then activate the individual surround modes and adjust channel levels that will be remembered for each of those modes. Then, whenever you activate a particular surround sound mode, your preferred channel level adjustments for just that mode will be recalled. Check the instructions for adjusting channel levels within each surround mode on page 40. 29
-
 1
1 -
2
-
3
-
4
-
5
-
6
-
7
-
8
-
9
-
10
-
11
-
12
-
13
-
14
-
15
-
16
-
17
-
18
-
19
-
20
-
21
-
22
-
23
-
 24
24 -
 25
25 -
 26
26 -
 27
27 -
 28
28 -
 29
29 -
 30
30 -
 31
31 -
 32
32 -
 33
33 -
 34
34 -
35
-
36
-
37
-
38
-
39
-
40
-
41
-
42
-
43
-
44
-
45
-
46
-
47
-
48
-
49
-
50
-
51
-
52
-
53
-
54
-
55
-
56
-
57
-
58
-
59
-
60
-
61
-
62
-
63
-
64
-
65
-
66
-
67
-
68
-
69
-
70
-
71
-
72
-
73
-
74
-
75
-
76
-
77
-
78
-
79
-
80
-
81
-
82
-
83
-
84
-
85
-
86
-
87
-
88
-
89
-
90
-
91
-
92
-
93
-
94
-
95
-
96
-
97
-
98
-
99
-
100
-
101
-
102
-
103
-
104
-
105
-
106
-
107
-
108
-
109
-
110
-
111
-
112
-
113
-
114
-
115
-
116
-
117
-
118
-
119
-
120
-
121
-
122
-
123
-
124
-
125
-
126
-
127
-
128
-
129
-
130
-
131
-
132
-
133
-
134
-
135
-
136
-
137
-
138
-
139
-
140
-
141
-
142
-
143
-
144
-
145
-
146
-
147
-
148
-
149
-
150
-
151
-
152
-
153
-
154
-
155
-
156
-
157
-
158
-
159
-
160
-
161
-
162
-
163
-
164
-
165
-
166
-
167
-
168
 |
 |