Denon ADV-700 Owners Manual - Page 8
CONNECTIONS, Connecting the audio components - audio connection
 |
View all Denon ADV-700 manuals
Add to My Manuals
Save this manual to your list of manuals |
Page 8 highlights
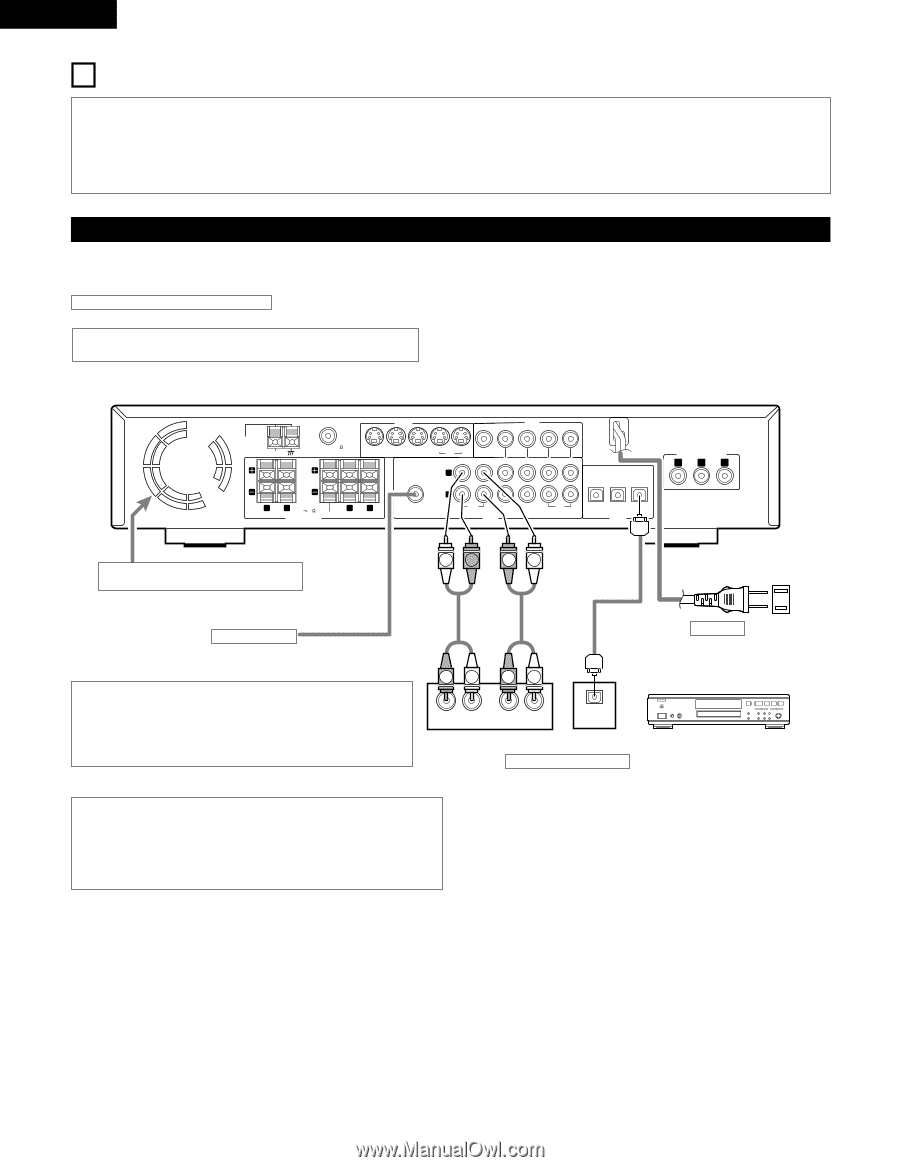
ENGLISH 7 CONNECTIONS • Do not plug in the AC cord until all connections have been completed. • Be sure to connect the left and right channels properly (left with left, right with right). • Insert the plugs securely. Incomplete connections will result in the generation of noise. • Note that binding pin plug cords together with AC cords or placing them near a power transformer will result in generating hum or other noise. • Noise or humming may be generated if a connected audio equipment is used independently without turning the power of this unit on. If this happens, turn on the power of the this unit. (1) Connecting the audio components • When making connections, also refer to the operating instructions of the other components. Connecting the DIGITAL (optical) jacks Use these for connections to audio equipment with digital (optical) output. NOTES: • Use optical cables for optical connections, removing the cap before connecting. S VIDEO VIDEO LOOP ANT. FM COAX. 75 MON.OUT IN IN AM TV/DBS V.AUX R L IMPEDANCE 6 16 FRONT CENTER SPEAKER SYSTEMS R L SURROUND PRE OUT SUB WOOFER IN OUT MON.OUT VCR IN OUT IN IN L R CDR/ TAPE TV/DBS AUDIO V.AUX IN OUT VCR IN IN OUT TV/DBS V.AUX (OPTICAL) DIGITAL COMPONENT VIDEO OUT Y CB CR Route the connection cords, etc., in such a way that they do not obstruct the ventilation holes. LR RL Subwoofer jack Connect the internal amplifier's subwoofer to the subwoofer terminal. (Refer to page 14.) • To conduct digital recording onto a digital recorder (CD recorder, MD recorder, etc.) while playing Dolby Digital, 96 kHz PCM sources on this DVD player. • Set the "AUDIO SETUP" default setting as shown below. (See page 77, 78.) • "DIGITAL OUT" → "PCM" "LPCM SELECT" → "ON" Playing DVDs with incorrect settings may result noise that could damage your ears or the speakers. RL RL OUTPUT NOTE: • Track numbers may not be added automatically when making digital recordings of CDs being played on the ADV-700 onto a connected recorder. • When making digital recordings on a CD recorder, set the CD recorder's recording setting to manual and add track numbers (track marks) manually as you record. • When making digital recordings on an MD recorder, use the editing function after the recording is completed to divide the tracks. AC CORD AC 120 V, 60 Hz RL CD recorder, MD recorder or Tape deck B RL IN INPUT OPTICAL Connecting a recorder Connections for recording: Connect the tape deck's recording input jacks (LINE IN or REC) to this unit's tape recording (CDR/TAPE OUT) jacks using pin plug cords. Connections for playback: Connect the tape deck's playback output jacks (LINE OUT or PB) to this unit's tape playback (CDR/TAPE IN) jacks using pin plug cords. 8
-
 1
1 -
2
-
 3
3 -
 4
4 -
 5
5 -
 6
6 -
 7
7 -
 8
8 -
 9
9 -
 10
10 -
 11
11 -
 12
12 -
 13
13 -
14
-
15
-
16
-
17
-
18
-
19
-
20
-
21
-
22
-
23
-
24
-
25
-
26
-
27
-
28
-
29
-
30
-
31
-
32
-
33
-
34
-
35
-
36
-
37
-
38
-
39
-
40
-
41
-
42
-
43
-
44
-
45
-
46
-
47
-
48
-
49
-
50
-
51
-
52
-
53
-
54
-
55
-
56
-
57
-
58
-
59
-
60
-
61
-
62
-
63
-
64
-
65
-
66
-
67
-
68
-
69
-
70
-
71
-
72
-
73
-
74
-
75
-
76
-
77
-
78
-
79
-
80
-
81
-
82
-
83
-
84
-
85
-
86
-
87
-
88
-
89
-
90
-
91
-
92
-
93
-
94
-
95
-
96
-
97
-
98
-
99
-
100
-
101
-
102
-
103
-
104
-
105
-
106
-
107
-
108
-
109
-
110
-
111
-
112
-
113
-
114
-
115
-
116
-
117
-
118
-
119
-
120
-
121
-
122
-
123
-
124
-
125
-
126
-
127
-
128
-
129
-
130
-
131
-
132
-
133
-
134
-
135
-
136
-
137
-
138
-
139
-
140
-
141
-
142
-
143
-
144
-
145
-
146
-
147
-
148
-
149
-
150
-
151
-
152
-
153
-
154
-
155
-
156
-
157
-
158
-
159
-
160
-
161
-
162
-
163
-
164
-
165
-
166
-
167
-
168
 |
 |