Denon AVR 3806 Owners Manual - Page 8
Cautions on handling, Preparing the remote control unit, Cautions on installation, Operating range - avr
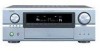 |
UPC - 081757506786
View all Denon AVR 3806 manuals
Add to My Manuals
Save this manual to your list of manuals |
Page 8 highlights
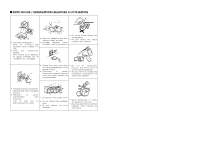
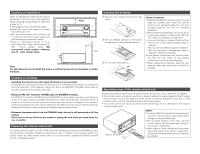
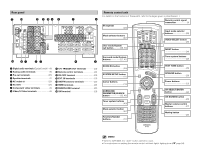
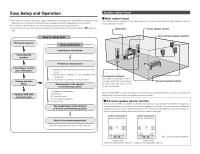
Getting Started Cautions on installation Noise or disturbance of the picture may be generated if this unit or any other electronic equipment using microprocessors is used near a tuner or TV. If this happens, take the following steps: • Install this unit as far away as possible from the tuner or TV. • Run the antenna wires from the tuner or TV away from this unit's power supply cord and input/output connection cables. • Noise or disturbance tends to occur particularly when using indoor antennas or 300 Ω/ohms feeder wires. We recommend using outdoor antennas and 75 Ω/ohm coaxial cables. Note Wall Note: For heat dispersal, do not install this unit in a confined space such as a bookcase or similar enclosure. Inserting the batteries q Remove the remote control unit's rear cover. w Set two LR6/AA batteries in the battery compartment in the indicated direction. e Put the rear cover back on. Getting Started Notes on batteries: • Replace the batteries with new ones if the set does not operate even when the remote control unit is operated nearby the unit. (The included batteries are only for verifying operation.) • When inserting the batteries, be sure to do so in the proper direction, following the "" marks in the battery compartment. • To prevent damage or leakage of battery fluid: • Do not use a new battery together with an old one. • Do not use two different types of batteries. • Do not short-circuit, disassemble, heat or dispose of batteries in flames. • If the battery fluid should leak, carefully wipe the fluid off the inside of the battery compartment and insert new batteries. • When replacing the batteries, have the new batteries ready and insert them as quickly as possible. Cautions on handling • Switching the input source when input terminals are not connected. A clicking noise may be produced if the input source is switched when nothing is connected to the input terminals. If this happens, either turn down the MASTER VOLUME control knob or connect components to the input terminals. • Muting of PRE OUT terminals, PHONES jack and SPEAKER terminals. The PRE OUT terminals, PHONES jack and SPEAKER terminals include a muting circuit. Because of this, the output signals are greatly attenuated for several seconds after the power switch is turned on or the input source, surround mode or any other set-up is changed. If the volume is turned up during this time, the output will be very high after the muting circuit stops functioning. Always wait until the muting circuit turns off before adjusting the volume. • Whenever the power switch is in the STANDBY state, the unit is still connected to AC line voltage. Please be sure to turn off the power switch or unplug the cord when you leave home for, say, a vacation. Preparing the remote control unit The included remote control unit (RC-1024) can be used to operate not only the AVR-3806 but other remote control compatible DENON components as well. In addition, the memory contains the control signals for other remote control units, so it can be used to operate non-DENON remote control compatible products. Operating range of the remote control unit • Point the remote control unit at the remote sensor on the main unit as shown in the diagram. • The remote control unit can be used from a straight distance of approximately 23 feet/7 meters from the main unit, but this distance will be shorter if there are obstacles in the way or if the remote control unit is not pointed directly at the remote sensor. • The remote control unit can be operated at a horizontal angle of up to 30 degrees with respect to the remote sensor. Approx. 23 feet/7 m 30° 30° NOTE: • It may be difficult to operate the remote control unit if the remote sensor is exposed to direct sunlight or strong artificial light. • Do not press buttons on the main unit and remote control unit simultaneously. Doing so may result in malfunction. • Neon signs or other devices emitting pulsetype noise nearby may result in malfunction, so keep the set as far away from such devices as possible. 3
-
 1
1 -
2
-
 3
3 -
 4
4 -
 5
5 -
 6
6 -
 7
7 -
 8
8 -
 9
9 -
 10
10 -
 11
11 -
 12
12 -
 13
13 -
14
-
15
-
16
-
17
-
18
-
19
-
20
-
21
-
22
-
23
-
24
-
25
-
26
-
27
-
28
-
29
-
30
-
31
-
32
-
33
-
34
-
35
-
36
-
37
-
38
-
39
-
40
-
41
-
42
-
43
-
44
-
45
-
46
-
47
-
48
-
49
-
50
-
51
-
52
-
53
-
54
-
55
-
56
-
57
-
58
-
59
-
60
-
61
-
62
-
63
-
64
-
65
-
66
-
67
-
68
-
69
-
70
-
71
-
72
-
73
-
74
-
75
-
76
-
77
-
78
-
79
-
80
-
81
-
82
-
83
-
84
-
85
-
86
-
87
-
88
-
89
-
90
-
91
-
92
-
93
-
94
-
95
-
96
-
97
-
98
-
99
-
100
-
101
-
102
-
103
-
104
-
105
-
106
-
107
-
108
-
109
-
110
-
111
-
112
-
113
-
114
-
115
-
116
-
117
-
118
-
119
-
120
-
121
-
122
-
123
-
124
-
125
-
126
-
127
-
128
-
129
-
130
-
131
-
132
-
133
-
134
-
135
-
136
-
137
-
138
-
139
-
140
-
141
-
142
 |
 |
