Denon DVD-9000 Owners Manual - Page 17
PART NAMES AND FUNCTIONS, Front Panel - specifications
 |
View all Denon DVD-9000 manuals
Add to My Manuals
Save this manual to your list of manuals |
Page 17 highlights
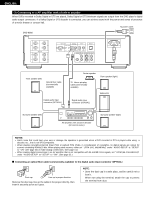
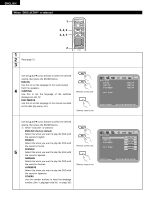
ENGLISH 5 PART NAMES AND FUNCTIONS (1) Front Panel See page 3. q Power button • Press once to turn the power on. • Press again to set to the "OFF" position and turn the power off. • Set the power to the standby mode by pressing the POWER OFF button on the remote control unit while the power is on. • Turn the power on from the standby mode by pressing the POWER ON button on the remote control unit. w Power indicator • This indicator lights when the power is on and when the power is in the standby mode. e AL24 PLUS indicator • This indicator lights when the audio signals of a DVD, etc., are being processed digitally with the AL24 processing Plus, a newly developed analog waveform reproduction technology. r DVD AUDIO indicator • This indicator lights when playing discs recorded in DVD audio format. t Disc tray • Load discs here. (See page 41.) • Press the OPEN/CLOSE button !4 to open and close the disc tray. • The disc tray is also closed when the PLAY button y is pressed. y PLAY button • Press this button to play the disc. (See page 42.) u STOP button • Press this to stop the disc. (See page 43.) i Skip button (8) • Press this to move back to the beginning of the current track (or chapter). • Press again to move back to the beginning of the previous track (or chapter). (See page 44.) o Skip button (9) • Press this to move ahead to the beginning of the next track (or chapter). (See page 44.) !0 PURE DIRECT selector • Use this to select modes with specific movie signal and digital audio signal output settings. !1 SOURCE selector • Use this to select the program source for output. DVD : The signals of the disc being played on the DVD-9000 are output. OPTICAL : The program source connected to the OPTICAL digital input connector is output. COAXIAL : The program source connected to the COAXIAL digital input connector is output. • The program source selected with this selector is also output to the digital output connector. !2 Remote control sensor !3 Display • Information on the disc that is currently playing is shown on the display. (See page 18.) !4 OPEN/CLOSE button (5) • Press this button to open and close the disc tray. (See page 41.) 17
-
 1
1 -
2
-
3
-
4
-
5
-
6
-
7
-
8
-
9
-
10
-
11
-
 12
12 -
 13
13 -
 14
14 -
 15
15 -
 16
16 -
 17
17 -
 18
18 -
 19
19 -
 20
20 -
 21
21 -
 22
22 -
23
-
24
-
25
-
26
-
27
-
28
-
29
-
30
-
31
-
32
-
33
-
34
-
35
-
36
-
37
-
38
-
39
-
40
-
41
-
42
-
43
-
44
-
45
-
46
-
47
-
48
-
49
-
50
-
51
-
52
-
53
-
54
-
55
-
56
-
57
-
58
-
59
-
60
-
61
-
62
-
63
-
64
-
65
-
66
-
67
-
68
-
69
-
70
-
71
-
72
-
73
-
74
-
75
-
76
-
77
-
78
-
79
-
80
-
81
-
82
-
83
-
84
-
85
-
86
-
87
-
88
-
89
-
90
-
91
-
92
-
93
-
94
-
95
-
96
-
97
-
98
-
99
-
100
-
101
-
102
-
103
-
104
-
105
-
106
-
107
-
108
-
109
-
110
-
111
-
112
-
113
-
114
-
115
-
116
-
117
-
118
-
119
-
120
-
121
-
122
-
123
-
124
-
125
-
126
-
127
-
128
-
129
-
130
-
131
-
132
-
133
-
134
-
135
-
136
 |
 |
