Denon DVD-9000 Owners Manual - Page 46
Adjusting The Picture Quality
 |
View all Denon DVD-9000 manuals
Add to My Manuals
Save this manual to your list of manuals |
Page 46 highlights
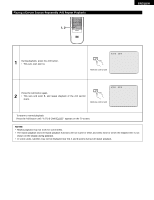
ENGLISH 10 ADJUSTING THE PICTURE QUALITY 1 Press the PICTURE ADJUST button during playback. 2, 3, 4, 5, 7, 8 2, 6, 9 1 PICTURE ADJUST SKIP STOP SLOW / SEARCH STILL / PAUSE PLAY DISPLAY SUBTITLE AUDIO ANGLE TOP MENU ENTER MENU RETURN PICTURE ADJUST PURE DIRECT MEMORY DIMMER ZOOM 1 2 3 PROG/DIR 4 5 6 CLEAR 7 8 9 CALL 0 10 SEARCH MODE MARKER Remote control unit Use the 0 and 1 cursor buttons to select the picture memory, then press the ENTER button. • The display switches as follows: STD (STANDARD) ´ M1 (MEMORY 1) ´ M2 ´ M3 ´ M4 ´ M5 2 STD (Factory default) When this is selected, both the picture quality and function are reset to factory setting. M1 to M5 Picture quality settings you have adjusted can be stored here. Remote control unit ENTER Remote control unit P I C TURE MODE STD M1 M2 M3 M4 M5 Select the item to change using 0 and 1 buttons. ADJUST MODE • The contrast , brightness , sharpness and color (HUE) can be adjusted. • Perform steps 4 and 5 to adjust the picture quality 3 (ADJUST MODE). GAMMA • Select this if dark portions of the picture are too dark or bright portions are too bright. (This does not affect Interlaced images.) • Perform steps 7 and 8 to adjust the gamma correction (GAMMA). Remote control unit MEMORY 1 GAMMA 0 0 0 0 Press the ª cursor button to select the adjust mode, then use the 0 and 1 cursor buttons to select the image quality adjustment item. CONTRAST (-6 ~ +6) Adjusts the contrast of the image. 4 BRIGHTNESS (0 ~ +12) Adjusts the picture's brightness. SHARPNESS (-6 ~ +6) Adjusts the sharpness of the picture. HUE (-6 ~ +6) Adjusts the balance of the green and red. (This does not affect Progressive Scan images.) Remote control unit Remote control unit MEMORY 1 CONTRA ST GAMMA 0 0 0 0 46
-
 1
1 -
2
-
3
-
4
-
5
-
6
-
7
-
8
-
9
-
10
-
11
-
12
-
13
-
14
-
15
-
16
-
17
-
18
-
19
-
20
-
21
-
22
-
23
-
24
-
25
-
26
-
27
-
28
-
29
-
30
-
31
-
32
-
33
-
34
-
35
-
36
-
37
-
38
-
39
-
40
-
 41
41 -
 42
42 -
 43
43 -
 44
44 -
 45
45 -
 46
46 -
 47
47 -
 48
48 -
 49
49 -
 50
50 -
 51
51 -
52
-
53
-
54
-
55
-
56
-
57
-
58
-
59
-
60
-
61
-
62
-
63
-
64
-
65
-
66
-
67
-
68
-
69
-
70
-
71
-
72
-
73
-
74
-
75
-
76
-
77
-
78
-
79
-
80
-
81
-
82
-
83
-
84
-
85
-
86
-
87
-
88
-
89
-
90
-
91
-
92
-
93
-
94
-
95
-
96
-
97
-
98
-
99
-
100
-
101
-
102
-
103
-
104
-
105
-
106
-
107
-
108
-
109
-
110
-
111
-
112
-
113
-
114
-
115
-
116
-
117
-
118
-
119
-
120
-
121
-
122
-
123
-
124
-
125
-
126
-
127
-
128
-
129
-
130
-
131
-
132
-
133
-
134
-
135
-
136
 |
 |
