Denon DVD-9000 Owners Manual - Page 66
Marking Scenes You Want To See Again, Setting Marks Dvd-audio / Dvd-video
 |
View all Denon DVD-9000 manuals
Add to My Manuals
Save this manual to your list of manuals |
Page 66 highlights
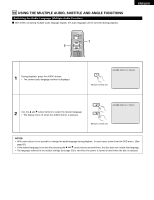
ENGLISH 21 MARKING SCENES YOU WANT TO SEE AGAIN 2 Set marks at scenes you want to see again so that you can start playback from the marked position whenever you want. Setting Marks (DVD-AUDIO / DVD-VIDEO) 2, 3 2, 3 POWER ON POWER OFF NTSC / PAL OPEN / CLOSE SKIP STOP SLOW / SEARCH STILL / PAUSE PLAY DISPLAY SUBTITLE AUDIO ANGLE TOP MENU ENTER MENU RETURN PICTURE ADJUST PURE DIRECT MEMORY DIMMER ZOOM 1 2 3 PROG/DIR 4 5 6 CLEAR 7 8 9 CALL 0 +10 SEARCH MODE MARKER REPEAT A-B RANDOM V.S.S. SETUP PAGE - PAGE + 1 During playback, press the MARKER button. • Use the 0 and 1 cursor buttons to select the "*" 1 marks. • The marker screen appears. • "*" is displayed if the mark is not set. Press the ENTER button at the scene you want to mark. 2 • A number is displayed. • Up to five marks can be set. (To select another marker, use the cursor buttons (0, 1).) MARKER Remote control unit ENTER Remote control unit Calling Out Marked Scenes and Clearing Marks ENTER Use the 0 and 1 cursor buttons to select the marker number and 3 press the ENTER button. • If the marker screen is not displayed during playback, press the MARKER button to display it. Remote control unit Remote control unit ✽ To clear the marker display: Press the MAKER button. ✽ To clear a marker: Use the 0 and 1 cursor buttons to select a marker number and press the CLEAR button. • You can clear existing markers, but they are restored when you open the disc tray or switch the unit to standby. NOTE: • All the markers added with this unit are cleard when the unit is switched to standby or the disc tray is opened. 66
-
 1
1 -
2
-
3
-
4
-
5
-
6
-
7
-
8
-
9
-
10
-
11
-
12
-
13
-
14
-
15
-
16
-
17
-
18
-
19
-
20
-
21
-
22
-
23
-
24
-
25
-
26
-
27
-
28
-
29
-
30
-
31
-
32
-
33
-
34
-
35
-
36
-
37
-
38
-
39
-
40
-
41
-
42
-
43
-
44
-
45
-
46
-
47
-
48
-
49
-
50
-
51
-
52
-
53
-
54
-
55
-
56
-
57
-
58
-
59
-
60
-
 61
61 -
 62
62 -
 63
63 -
 64
64 -
 65
65 -
 66
66 -
 67
67 -
 68
68 -
 69
69 -
 70
70 -
 71
71 -
72
-
73
-
74
-
75
-
76
-
77
-
78
-
79
-
80
-
81
-
82
-
83
-
84
-
85
-
86
-
87
-
88
-
89
-
90
-
91
-
92
-
93
-
94
-
95
-
96
-
97
-
98
-
99
-
100
-
101
-
102
-
103
-
104
-
105
-
106
-
107
-
108
-
109
-
110
-
111
-
112
-
113
-
114
-
115
-
116
-
117
-
118
-
119
-
120
-
121
-
122
-
123
-
124
-
125
-
126
-
127
-
128
-
129
-
130
-
131
-
132
-
133
-
134
-
135
-
136
 |
 |
