Epson ActionDesk 4000 User Manual - Page 94
Removing a Drive from the Upper Drive Bay
 |
View all Epson ActionDesk 4000 manuals
Add to My Manuals
Save this manual to your list of manuals |
Page 94 highlights
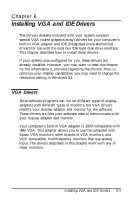
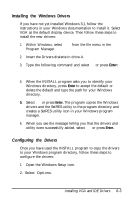
Removing a Drive from the Upper Drive Bay To remove a drive from the upper drive bay, follow these steps: 1. Remove both the ribbon cable connector and the power cable connector from the drive. 2. Remove the screws securing the drive. 3. Reach behind the drive and gently push it to the front of the bay; then pull it out of the slot. 4. Once you have removed the drive, replace the faceplate by inserting one side of the plate, then gently guiding the other side into place. You will hear it snap into place. Reconnecting the Drive and Power Cables to the Diskette Drive in the Lower Drive Bay If for any reason you had to disconnect the drive and power cables from the diskette drive mounted in the lower drive bay, refer to the illustration below while you follow these steps to reconnect the cables: 1. Locate the connector on the diskette drive ribbon cable. 5-18 Installing and Removing Drives
-
 1
1 -
2
-
3
-
4
-
5
-
6
-
7
-
8
-
9
-
10
-
11
-
12
-
13
-
14
-
15
-
16
-
17
-
18
-
19
-
20
-
21
-
22
-
23
-
24
-
25
-
26
-
27
-
28
-
29
-
30
-
31
-
32
-
33
-
34
-
35
-
36
-
37
-
38
-
39
-
40
-
41
-
42
-
43
-
44
-
45
-
46
-
47
-
48
-
49
-
50
-
51
-
52
-
53
-
54
-
55
-
56
-
57
-
58
-
59
-
60
-
61
-
62
-
63
-
64
-
65
-
66
-
67
-
68
-
69
-
70
-
71
-
72
-
73
-
74
-
75
-
76
-
77
-
78
-
79
-
80
-
81
-
82
-
83
-
84
-
85
-
86
-
87
-
88
-
 89
89 -
 90
90 -
 91
91 -
 92
92 -
 93
93 -
 94
94 -
 95
95 -
 96
96 -
 97
97 -
 98
98 -
 99
99 -
100
-
101
-
102
-
103
-
104
-
105
-
106
-
107
-
108
-
109
-
110
-
111
-
112
-
113
-
114
-
115
-
116
-
117
-
118
-
119
-
120
-
121
-
122
-
123
-
124
-
125
-
126
-
127
-
128
-
129
-
130
-
131
-
132
-
133
-
134
-
135
-
136
-
137
-
138
-
139
-
140
-
141
-
142
-
143
-
144
-
145
-
146
-
147
-
148
-
149
-
150
-
151
 |
 |
