Epson C264011 User Manual - Page 49
Print, Setup, Customize, Width, Height, Inches, Delete
 |
UPC - 010343816213
View all Epson C264011 manuals
Add to My Manuals
Save this manual to your list of manuals |
Page 49 highlights
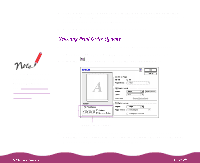
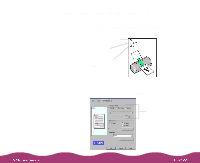
If you've finished selecting options, click OK to close the Page Setup dialog box. Then select Print from the File menu to print your document. You can create up to 8 custom paper sizes and add them to the Paper Size list. This is useful if you're printing a custom size document, such as a banner. You can select any width from 3.5 to 12.95 inches, and any height (length) from 3.5 to 44 inches. 1 Open your application's File menu and select Page Setup. 2 Click the Customize button. You see the following dialog box: To delete a custom paper size, click the Customize button. Then click the name of the custom paper size and click Delete. 3 Click the New button. Width and Height fields and Inches and cm radio buttons appear on the screen. 4 Type the width and length of your custom paper in the Width and Height fields. If you need to change from inches to centimeters, click the cm radio button.
-
 1
1 -
2
-
3
-
4
-
5
-
6
-
7
-
8
-
9
-
10
-
11
-
12
-
13
-
14
-
15
-
16
-
17
-
18
-
19
-
20
-
21
-
22
-
23
-
24
-
25
-
26
-
27
-
28
-
29
-
30
-
31
-
32
-
33
-
34
-
35
-
36
-
37
-
38
-
39
-
40
-
41
-
42
-
43
-
 44
44 -
 45
45 -
 46
46 -
 47
47 -
 48
48 -
 49
49 -
 50
50 -
 51
51 -
 52
52 -
 53
53 -
 54
54 -
55
-
56
-
57
-
58
-
59
-
60
-
61
-
62
-
63
-
64
-
65
-
66
-
67
-
68
-
69
-
70
-
71
-
72
-
73
-
74
-
75
-
76
-
77
-
78
-
79
-
80
-
81
-
82
-
83
-
84
-
85
-
86
-
87
-
88
-
89
-
90
-
91
-
92
-
93
-
94
-
95
-
96
-
97
-
98
-
99
-
100
-
101
-
102
-
103
-
104
-
105
-
106
-
107
-
108
-
109
-
110
-
111
-
112
-
113
-
114
-
115
-
116
-
117
-
118
-
119
-
120
-
121
-
122
-
123
-
124
-
125
-
126
-
127
-
128
-
129
-
130
-
131
-
132
-
133
-
134
-
135
-
136
-
137
-
138
-
139
-
140
-
141
-
142
-
143
-
144
-
145
-
146
-
147
-
148
-
149
-
150
-
151
-
152
-
153
-
154
-
155
-
156
-
157
-
158
-
159
-
160
-
161
-
162
-
163
-
164
-
165
-
166
-
167
-
168
 |
 |
