Epson C264011 User Manual - Page 57
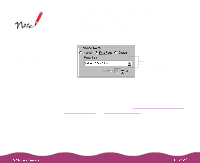
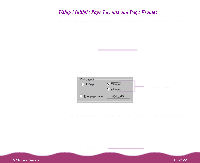
Settings, User Defined, button. You see
 |
UPC - 010343816213
View all Epson C264011 manuals
Add to My Manuals
Save this manual to your list of manuals |
Page 57 highlights
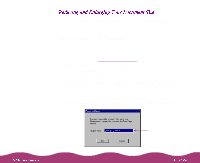
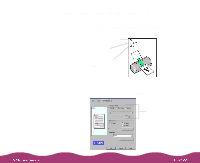
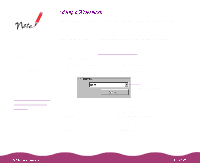
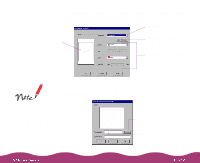
4 To change the watermark or specify how it appears, click the Settings button. You see the following dialog box: See how your selections will look in the Layout graphic Click here to select a predefined watermark Click here to load a custom watermark you've created Specify how you want your watermark to look using these options 5 To load a custom watermark you've created as a bitmap file in an application program, click the User Defined button. You see the following dialog box: You can create up to 10 custom watermarks using any bitmap file up to 15MB in size. With Windows NT, the file can be any size. Click Browse to select your bitmap file Then type a name for your custom watermark here and click Save
-
 1
1 -
2
-
3
-
4
-
5
-
6
-
7
-
8
-
9
-
10
-
11
-
12
-
13
-
14
-
15
-
16
-
17
-
18
-
19
-
20
-
21
-
22
-
23
-
24
-
25
-
26
-
27
-
28
-
29
-
30
-
31
-
32
-
33
-
34
-
35
-
36
-
37
-
38
-
39
-
40
-
41
-
42
-
43
-
44
-
45
-
46
-
47
-
48
-
49
-
50
-
51
-
 52
52 -
 53
53 -
 54
54 -
 55
55 -
 56
56 -
 57
57 -
 58
58 -
 59
59 -
 60
60 -
 61
61 -
 62
62 -
63
-
64
-
65
-
66
-
67
-
68
-
69
-
70
-
71
-
72
-
73
-
74
-
75
-
76
-
77
-
78
-
79
-
80
-
81
-
82
-
83
-
84
-
85
-
86
-
87
-
88
-
89
-
90
-
91
-
92
-
93
-
94
-
95
-
96
-
97
-
98
-
99
-
100
-
101
-
102
-
103
-
104
-
105
-
106
-
107
-
108
-
109
-
110
-
111
-
112
-
113
-
114
-
115
-
116
-
117
-
118
-
119
-
120
-
121
-
122
-
123
-
124
-
125
-
126
-
127
-
128
-
129
-
130
-
131
-
132
-
133
-
134
-
135
-
136
-
137
-
138
-
139
-
140
-
141
-
142
-
143
-
144
-
145
-
146
-
147
-
148
-
149
-
150
-
151
-
152
-
153
-
154
-
155
-
156
-
157
-
158
-
159
-
160
-
161
-
162
-
163
-
164
-
165
-
166
-
167
-
168
 |
 |

4
To change the watermark or specify how it appears, click the
Settings
button. You see the following dialog box:
5
To load a custom watermark you’ve created as a bitmap file in an
application program, click the
User Defined
button. You see the
following dialog box:
Click here to select a
predefined watermark
Click here to load a
custom watermark
you’ve created
Specify how you want
your watermark to look
using these options
See how your
selections will
look in the
Layout graphic
You can create up to
10 custom watermarks
using any bitmap file
up to 15MB in size.
With Windows NT, the
file can be any size.
Click
Browse
to select your
bitmap file
Then type a name for
your custom
watermark here and
click Save