Epson C84WN User Setup Information - Page 25
The print server automatically detects the settings for your wireless network.
 |
UPC - 010343849143
View all Epson C84WN manuals
Add to My Manuals
Save this manual to your list of manuals |
Page 25 highlights
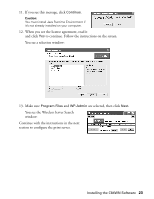
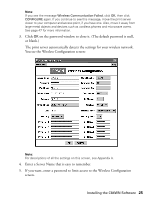
Note: If you see the message Wireless Communication Failed, click OK, then click CONFIGURE again. If you continue to see this message, move the print server closer to your computer and access point, if you have one. Also, move it away from large metal objects and devices such as cordless phones and microwave ovens. See page 47 for more information. 3. Click OK on the password window to close it. (The default password is null, or blank.) The print server automatically detects the settings for your wireless network. You see the Wireless Configuration screen: Note: For descriptions of all the settings on this screen, see Appendix A. 4. Enter a Server Name that is easy to remember. 5. If you want, enter a password to limit access to the Wireless Configuration screen. Installing the C84WN Software 25
-
 1
1 -
2
-
3
-
4
-
5
-
6
-
7
-
8
-
9
-
10
-
11
-
12
-
13
-
14
-
15
-
16
-
17
-
18
-
19
-
 20
20 -
 21
21 -
 22
22 -
 23
23 -
 24
24 -
 25
25 -
 26
26 -
 27
27 -
 28
28 -
 29
29 -
 30
30 -
31
-
32
-
33
-
34
-
35
-
36
-
37
-
38
-
39
-
40
-
41
-
42
-
43
-
44
-
45
-
46
-
47
-
48
-
49
-
50
-
51
-
52
-
53
-
54
-
55
-
56
-
57
-
58
-
59
-
60
-
61
-
62
-
63
-
64
-
65
-
66
-
67
-
68
 |
 |
