Epson C84WN User Setup Information - Page 26
Select either, in the WEP Key box, depending on which
 |
UPC - 010343849143
View all Epson C84WN manuals
Add to My Manuals
Save this manual to your list of manuals |
Page 26 highlights
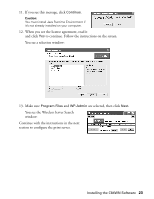
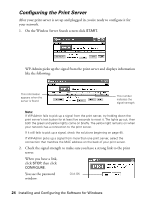
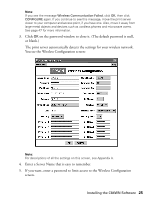
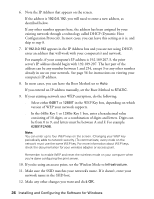
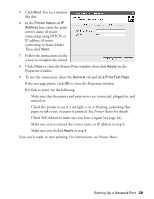
6. Note the IP Address that appears on the screen. If the address is 192.0.0.192, you will need to enter a new address, as described below. If any other number appears here, the address has been assigned by your existing network through a technology called DHCP (Dynamic Host Configuration Protocol). In most cases, you can leave this setting as it is, and skip to step 8. 7. If 192.0.0.192 appears in the IP Address box and you are not using DHCP, enter an address that will work with your computer(s) and network. For example, if your computer's IP address is 192.189.207.3, the print server's IP address should begin with 192.189.207. The last part of the address can be any number between 1 and 254, except 3 or any other number already in use on your network. See page 56 for instructions on viewing your computer's IP address. 8. In most cases, you can leave the Boot Method set to Auto. If you entered an IP address manually, set the Boot Method to STATIC. 9. If your existing network uses WEP encryption, do the following: s Select either 64BIT or 128BIT in the WEP Key box, depending on which version of WEP your network supports. s In the 64Bit Key 1 or 128Bit Key 1 box, enter a hexadecimal value consisting of 10 digits, or a combination of digits and letters. Digits can be from 0 to 9, and letters must be between A and F. For example: 62B91F2A98. Note: You can enter up to four WEP keys on the screen. (Changing your WEP key periodically adds to network security.) To communicate, every node on the network must use the same WEP key. For more information about WEP keys, check the documentation for your wireless adapter or access point. Remember to enable WEP and reset the wireless mode on your computer when you're done configuring the print server. 10. If you're using an access point, set the Wireless Mode to Infrastructure. 11. Make sure the SSID matches your network's name. If it doesn't, enter your network name in the SSID box. 12. Make any other changes you want and click OK. 26 Installing and Configuring the Software for Windows
-
 1
1 -
2
-
3
-
4
-
5
-
6
-
7
-
8
-
9
-
10
-
11
-
12
-
13
-
14
-
15
-
16
-
17
-
18
-
19
-
20
-
 21
21 -
 22
22 -
 23
23 -
 24
24 -
 25
25 -
 26
26 -
 27
27 -
 28
28 -
 29
29 -
 30
30 -
 31
31 -
32
-
33
-
34
-
35
-
36
-
37
-
38
-
39
-
40
-
41
-
42
-
43
-
44
-
45
-
46
-
47
-
48
-
49
-
50
-
51
-
52
-
53
-
54
-
55
-
56
-
57
-
58
-
59
-
60
-
61
-
62
-
63
-
64
-
65
-
66
-
67
-
68
 |
 |